Setting gain on an audio interface can seem tricky. But it’s essential for clear sound.
Understanding gain settings helps you achieve the best audio quality. Incorrect gain can cause distortion or weak sound. In this guide, we’ll explore how to set gain properly. You’ll learn the basics of gain, why it matters, and step-by-step instructions.
Whether you’re recording music, podcasts, or any audio, setting the gain correctly is crucial. This ensures your recordings are clear and professional. Let’s dive into the details and make your audio sound great!
Introduction To Gain Setting
Setting the gain on your audio interface might seem like a small detail. But it is a crucial step for achieving the best sound quality. Proper gain setting ensures your recordings are clean and clear. This section will help you understand the basics and importance of setting gain correctly.
Importance Of Proper Gain
Gain controls the input level of your audio signal. Proper gain setting helps in avoiding unwanted noise and distortion. When gain is too low, your audio will sound weak and noisy. If the gain is too high, it will distort, making your recordings unusable. Thus, setting the right gain is essential for high-quality recordings.
Common Misconceptions
Many people confuse gain with volume. Volume controls the output level, while gain adjusts the input level. Another misconception is that higher gain always means better sound. In reality, too much gain can ruin your audio quality. Some believe that setting gain is complex, but it is quite simple with the right steps.
Understanding Audio Interface
An audio interface is essential for any recording setup. It acts as the bridge between your instruments and your computer. This device converts analog signals into digital audio. Knowing how to set the gain properly is crucial. It ensures the best sound quality in your recordings.
Basic Components
Audio interfaces have several key components. The most common ones include input jacks, output jacks, and gain knobs. Input jacks are where you plug in your instruments or microphones. Output jacks connect to your speakers or headphones.
Gain knobs control the input level of your audio signal. Turning the gain knob adjusts the strength of the signal. Each interface may have different types of input and output connections. Some interfaces also have built-in preamps and phantom power.
Signal Flow
Understanding signal flow is important for setting gain. The signal starts at your instrument or microphone. It then travels through the cable to the audio interface. Inside the interface, the signal reaches the gain knob first.
The gain knob boosts the signal to the desired level. After adjusting the gain, the signal converts from analog to digital. Finally, the digital signal reaches your computer for recording or editing. Proper signal flow ensures a clean and clear audio output.
Always monitor the signal flow and adjust the gain accordingly. This helps to avoid clipping and distortion in your recordings.
Preparing Your Equipment
Before you can set the gain on your audio interface, you need to prepare your equipment. This involves making sure all your instruments and microphones are connected properly. It’s also essential to check your levels to prevent any audio issues later.
Connecting Instruments And Microphones
Start by connecting your instruments and microphones to the audio interface. Use the appropriate cables for each device. For example, use XLR cables for microphones and quarter-inch cables for instruments.
Ensure each connection is secure. Loose connections can cause noise or signal loss. Double-check each cable to make sure it is plugged in firmly.
Checking Levels
Once everything is connected, it’s time to check your levels. Turn on your audio interface and open your recording software. Play or speak into your instrument or microphone.
Watch the level meters in your software. Adjust the gain knob on your audio interface until the levels are in the green zone. Avoid the red zone, as this indicates clipping and can distort your sound.
Repeat this process for each connected device. Ensuring proper levels will give you the best sound quality and prevent unwanted noise.
Credit: www.reddit.com
Adjusting The Gain Knob
Adjusting the gain knob on your audio interface is crucial. It helps to get a clear and balanced sound. The gain knob controls the input level of your audio signal. Turn it up too high, and your sound will distort. Set it too low, and your signal will be weak. So, how do you find the right balance? Let’s dive into the details.
Finding The Optimal Level
First, set your audio interface to zero. Start with the gain knob turned all the way down. Play or sing into your microphone. Gradually turn the gain knob up. Watch the level meter on your audio interface. Aim for the meter to peak around -6dB to -3dB. This level ensures a strong signal without distortion. Your audio should sound clear and full.
Avoiding Clipping
Clipping happens when your signal is too strong. It results in a harsh, distorted sound. To avoid this, keep an eye on your level meter. If the meter hits the red zone, reduce your gain. Try to stay in the green or yellow zones. This way, your recordings will be clean and professional. Remember, every voice and instrument is different. Always adjust your gain based on what you hear.
Using Visual Indicators
Using visual indicators to set gain on an audio interface can be very effective. These indicators help you monitor levels and ensure optimal audio quality. Two common visual indicators are peak meters and signal LEDs. Let’s explore how to use these tools to set your gain correctly.
Peak Meters
Peak meters display your audio signal’s level in real-time. They usually range from green to red. Green indicates a safe level. Red means the signal is too high and may cause distortion. Aim to keep your levels within the green and yellow zones. This ensures clear audio without clipping. Regularly check the peak meters while recording.
Signal Leds
Signal LEDs are simpler than peak meters. They often use a three-light system: green, yellow, and red. Green means the signal is good. Yellow indicates the signal is getting high. Red means the signal is too hot and could clip. Adjust your gain so the LED stays in the green and yellow range. This will help maintain audio quality.
Using these visual indicators can make setting gain much easier. They provide immediate feedback on your audio levels. Always monitor these indicators to ensure the best sound quality.

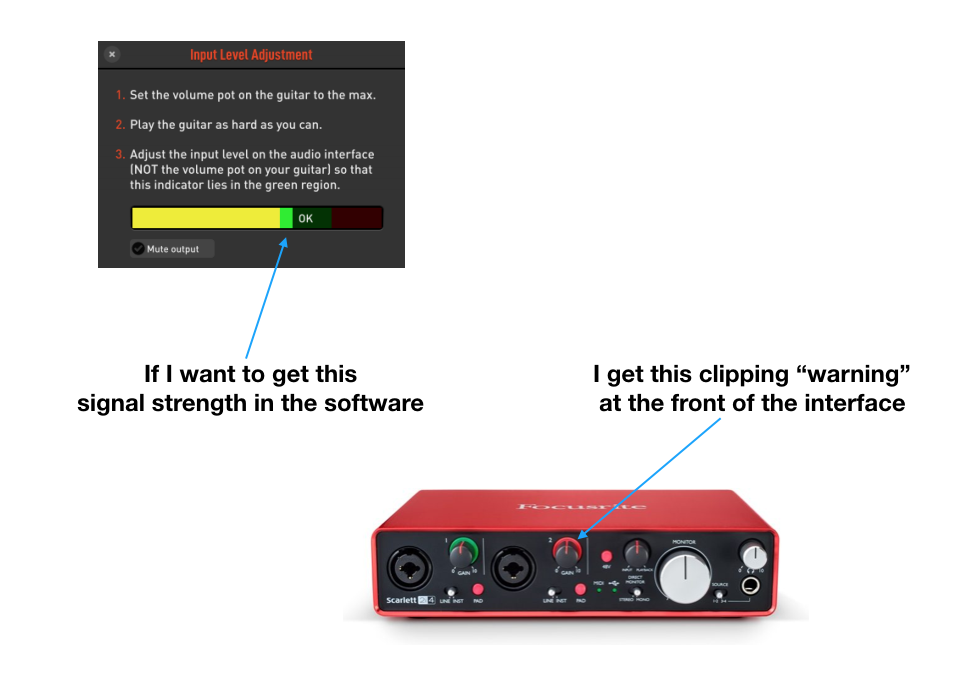
Credit: www.audiomasterclass.com
Setting Gain For Different Sources
Setting gain on your audio interface ensures clear and balanced sound quality. Different sources need different gain settings. This guide will help you set gain for various audio sources.
Microphones
Microphones often need a lot of gain. Start with the gain knob at zero. Gradually increase it while speaking or singing. Watch the input meter on your interface. Aim for levels between -12dB and -6dB. Avoid the red zone to prevent distortion.
Instruments
Instruments like guitars or keyboards need medium gain. Begin with the gain knob at zero. Strum or play a few notes. Slowly turn up the gain. Check the input meter. Levels should be between -12dB and -6dB. Too high a gain will cause clipping.
Line-level Devices
Line-level devices include CD players and synthesizers. These need the least gain. Start with the gain knob at zero. Play the device. Increase the gain slowly. Watch the input meter. Aim for levels between -12dB and -6dB. Keep the signal clean and clear.
Troubleshooting Common Issues
Setting the gain on an audio interface can be tricky. Often, issues arise that can affect the quality of your recordings. In this section, we will address common problems and how to troubleshoot them.
Distortion
Distortion occurs when the signal is too strong. This results in a harsh, unpleasant sound. Here are some steps to fix distortion:
- Check the input level on your audio interface. Ensure it is not too high.
- Adjust the gain knob. Turn it down slowly while monitoring the signal.
- Use the peak meter to ensure the signal does not enter the red zone.
Sometimes, adjusting the gain is not enough. You might need to change the placement of your microphone. Move it further from the sound source to reduce the input signal strength.
Low Signal
A low signal can result in a weak or inaudible recording. Follow these steps to troubleshoot low signal issues:
- Check all connections. Ensure cables are securely plugged in.
- Increase the gain slowly. Watch the peak meter to avoid distortion.
- Ensure the microphone or instrument is working properly.
If the signal remains low, consider using a preamp. This device boosts the signal before it reaches the audio interface. Also, check your audio software settings. Ensure the input level is set correctly.
| Issue | Solution |
|---|---|
| Distortion | Lower gain, adjust mic placement |
| Low Signal | Increase gain, check connections, use preamp |
Addressing these common issues will help ensure high-quality recordings. Keep these tips in mind during your next recording session.
Practical Tips And Best Practices
Setting the gain on your audio interface can be tricky. Follow these practical tips and best practices to ensure clear, high-quality recordings.
Consistency In Recording
Consistency is key in achieving a professional sound. Regularly check your gain settings before each recording session. This avoids sudden spikes or drops in volume.
Use a dedicated microphone and position it correctly. This helps in maintaining a consistent sound level. Keep the distance between your mouth and the microphone the same each time.
Consider using a gain staging technique. This involves setting the gain at multiple points in the signal chain. Make sure each stage is neither too high nor too low.
Maintaining Equipment
Maintaining your equipment ensures optimal performance. Regularly clean your audio interface and microphones. Dust can affect sound quality.
Check for any loose connections or worn-out cables. Replace them if necessary. This helps in avoiding unwanted noise or interruptions.
Store your equipment in a safe, dry place. Humidity can damage electronic components over time.
| Action | Frequency |
|---|---|
| Check gain settings | Before each session |
| Clean equipment | Weekly |
| Inspect cables | Monthly |
Following these tips will help you set the gain on your audio interface effectively. Happy recording!
Credit: forum.troygrady.com
Frequently Asked Questions
What Is Gain On An Audio Interface?
Gain controls the input level of your audio signal. It ensures optimal sound quality. Too low, and your audio is weak; too high, and it distorts.
How Do I Set Gain Correctly?
Start with the gain knob at zero. Gradually increase it while playing your instrument or speaking. Stop when the signal peaks just below the red zone.
Why Is Gain Important?
Gain is crucial for achieving clear, high-quality audio. Proper gain settings prevent distortion and ensure your recordings are crisp and professional.
What Happens If Gain Is Too High?
If gain is too high, your audio will distort. This results in a harsh, unpleasant sound that is difficult to fix in post-production.
Conclusion
Setting gain on your audio interface is crucial for sound quality. Proper gain ensures clear and distortion-free recordings. Practice these steps to get comfortable. Always monitor levels to avoid clipping. Adjust settings based on your specific equipment. Experiment with different gain levels to find the sweet spot.

Remember, each setup may vary. Following these tips will help you achieve better audio results. Happy recording!
{ “@context”: “https://schema.org”, “@type”: “FAQPage”, “mainEntity”: [ { “@type”: “Question”, “name”: “What is gain on an audio interface?”, “acceptedAnswer”: { “@type”: “Answer”, “text”: “Gain controls the input level of your audio signal. It ensures optimal sound quality. Too low, and your audio is weak; too high, and it distorts.” } } , { “@type”: “Question”, “name”: “How do I set gain correctly?”, “acceptedAnswer”: { “@type”: “Answer”, “text”: “Start with the gain knob at zero. Gradually increase it while playing your instrument or speaking. Stop when the signal peaks just below the red zone.” } } , { “@type”: “Question”, “name”: “Why is gain important?”, “acceptedAnswer”: { “@type”: “Answer”, “text”: “Gain is crucial for achieving clear, high-quality audio. Proper gain settings prevent distortion and ensure your recordings are crisp and professional.” } } , { “@type”: “Question”, “name”: “What happens if gain is too high?”, “acceptedAnswer”: { “@type”: “Answer”, “text”: “If gain is too high, your audio will distort. This results in a harsh, unpleasant sound that is difficult to fix in post-production.” } } ] }As an Amazon Associate, Cleanestor earns from qualifying purchases at no additional cost to you.