Setting up your first drum set is not an easy task especially if you’re a beginner but you can do it like the pros if you know how to set up a drum set. Cheers!
Setting up your first drum set is not an easy task to do. Especially while we’re all riled up about getting a drum set in the first place, we can’t really put a stop to the excitement and concentrate on setting it up because we’re just human beings. But we have to do it anyway because it’s the first step to getting accustomed to them. This article is about how to set up a drum set. Here I will not only discuss vaguely how you will set your drum set, no sir, but we will also individually learn about each part of a beginner’s drum kit and discuss in a very broad manner how you can set them perfectly. Here’s a quick sneak peek of how to set up a drum set in 8 steps:
- Set the right height for the stool
- Set the correct distance for your bass drum
- Place the snare drums perfectly
- Adjust the bass pedal spring correctly
- Set the hi-hats correctly
- Place the tom-toms perfectly
- Place the floor tom perfectly
- Adjust the crash cymbal to the right height and distance
But there’s a big question that remains unsettled, unlike the guitar, is there any specific way of setting up your drums? The answer is, not really. There is no right or wrong way to set up a drum set. But yes, there’s a specific pattern that everyone follows, but there’s no specific way of doing it. You have to set up your drum kit according to your height, weight, and, most importantly, your preference. What works for one drummer might not work for another. Don’t be frightened to adjust your kit over time to suit your playing style. Keep it comfortable and make life easy for yourself! So, without any further ado, let’s get started on the introductory phase so we can deal with the real question, how to set up a drum kit?
Drum Setup In A Nutshell
First set up the stool and bass drum. Then, assemble the snare drum in its stand and place it slightly to the left of the bass drum. Next, mount the toms on top of the bass drum, then attach the floor tom’s legs and position it to the right of the bass drum. After that, set up the hi-hats and cymbals. Finally, adjust the height of your stool and all of your drums so you can play comfortably.
Which Drum Set Would We Learn About Today?
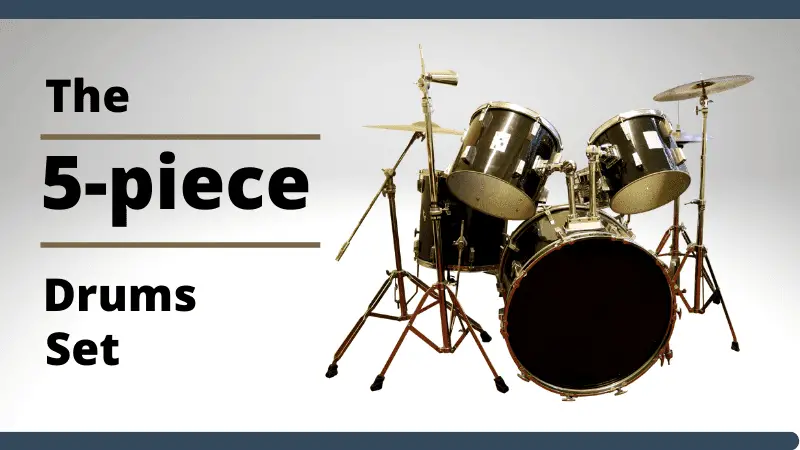
The most common question to ask is which set of drums we would take as the ideal while guiding everyone. The answer is the 5-piece drum set. It’s the most ideal one that even 8-year-olds start with. Even professional drummers use the 5-piece drum set for live shows even after years of professional drumming experience.
Why? Because a 5-piece drum set has all the necessary sound you need for any song. So, keeping that as an ideal, we will learn about the parts of a 5-piece drum set and then finally learn about how we can individually set them according to our height, weight, and preferences.
Now, Let’s learn about each part:
Stool- Where We Sit For The Action
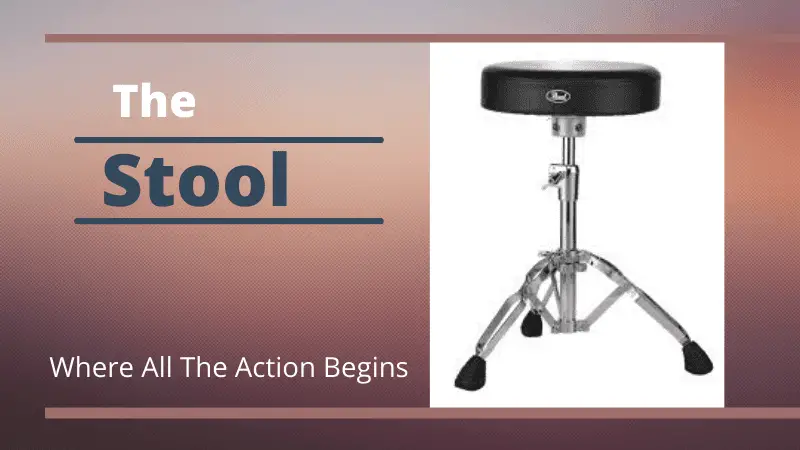
The stool is the first important part of any drum set. It should occur to you that it’s really funny to even talk about the stool because it’s not a musical part. But trust me, it is as important as any musical part of a drum set. Having a perfectly adjusted stool helps you to perfect and also improve your drumming skills while you’re at practice. If you’re too close, your shins will start to ache and if you’re too far you’ll be craning to reach the rest of the kit.
Now, why is it important to know and adjust the height of your stool? Comfort? No, comfort here is not the main issue. Rather the main issue is ensuring that the sitting technique is perfect according to your height. So that you can reach your drums better, pedal properly, and thus improve your overall technique as a drummer. For increased playability, place your drum throne in a spot where you can reach all components of your drum set. This will allow you to play with the least effort and help you prevent injury. And this will create a proper drum set posture.
If the stool is not adjusted properly, drummers tend to mess up their skills and technique. Even the professional ones take an ample amount of time to adjust the height of their drumming stool. Especially, you would see that rather than tuning the guitar, drummers take more time on stage to adjust and set up their drum set according to their preference.
It’s because by turning two-three knobs you can adjust your guitar, but you need to adjust every piece of your drum kit accordingly, including the most important one, the stool.
Snare Drum- The First Drums of Your Drum Set

The most important drums of your drum set are the snare drum. The snare drum is known to be the most versatile drum in any drum kit. It’s an integral part of any drum set. The snare drum usually sits in a short stand with three adjustable horizontal arms that hold it in place – usually, the ends of these arms are rubberized to keep the snare from moving while you play it. The stand itself is fairly easy to set up – simply spread the legs at the bottom so that the stand stays upright and use the mechanism at the top to lift and adjust the angles of the arms.
Usually, the 5-piece drum set is the ideal drum set because it has all the necessary parts. If you search for a higher number of parts, you will see that all those sets contain the five pieces of a 5-piece drum set and then add extra parts. Among all those drum sets, if you try to analyze the parts individually, you’ll see that every time, the snare drum is talked about at first and is considered the most important part of any set.
A snare drum is basically placed between your feet, and its placement is very important because, unlike other parts, you don’t get to choose a specific spot to hit. Rather, you have to adjust it in a way that you can hit any part of the snare drum properly to make the perfect sound for each note.
Keeping that in mind, after adjusting the stool, we will focus on adjusting the snare drum first.
The Bass Drum- The Monster to Control With Your Feet
The bass drum is the largest piece of any drum kit. Basically, it’s the most visible part of any drum kit, and asks any drummer; this is the part that most of them are most excited about. Why? Because playing the bass drum perfectly is a tough job and satisfactory as well. Keeping the flow according to your hands above and feet downstairs is not a very easy task.
People with zero experience with drumming think only hands have to be perfectly synchronized. But ask any drummer or a fanboy who knows what a single pedal or a double pedal bass drum is, he will make you understand what big a deal learning how to perfectly play the bass drums is, especially, learning double pedals.
The single pedal is fine and mandatory, but double-pedal bass drumming is considered a very big deal in the world of musicians. Not all professional drummers know how to sync both of their feet to play a double-pedal bass drum. Most bass drums include a metal bracket on top that will allow you to mount two toms in a way similar to how you mounted the bass drum’s legs. Usually, the foot pedal you use to play the kick drum is secured to the bottom edge of the bass drum with a screw-on “bracket”.
Let’s continue with the bass pedal:
Bass Pedal- The One You Play The Bass Drum With

Your bass drum is nothing without your bass pedal. You absolutely need it to add some bass to any song from your drums. Without a bass pedal, your bass drum is useless. Ensure your bass drum pedal is set to a comfortable tension.
Now, a single pedal is a must for every drummer to have. But to play genres that require up-tempo bass sound coming from the drums, you need two pedals, and you have to synchronize them well enough so that both of your feet can be in action.
Hi-Hat- The Cymbal You Control With Your Feet
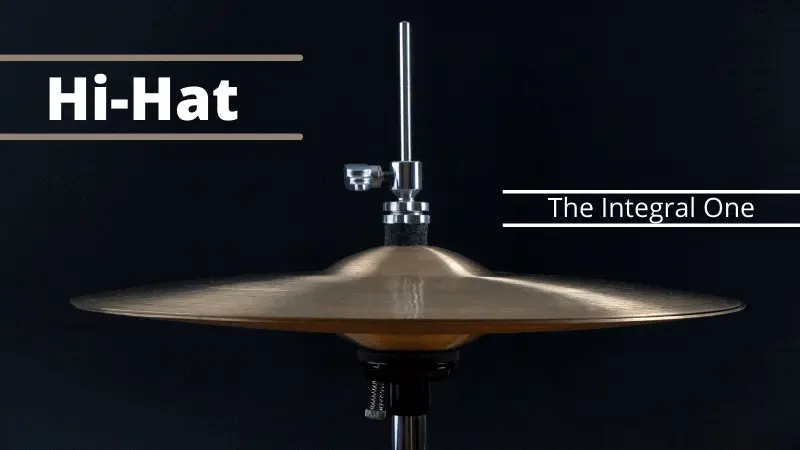
Basically, a hi-hat is an integral part of any drum set if you’re willing to learn jazz, blues, pop, or rock. But most drummers these days are concentrated on double pedals on bass drums because it sounds really cool, but you have to be near a pro to be able to do that. But as beginners, people need to learn how to use the other leg and the pedal to control the hi-hat. If your hi-hat is set too low, you’ll find that your right-hand stick will obstruct your left stick when playing the snare drum.
In jazz and blues music, knowing how to perfectly hit the hi-hat is considered another art in the music as art itself. So, that’s why the hi-hat is the part that completes any drum set. Not necessarily because you get to use it really often, but because it’s one of the most basic synchronizations you require to learn while learning your drums.
Tom-Toms- The Drum That Adds Color To Your Drum Set

Tom-toms are the drums that you hit the most during any song you play. Tom-toms add a variety of sounds to your drumming. A drum kit can be snare drums, a bass drum, and a cymbal. That’s kind of all you need to play your songs. But adding tom-toms to your drum set really spices things up. You get to add variations in your drum sounds to make them even more appealing.
Some drummers even use their tom-toms as an alternative to hitting the cymbals too often. Tom-toms are not snared drums and have been added to a drum set as late as the 20th century.
So, you can understand that a tom-tom or any number of tom-toms were not a permanent and necessary part of a drum set yet now, you cannot think of any professional drum set without tom-toms.
Floor Toms: or Low Toms

Floor toms or low toms are basically two-headed toms that are placed on the floor with three legs like a tripod. Floor tom’s main job is to add booming to any number. It may or may not be attached to cymbals with a drum clamp. It has no snare wires and is cylindrical in shape.
The floor toms have been there for over a century, but it was popularized as a permanent part of a drum set during the early 50s. Before that, they were used on certain occasions only. The usage of low toms became very popular when songs were going through a variation of pitch.
Ride/ Crash Cymbals: The Piece You Can’t Let Go Off

Cymbals are known to bear the exact sound that puts an end to a drum chord when you’re playing. It sort of provides the closure that every drum chord needs to complete a song with proper sounds.
Cymbals have always been a part of any drum set, starting from beginner to professional kits. Most standard drum kits also come with at least one crash cymbal. In beginner kits, there’s usually one basic cymbal that provides both the sounds from the ride and crash cymbals. But professional drums like 5-piece ones have a different approach when it comes to setting up the cymbals.
We will clearly emphasize that after all other pieces are sorted out because they can only be set after setting up all the other pieces of a drum set. So, now we know what is what, we can focus on setting them up. Let’s follow the introductory order to complete our work.
How To Set Up A Drum Set (The 8-Steps Beginner Guide)
1. Set the right height for the stool
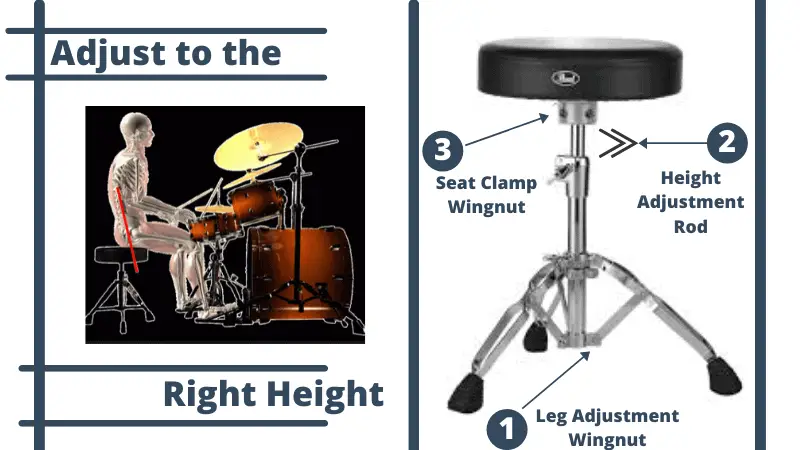
Before starting the setup make sure to find a suitable place that has plenty of room for assembly and enough space for the completed set. The stool setup is the first basic setup that’s required before you can actually start setting up the other pieces of the drum set. Why? Because everything else kind of depends on the height of your stool. Believe me, the height of your stool will actively determine the height of every other piece of your drum set.
The height of your stool will also determine the height of the snare drum, tom toms, floor tom, hi-hats, crash cymbal, and ride cymbal, so it’s imperative that you prioritize this. The legs of the throne should be roughly 45 degrees. I prefer to have the height at a level where my legs slope downwards slightly when my feet are flat on the floor. Once you have it at a comfortable height you can lock it in place using any memory locks on the throne.
The stool setup is important because of another reason also. The stool also aims to make the drumming experience comfortable for you because when you have to sit on it and play the drums, which can be a very tiring job, you would need that comfort, so the height has to be perfect according to your height.
- If the height is higher than you need you won’t be able to reach the pedals portly and it will actively damage your technique
- If the height is too low, it will be the reason that your spine, shin, and back hurt every time you play your drums.
So, setting up the height and adjusting it to ensure your comfort is the first step of setting up your drum set.
2. Set the correct distance for your bass drum

After setting up the stool, the first place to start will always be the bass drum. This is the biggest drum in the set. Place it on the floor in front of the drum throne. This huge drum is basically not an adjustable piece. You can’t really make any changes to the way it sits or to the height it stands on. Note that some bass drum legs will have spikes on the tips and others will have rubber ‘feet’.
Also, you use a pedal to hit the drum, so you’re hitting the exact same spot every time, so there’s nothing to worry about the angle it’s placed in once you’ve found the sweet spot. Be sure to widen your stand bases and tighten the wingnuts afterward. Widening stand bases too far will take up an unnecessary amount of floor space, something which could cause problems if you’re playing a large drum kit, or intend to use mic stands to record your drums.
Then what is the crucial factor? The crucial factor is the distance of the bass drum from your stool.
- If you’re too far, you’ll have to close it down to reach the other pieces of the set.
- If you’re too close, your shins will ache for sure
You have to make sure of two things. One, the pedal is clamped properly with the bass drum hook. Two, do check if the hoop has any sort of protective measure or not.
These two things will stop your drum and pedal from getting damaged.
3. Place the snare drums perfectly
The snare drum is the most versatile drum of any drum set. It’s kind of that piece that will be mostly used. So, after setting up your stool and placing your bass drum, setting up the snare is the most important part. The snare stand looks like a complex claw, but is, in fact, quite simple.
Now, while setting this up, you have to consider that it sits in the middle between your legs, for most rock-style playing, you’ll want the snare to sit in front of and slightly to the left of the kick drum so that you can hit it with the left-hand stick (assuming a right-handed setup) with the stick nearly flat. You will need to adjust the height of your snare drum first.
The height of your snare drum should be set a few inches above your leg and set so you can easily hit the drum with either of your hands without hitting the rim of your drum. With the bass section of your kit assembled, let’s move to the snare. Placed to the left of the bass drum, the snare, and its stand are slightly more complex.
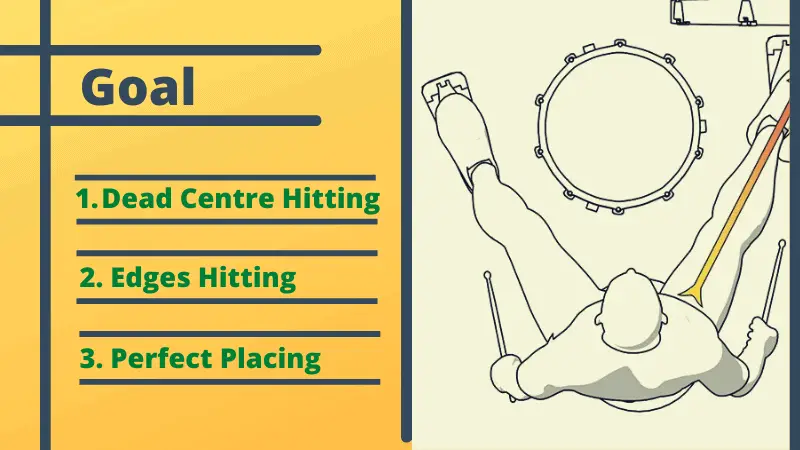
So, set it up in a specific way that you’re able to hit the dead center and also go for the edges when you need to.
Now, there are ways you can ensure that, but those ways are not specific. We could show you two ways of doing that.
- You could keep the drum completely flat so that you can hit each spot similarly.
- Or you can keep the drum a little bit tilted towards you.
This adjustment actually depends on the technique you’ll build up eventually. The angle of the snare is up to you, some people like to have it facing away from them, some like it facing towards them, and some like it to be flat. You have to set it up and try to see which way you get to hit the drum properly and set it accordingly.
4. Adjust the bass pedal spring correctly
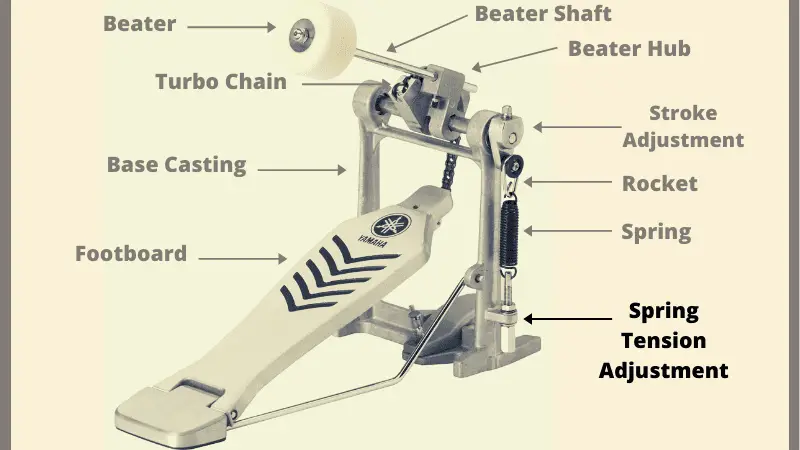
Getting the pedal that came with the kit and attaching it to the front of the bass drum should be your next step. Some will focus more on how you set the bass pedal according to your feet, but that is something that comes naturally. You just have to keep it in a way that your feet comfortably rest on it.
The main adjustment you have to make is tightening or loosening the spring to ensure perfect tension. Use the spurs on the bass drum legs to keep the drum from sliding around if you’re on carpet, and adjust the height of the legs so that the front of the bass drum is raised up off the floor a hair to compensate for the lift you’re going to get on the batter hoop when you slide your pedal clamp under it and to allow the bass drum to resonate freely.
If the tension is not perfect, the beat on the bass drum will be mistimed. So, rather than focusing on where to keep the pedal, be sure to focus on how tight or lose the spring is.
5. Set the hi-hats correctly
The hi-hat is kind of the last essential piece of your kit. By far, the most complex piece of the kit is the hi-hat. Yes, you do need some other pieces like the tom-toms and the cymbals, but without hi-hats, your art will still be incomplete.
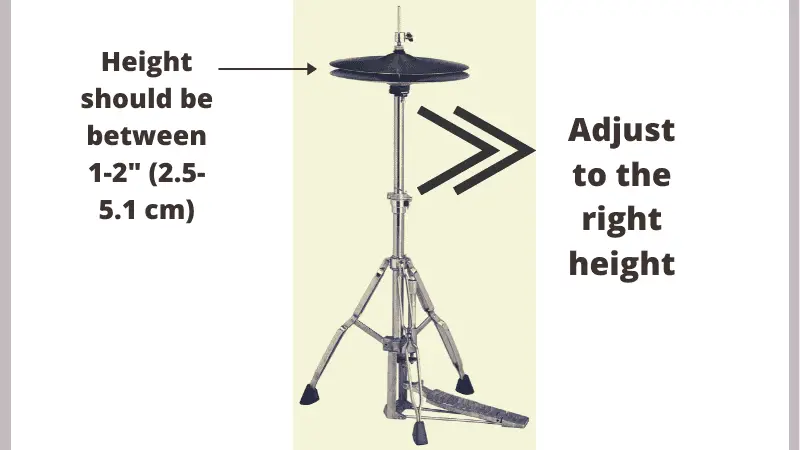
So, Hi-Hat being the potential final piece, let’s see how you can adjust it. It’s important that you set the hi-hat clutch (the device that holds the top hi-hat in place) so it’s an appropriate distance above the bottom hi-hat. If you’re having trouble telling the difference between the top and bottom hi-hat cymbals, usually, the top cymbal will bear the name and logo of the manufacturer, while the bottom one will be relatively unmarked.
Well, the adjustability is kind of not an issue to overlook, but it’s not that complicated. Your hi-hat should be just to the left of your snare. The first thing to do would be to set up the hi-hats. Get the hi-hat stand you set up earlier and place the bottom hat on the stand facing upwards. All you have to do is make sure the height of your Hi-Hat is comfortable for you to reach.
If the height is too low, you’ll see that there will be a conflict between your left and right hand while playing the snare drum. And if the height is too high, there will also be the same problem, but this time, the gap between the hands would unnecessarily increase.
Next, get your hi-hats and position them to the left of the bass drum so that when your right foot sits on the bass drum pedal your left foot can comfortably sit on the hi-hat pedal.
So, what you have to make sure of is that the height is not too low or not too high.
6. Place the tom-toms perfectly
To place your tom-toms, you’ll see that your bass drum has drilled holes where they go in proper brackets. This means the distance of the bass drums is a significant factor while ensuring the placement of your tom-toms. Position your toms around the kit. Working from left to right you should have your high tom, medium tom, and then low / floor tom. Likewise, you want to set up each tom so that its angle, like the angle of the snare drum, reflects the natural angle of attack from your sticks.
Now, there’s another issue. The issue is the height of the tom-toms. They have to be a little bit higher than the snare drum and a little bit tilted toward you for perfect playing. Position your toms so that they’re easy to get to. I like to have the high and mid tom as low as possible without touching the bass drum or each other, angled so that they’re easy to hit in relation to the snare. You should position the drums to make life easy for yourself – minimize the chance of catching the drum rims or any unnecessary stretching.
While buying the bass drum, make sure it has drilled holes. The modern-day bass drum has drilled holes, but some don’t have them. If your bass drum doesn’t have drilled holes, you’ll have to buy separate stands. And it’s not a pleasant thing to set tom-toms separate from your bass drum.
If your bass drum is undrilled, you’ll need to find an alternative method of mounting tom-toms. This is usually done by mounting them on a nearby cymbal stand using a clamp but can also be done by using a snare drum stand, though this method only really works if your drum kit only has one mounted tom.
7. Place the floor tom perfectly
The floor tom is not actually something that you keep on the floor. Usually, assuming a right-handed setup, the floor tom sits in front of and to the right of the bass drum so that it can be comfortably hit with the right hand. The three legs are actually three brackets that you place properly above the mid-tom.
Usually, the floor tom is a little bit tilted towards you as it’s a bit distant from the place you’re playing the drum.
8. Adjust the crash cymbal to the right height and distance
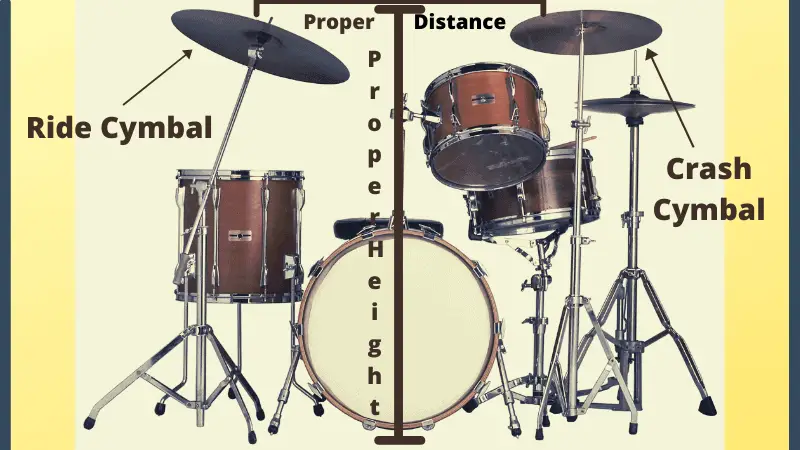
The ride cymbal is usually placed hanging over the floor tom. On the other hand, the crash cymbal is positioned on top of the hi-hat. You should have at minimum, one ride cymbal, a crash cymbal, and a pair of high-hat cymbals (which are mounted in such a way as to be played with the foot as well as the sticks). To accommodate this, the ride cymbal will either need to be set to a low height or have a sharp tilt toward you. On the other hand, the crash will need to be set slightly higher, or with a flatter angle to allow the edge of the cymbal to be within reach.
Now, the ride cymbal is played the same way as the hi-hat. The crash cymbal is usually played to add some extra accent to the cymbal sound. So, the ride cymbal will be hit by the tip of the stick, and the crash cymbal will be hit by the edge of the stick. To make sure of that, the ride cymbal has to have a lower height and a harsh tilt toward you so that you can hit it perfectly with the tip of the stick. The crash cymbal will be higher and flat so that you can hit it on edge.
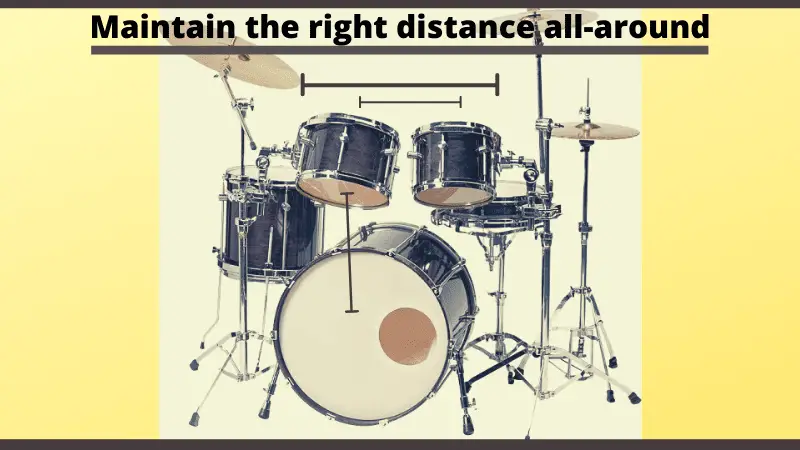
After placing the cymbal stands around the drums, I always encourage people to play around on the drums to make sure that they’re feeling comfortable. Another thing is, that cymbals are usually wobbly. So, if they are placed too close to other pieces, they will hit them and overlap to create bad sounds. So, keeping a little distance is essential. Make sure the cymbal has enough room to move freely without hitting any other drums/cymbals. It’s handy to have a second crash towards the right-hand side of the kit so you don’t have to move as far when going from the floor tom to crash. It’s always better to position the drums comfortably before you set the cymbals up.
So, that’s how you set up your 5-piece beginner’s drum set. No part of your kit should be resting on or touching any other part of your kit. Now, it’s time to learn a thing or two about tuning.
Step By Step Drum Tuning

The process is a bit hard, but not many steps. Let’s go through this.
Step 1: Loosening The Lug Nuts
First, to ensure the tuning is at its best, loosen all the lug nuts and detune the drum completely. Then clean the nuts and lugs from dust. To get the entire drum kit in tune, you need to achieve similar tension levels across all the drums.
Step 2: Starting With The Drum Head
Keep the resonant head on the stool because it will interfere with the way of tuning. Start with the batter drum head. Now turn it upside down, and now you can tune the resonant side of the drum.
Batter means top and resonant means bottom.
Step 3: Make Sure There’s No Gap
Make sure that the drum head seats properly. Press around the edge and in the center to make sure that there are no gaps. If there’s any gap, the tuning process will be in vain.
Step 4: Finger Tightening
Finger-tighten the tuning rods first. Do check properly to see if the tightening process is done properly. After that, tighten each rod a ¼ turn using a drum key.
Always remember to tighten the rod on the opposite side after the one you’ve done.
Suppose your drum has ten tuning rods, and you’ve numbered them accordingly. If you start with 1, the next rod you have to tighten would be number 6. The number 2s opposite is the number 7. Follow this order till you’re done.
Step 5: Check The Sound
Check how it sounds. There are a lot of soundtracks with or without videos to measure the perfect sound when you’re at a beginner level. You can compare to see if the tuning is correct.
So, this is the step-by-step process of tuning any drum.
Final Verdict
So, this is all that you need to know while setting up a drum set. You came to know about all the pieces of a 5-piece drum set. If you go through the article, I’m pretty sure that you’ll be able to set up your drum set yourself without any help whatsoever. Remember it’s up to YOU – how you set up YOUR drum kit. Drum kits come in all shapes and sizes and we’re all different. What works for one drummer might not work for another as I already mentioned in the intro.

Also, if you follow the simple drum tuning steps, it’s handy to work, but nothing too hard that you can’t do. Being a good drummer involves creating your own style. All of the greats play their own way and have their kits set up a different way. Always experiment with what you have, just don’t go too crazy that you can’t play. Learn the way of setup today, and get ready to blow everyone’s mind with your skills tomorrow.
As an Amazon Associate, Cleanestor earns from qualifying purchases at no additional cost to you.