To turn off the microphone in FL Studio, follow these steps. Open the software, then go to the mixer.
Locate the input source and disable it. FL Studio is a powerful tool for music production. Sometimes, you may need to turn off the microphone to prevent unwanted noise or feedback. This can be useful during editing or when recording other instruments.
Disabling the microphone input is a simple process. It ensures your tracks are clean and free of background noise. In this guide, we will walk you through the steps to turn off the microphone in FL Studio. Whether you’re a beginner or an experienced user, this tutorial will help you maintain the quality of your recordings. Let’s get started!
Accessing Audio Settings
Accessing the audio settings in FL Studio is essential for controlling your microphone. Whether you want to mute it or adjust its settings, knowing where to find these options is crucial. This section will guide you step-by-step on how to access the audio settings in FL Studio. Follow these simple instructions to manage your microphone effectively.
Navigating To Audio Options
First, open FL Studio on your computer. Look at the top menu bar. Click on the “Options” menu. A drop-down list will appear. From this list, select “Audio settings.” This opens a new window. Now, you are in the audio settings of FL Studio.
Finding The Microphone Settings
In the audio settings window, look for the input/output section. Here, you will see various audio devices listed. Find the section labeled “Input/Output.” Under this section, locate your microphone. You can adjust its settings here. To turn off the microphone, simply disable it. This prevents it from picking up any sound.

Credit: www.youtube.com
Disabling Microphone Input
Disabling the microphone input in FL Studio can prevent unwanted noise. It ensures a cleaner audio production environment. Follow these steps to turn off the microphone easily.
Steps To Turn Off Microphone
- Open FL Studio and go to the Options menu.
- Select Audio Settings.
- In the Input/Output section, find the Input Device dropdown.
- Choose None from the list to disable the microphone.
Verifying Microphone Is Off
After following the steps, you need to verify that the microphone is off. This ensures no unwanted sounds are recorded.
- Go to the Mixer in FL Studio.
- Check each channel to see if the microphone is still active.
- If the microphone is off, no input levels will be visible.
By following these steps, you can ensure a noise-free recording environment.
Managing Input Channels
Managing input channels in FL Studio can be crucial. Especially if you want to turn off your microphone. This process ensures clean audio recordings. No unwanted noise or feedback.
Setting Up Input Channels
First, open FL Studio and go to the mixer. Look for the input channel section on the left. Select the channel you want to set up. Then, go to the input source and choose your microphone. Now your microphone is assigned to this channel.
Adjust the volume and other settings as needed. Test the microphone to make sure it works. This setup helps in managing input channels effectively.
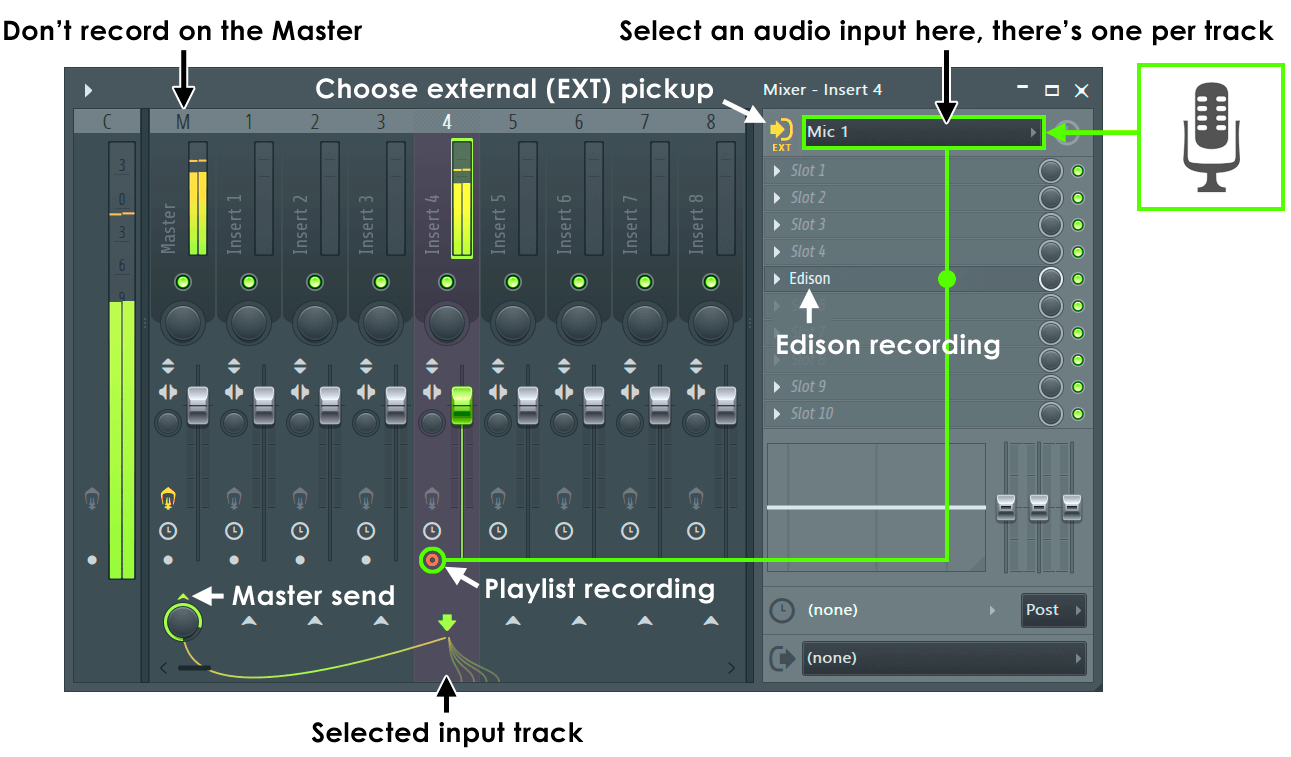
Removing Microphone From Channels
To turn off the microphone, go back to the mixer. Select the channel with the microphone input. Click on the input source. Choose “none” or “no input” from the list. This removes the microphone from that channel.
Double-check the channel to ensure the microphone is off. This step helps in avoiding unwanted noise. Your recordings will now be cleaner and more professional.
Credit: www.image-line.com
Adjusting Mixer Settings
Adjusting the mixer settings in FL Studio can help you control your audio inputs. If you want to turn off the microphone, you will need to adjust the mixer settings. This process involves a few steps, which are easy to follow. Let’s dive into the details.
Opening The Mixer
First, open FL Studio on your computer. Look at the top menu bar. Click on the ‘View’ option. A dropdown menu will appear. Select ‘Mixer’ from this menu. The mixer window will open. You can now see all the audio tracks and controls.
Muting Microphone In The Mixer
Find the track that has the microphone input. It usually shows a small microphone icon. Click on this track to select it. Look for the mute button. It looks like a small speaker with a line through it. Click on this button to mute the microphone. You have now turned off the microphone in FL Studio.
Using External Audio Interfaces
Using external audio interfaces can greatly enhance the sound quality in FL Studio. These devices can help you achieve professional-grade recordings. Knowing how to configure and disable the microphone on these interfaces can prevent unwanted noise.
Configuring External Interfaces
To get started, you need to configure your external audio interface in FL Studio.
- Connect your audio interface to your computer.
- Open FL Studio and go to Options.
- Select Audio Settings.
- In the Input/Output section, choose your audio interface from the list.
This ensures FL Studio uses the external interface for audio input and output.
Disabling Microphone On Interfaces
Disabling the microphone on your audio interface can be done in a few simple steps.
- Go to the Mixer window in FL Studio.
- Select the track with the microphone input.
- Click on the input source and choose None.
This will effectively turn off the microphone input on that track.
You can also disable the mic from the interface software if available. Check the user manual for specific instructions.

Credit: www.reddit.com
Troubleshooting Common Issues
You’ve turned off your microphone in FL Studio, but the audio still seems off. Let’s troubleshoot some common issues. This guide will help you resolve these problems quickly. Read on to find solutions to common audio problems.
Microphone Still Active?
Sometimes, the microphone remains active even after you turn it off. This can be due to incorrect settings. Follow these steps to fix it:
- Check the Mixer: Open the mixer and ensure the mic input is disabled.
- Audio Settings: Go to the audio settings and verify the input device is set correctly.
- Restart FL Studio: Sometimes a simple restart can fix the issue.
Resolving Audio Conflicts
Audio conflicts can cause the microphone to stay active. These conflicts can occur with other software or hardware. To resolve them, try these steps:
- Close Other Applications: Ensure no other applications are using the microphone.
- Check Device Manager: Open the device manager and disable any unnecessary audio devices.
- Update Drivers: Make sure your audio drivers are up-to-date. This can solve many conflicts.
By following these steps, you can fix common microphone issues in FL Studio. Ensure all settings are correct and no other software is causing conflicts.
Tips For Efficient Workflow
Working efficiently in FL Studio can make a big difference in your music production. Turning off your microphone when not needed helps reduce unwanted noise. This section covers some useful tips for managing your audio and maintaining a clean workspace.
Best Practices For Audio Management
Manage your audio inputs properly. Always check your audio settings before starting a new project. Disable unused inputs. This prevents unwanted noise and keeps your recordings clean.
Organize your tracks. Label each one clearly. This makes it easier to identify and manage them. Use folders and color coding. It helps keep your project tidy and easy to navigate.
Maintaining Clean Audio Environment
Keep your recording space quiet. Turn off background noise sources. Close windows and doors. Use a pop filter for your microphone. This reduces plosive sounds and makes your recordings clearer.
Regularly clean your equipment. Dust and debris can affect audio quality. Use a soft cloth to wipe down your microphone and other gear. Check cables and connections for wear and tear.
Mute your microphone when not in use. This prevents accidental recordings. It also helps keep your project files clean. Unwanted noise can be distracting and hard to edit out later.
Frequently Asked Questions
How Do I Disable The Microphone In Fl Studio?
To disable the microphone in FL Studio, go to the mixer and select the input channel. Choose ‘None’ as the input source to turn off the microphone.
Can I Mute The Microphone In Fl Studio?
Yes, you can mute the microphone in FL Studio by setting the input source to ‘None’ in the mixer.
Where Is The Microphone Settings In Fl Studio?
Microphone settings in FL Studio can be found in the mixer. Select the input channel and adjust the input source.
How Do I Stop Recording My Mic In Fl Studio?
To stop recording your mic in FL Studio, set the input source to ‘None’ in the mixer.
Conclusion
Turning off the microphone in FL Studio is straightforward. Follow the steps outlined, and you’ll have it done quickly. This guide helps improve your audio quality. No more unwanted background noise. Your recordings will sound cleaner. Practice these steps regularly.

It will become second nature. Enjoy a smoother production experience. Happy creating with FL Studio!
{ “@context”: “https://schema.org”, “@type”: “FAQPage”, “mainEntity”: [ { “@type”: “Question”, “name”: “How do I disable the microphone in FL Studio?”, “acceptedAnswer”: { “@type”: “Answer”, “text”: “To disable the microphone in FL Studio, go to the mixer and select the input channel. Choose ‘None’ as the input source to turn off the microphone.” } } , { “@type”: “Question”, “name”: “Can I mute the microphone in FL Studio?”, “acceptedAnswer”: { “@type”: “Answer”, “text”: “Yes, you can mute the microphone in FL Studio by setting the input source to ‘None’ in the mixer.” } } , { “@type”: “Question”, “name”: “Where is the microphone settings in FL Studio?”, “acceptedAnswer”: { “@type”: “Answer”, “text”: “Microphone settings in FL Studio can be found in the mixer. Select the input channel and adjust the input source.” } } , { “@type”: “Question”, “name”: “How do I stop recording my mic in FL Studio?”, “acceptedAnswer”: { “@type”: “Answer”, “text”: “To stop recording your mic in FL Studio, set the input source to ‘None’ in the mixer.” } } ] }As an Amazon Associate, Cleanestor earns from qualifying purchases at no additional cost to you.