Running two audio interfaces on a Mac can seem tricky. But it’s doable with the right steps.
In this guide, I’ll show you how to set up and use two audio interfaces at once on your Mac. Musicians, podcasters, and audio enthusiasts often need more inputs and outputs than a single interface can provide. By using two interfaces, you can expand your recording capabilities without breaking the bank.
This process involves creating an aggregate device on your Mac, which lets the system see multiple interfaces as one. Although it might sound technical, it’s quite manageable with clear instructions. This setup can enhance your audio projects, making your recordings more versatile and professional. Ready to dive in? Let’s explore how to make this setup work seamlessly on your Mac.
Introduction To Dual Audio Interfaces
Using two audio interfaces at once on a Mac can be a game-changer for your audio setup. It opens up a world of possibilities for music production, podcasting, and live streaming. Understanding how to harness the power of dual audio interfaces can greatly enhance your workflow and creative potential.
Many users find that a single audio interface limits their capabilities. Whether you need more input channels, better sound quality, or the ability to integrate different types of equipment, dual interfaces can provide the solution. Let’s explore the benefits and common use cases for using two audio interfaces simultaneously.
Benefits Of Dual Interfaces
Using dual audio interfaces offers several key benefits. Firstly, it increases the number of input and output channels. This is perfect for recording multiple instruments or microphones at the same time. It also allows you to connect different types of equipment, such as MIDI controllers and analog gear.
Secondly, dual interfaces can improve sound quality. Combining two high-quality interfaces can result in clearer, more detailed audio recordings. This is crucial for professional projects where sound quality is paramount. You can also customize your setup to match your specific needs, creating a more flexible and versatile recording environment.
Common Use Cases
There are many situations where dual audio interfaces are useful. Musicians often use them to record multiple instruments simultaneously. This is especially helpful for bands and solo artists who play several instruments. Podcasters can benefit from dual interfaces by connecting multiple microphones, ensuring each participant has their own dedicated input.
Live streamers can also take advantage of dual interfaces. They can connect a variety of audio sources, such as microphones, sound effects, and background music. This creates a more dynamic and engaging streaming experience. Finally, sound engineers and producers can use dual interfaces to integrate different types of audio equipment, from vintage analog gear to modern digital tools.
Credit: ask.audio
Requirements For Dual Interface Setup
Setting up two audio interfaces on a Mac can enhance your recording and production capabilities. This guide will help you understand the requirements for a dual interface setup. It covers the necessary hardware and software needed for a smooth experience.
Necessary Hardware
To start, you need the following hardware:
- Two Audio Interfaces: Ensure both are Mac compatible.
- USB or Thunderbolt Cables: For connecting the interfaces to your Mac.
- Power Supply: If your interfaces require external power.
Make sure both interfaces support the sample rates and bit depths you need. Compatibility is key for a smooth setup.
Software Needed
Installing the right software is crucial for your dual interface setup. Here is what you need:
- Mac OS: Ensure your OS is up-to-date. Compatibility with your interfaces is vital.
- Driver Software: Download the latest drivers from the manufacturer’s website.
- Aggregate Device Setup: Use the Audio MIDI Setup app on your Mac to create an Aggregate Device.
Follow these steps to create an Aggregate Device:
- Open Audio MIDI Setup from your Applications folder.
- Click the + button at the bottom left and select Create Aggregate Device.
- Check the boxes for both of your audio interfaces.
- Set the Clock Source to your preferred interface.
With these hardware and software requirements met, you are ready to start using two audio interfaces on your Mac. This setup will provide greater flexibility in your audio projects.
Setting Up Aggregate Device
Using two audio interfaces at once on a Mac can be challenging. But, it is possible with an Aggregate Device. This setup allows you to combine multiple interfaces into one. Here’s how you can do it.
Accessing Audio Midi Setup
First, open the Audio MIDI Setup application. You can find it in the Utilities folder inside Applications. Alternatively, you can search for it using Spotlight.
Once the app is open, you will see a list of your audio devices. Ensure both interfaces are connected and visible in the list. If they are not, check your connections and try again.
Creating Aggregate Device
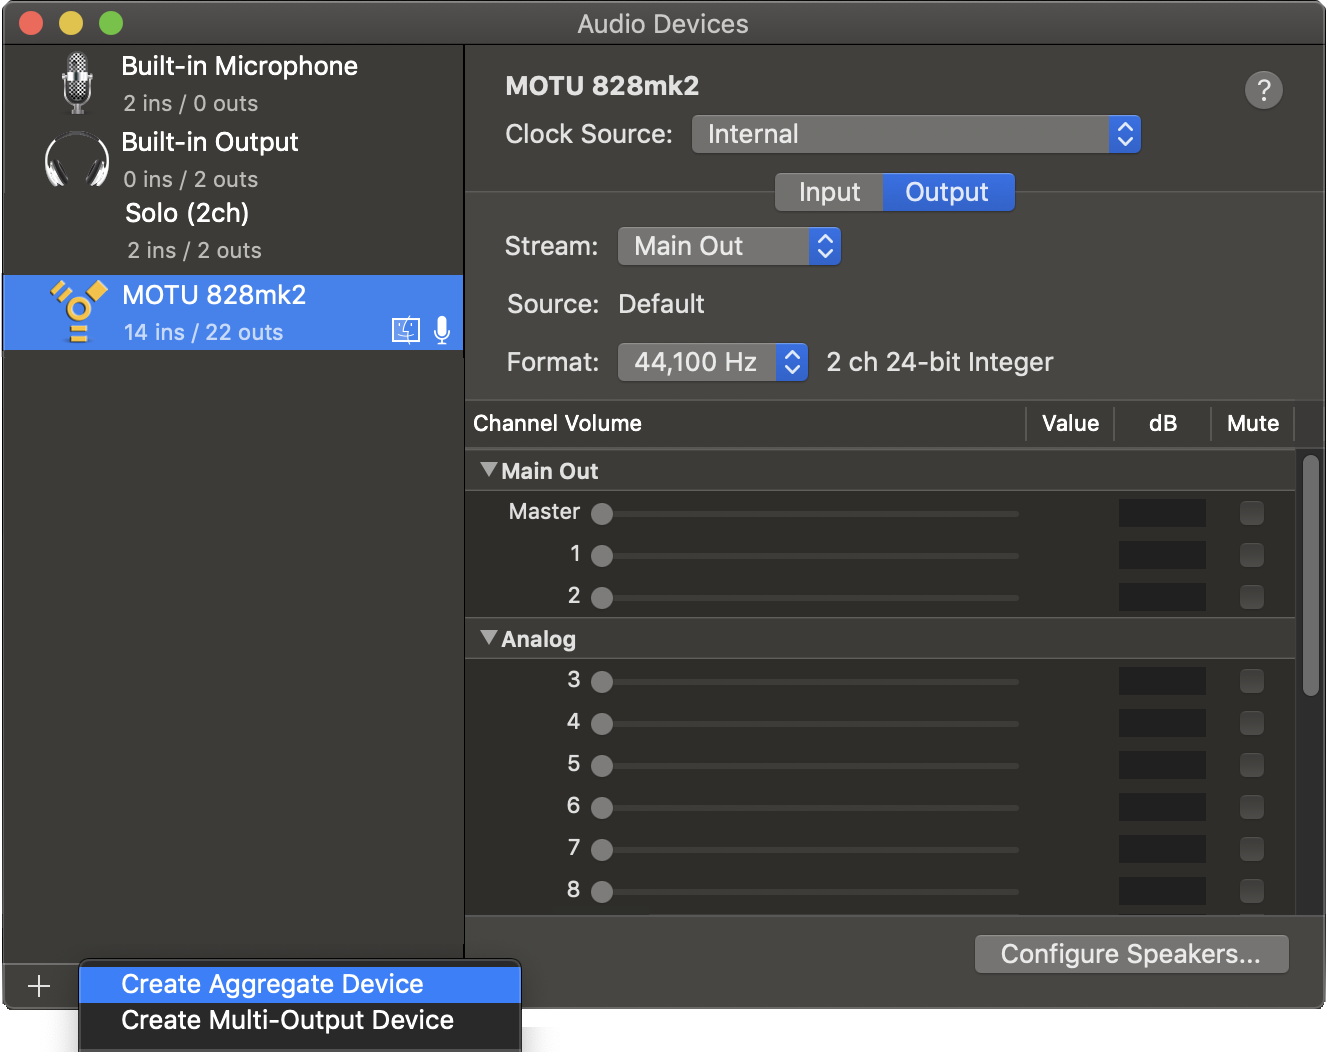
In the Audio MIDI Setup window, click the plus (+) button at the bottom-left corner. Select “Create Aggregate Device” from the menu. A new device named “Aggregate Device” will appear in the list.
Now, check the boxes next to the audio interfaces you want to combine. Ensure both interfaces are selected. You can rename the Aggregate Device by double-clicking its name.
Next, configure the sample rate to match both interfaces. Click the “Clock Source” dropdown and select the primary interface. This ensures proper synchronization.
Your Aggregate Device is now ready to use. Select it as the input and output device in your audio software. Enjoy using two audio interfaces at once on your Mac.

Credit: www.youtube.com
Configuring Input And Output
Configuring input and output for using two audio interfaces on a Mac can be tricky. But with the right steps, it becomes easy. This guide will help you set up input and output channels efficiently. Let’s dive in.
Assigning Input Channels
First, connect both audio interfaces to your Mac. Open the Audio MIDI Setup app. You will find this in the Applications folder under Utilities. Create a new Aggregate Device by clicking the plus (+) button at the bottom left. Name your new device for easy identification.
Next, select the Aggregate Device. Check the boxes next to each audio interface in the right panel. This action combines them into one device. Now, assign input channels to each interface. Click on the Configure Speakers button. Set each channel to its corresponding interface. Click Apply to save settings.
Setting Output Channels
Setting output channels is similar to setting input channels. Open the Audio MIDI Setup app again. Select the Aggregate Device you created earlier. Click on the Configure Speakers button. Assign output channels to each interface. Ensure each channel is correctly mapped.
Test your settings by playing audio. Adjust as needed for the best sound quality. Your Mac is now ready to use two audio interfaces at once. Enjoy your improved audio setup!
Testing Audio Signals
Testing audio signals is crucial when using two audio interfaces on a Mac. This ensures both interfaces work correctly and deliver the desired sound quality. Follow these steps to check input levels and verify output.
Checking Input Levels
First, connect both audio interfaces to your Mac. Open your chosen Digital Audio Workstation (DAW) software. Make sure both interfaces are recognized by the DAW.
Check each input channel. Ensure they are receiving signals. You can do this by playing an instrument or speaking into a microphone connected to each input.
Adjust the input gain levels on each interface. Ensure the signal is neither too weak nor clipping. Clipping can distort the audio and reduce quality.
Tip: Use the meters in your DAW to monitor input levels. Aim for levels that peak around -6dB to -3dB.
Verifying Output
After checking input levels, you need to verify the output from each interface. Set your DAW to output through both interfaces.
Play a test track or a sound sample in your DAW. Listen to the output through headphones or speakers connected to each interface.
Ensure the sound is clear and free from distortion. Balance the output levels if needed. This can be done within the DAW or on the interfaces themselves.
Tip: Use a reference track you are familiar with. This helps you notice any discrepancies in the sound quality.
If any issues arise during these tests, double-check your connections and settings. Ensure that each interface is set up correctly in both your Mac’s audio settings and your DAW.
| Step | Action | Details |
|---|---|---|
| 1 | Connect Interfaces | Ensure both interfaces are connected to your Mac. |
| 2 | Open DAW | Launch your Digital Audio Workstation software. |
| 3 | Check Inputs | Verify each input channel is receiving signal. |
| 4 | Adjust Gain | Set input gain levels to avoid weak signal or clipping. |
| 5 | Play Test Track | Use a known track to check output clarity. |
| 6 | Balance Output | Adjust levels to ensure balanced output. |

Credit: www.youtube.com
Troubleshooting Common Issues
Using two audio interfaces at once on a Mac can be tricky. Common issues arise that can disrupt your workflow. Let’s look at some solutions. These solutions will help you get back on track quickly.
Sync Problems
Sync problems can cause audio to be out of time. This is frustrating. Ensure both interfaces are set to the same sample rate. This setting must match in your audio software too. Check your cables and connections. Loose or faulty cables can cause sync issues. Restart your Mac if the problem persists. Sometimes a fresh start solves the issue.
Latency Issues
Latency issues make recording difficult. There’s a delay between input and output. First, reduce the buffer size in your audio software. A smaller buffer size means less delay. Be aware, though, it might cause more CPU load. Update drivers for both interfaces. Manufacturers release updates to fix such issues. Use a USB hub if both interfaces connect via USB. It can help manage data flow better.
Optimizing Performance
Optimizing performance while using two audio interfaces on a Mac can be challenging. You need to ensure that both interfaces work smoothly together. This requires some adjustments and fine-tuning. Below are some key steps to help you optimize performance and get the best results.
Adjusting Buffer Size
Buffer size affects the performance of your audio setup. A smaller buffer size reduces latency but increases the load on your CPU. To adjust buffer size, open your audio software. Look for the preferences or settings menu. Find the audio or hardware tab. You will see an option to change the buffer size. Start with a moderate setting. Test your setup. If you experience glitches, try increasing the buffer size slightly.
Reducing Latency
Latency refers to the delay between input and output. High latency can disrupt your workflow. To reduce latency, ensure your Mac’s software and drivers are up to date. Close unnecessary applications. This frees up system resources. Also, use wired connections for your audio interfaces. Wi-Fi and Bluetooth can introduce latency. If possible, connect your Mac directly to your audio hardware. This can provide a more stable and faster connection.
Practical Applications
Using two audio interfaces simultaneously on a Mac opens up a world of possibilities. Whether you’re a musician, podcaster, or sound engineer, this setup can enhance your workflow. Let’s explore some practical applications.
Recording Multiple Sources
In a recording session, you may need to capture multiple sound sources. Using two audio interfaces, you can record instruments and vocals separately. This ensures higher quality and flexibility in the mixing process.
For example, one interface can handle microphones for vocals, while the other manages electronic instruments. This separation reduces the risk of signal interference. It also allows you to adjust levels independently.
Here’s a sample setup:
| Interface 1 | Interface 2 |
|---|---|
| Microphones | Guitars |
| Drums | Keyboards |
Live Performance Setup
In a live performance, having two audio interfaces can be a game-changer. One interface can handle the main stage audio. The other can manage in-ear monitors for the band. This setup ensures the audience gets the best sound quality.
It also helps the performers hear themselves clearly. This dual-interface setup can reduce latency. It ensures that the live performance runs smoothly.
Consider this configuration:
- Interface 1: Connect to the main sound system for audience output.
- Interface 2: Connect to in-ear monitors for the band.
By using two interfaces, you can create a seamless and professional live setup.
Advanced Tips And Tricks
Using two audio interfaces at once on a Mac can be tricky. But with some advanced tips and tricks, you can achieve it smoothly. This guide will walk you through the steps with clear instructions.
Using External Software
To use two audio interfaces, you need external software. Aggregate Device in Audio MIDI Setup helps. Follow these steps:
- Open Audio MIDI Setup from Applications > Utilities.
- Click the + button and choose Create Aggregate Device.
- Check the boxes for both audio interfaces.
- Set the clock source to the main interface.
This configuration allows both interfaces to work together as one unit. You can manage them easily through the software. This step ensures seamless integration.
Enhancing Sound Quality
Enhancing sound quality is crucial. Here are some tips:
- Sample Rate: Ensure both interfaces have the same sample rate. This prevents audio glitches.
- Bit Depth: Higher bit depth means better sound. Set both to 24-bit if possible.
- Latency: Lower latency for real-time monitoring. Adjust buffer size in the software settings.
Follow these tips for the best sound quality. Consistent settings ensure smooth operation.
| Feature | Recommendation |
|---|---|
| Sample Rate | 44.1 kHz or 48 kHz |
| Bit Depth | 24-bit |
| Latency | Low buffer size |
Use these settings for optimal performance. Your audio quality will improve.
Frequently Asked Questions
Can You Use 2 Audio Interfaces At Once On Mac?
Yes, you can use 2 audio interfaces at once on Mac. You can do this using the Aggregate Device feature in Audio MIDI Setup.
How Do I Set Up Multiple Audio Interfaces On Mac?
To set up multiple audio interfaces, open Audio MIDI Setup, create an Aggregate Device, and add the interfaces.
What Is An Aggregate Device On Mac?
An Aggregate Device allows you to combine multiple audio interfaces into one virtual device. This lets you use them simultaneously.
Do I Need Special Software For Multiple Audio Interfaces?
No, you don’t need special software. The built-in Audio MIDI Setup on Mac can handle multiple audio interfaces.
Conclusion
Using two audio interfaces on a Mac can seem tricky. But, with patience and the right steps, it’s doable. Start by connecting both interfaces. Then, configure them in Audio MIDI Setup. Make sure you choose the correct aggregate device. Test your setup to ensure both interfaces work smoothly.

This guide helps you enhance your audio projects. Practice these steps and soon it will feel natural. Enjoy your improved audio experience!
{ “@context”: “https://schema.org”, “@type”: “FAQPage”, “mainEntity”: [ { “@type”: “Question”, “name”: “Can you use 2 audio interfaces at once on Mac?”, “acceptedAnswer”: { “@type”: “Answer”, “text”: “Yes, you can use 2 audio interfaces at once on Mac. You can do this using the Aggregate Device feature in Audio MIDI Setup.” } } , { “@type”: “Question”, “name”: “How do I set up multiple audio interfaces on Mac?”, “acceptedAnswer”: { “@type”: “Answer”, “text”: “To set up multiple audio interfaces, open Audio MIDI Setup, create an Aggregate Device, and add the interfaces.” } } , { “@type”: “Question”, “name”: “What is an Aggregate Device on Mac?”, “acceptedAnswer”: { “@type”: “Answer”, “text”: “An Aggregate Device allows you to combine multiple audio interfaces into one virtual device. This lets you use them simultaneously.” } } , { “@type”: “Question”, “name”: “Do I need special software for multiple audio interfaces?”, “acceptedAnswer”: { “@type”: “Answer”, “text”: “No, you don’t need special software. The built-in Audio MIDI Setup on Mac can handle multiple audio interfaces.” } } ] }As an Amazon Associate, Cleanestor earns from qualifying purchases at no additional cost to you.