Using an audio interface with your iPhone can transform your audio experience. It allows for better sound quality and more control.
Connecting an audio interface to your iPhone opens up a world of possibilities. Musicians can record high-quality tracks on the go. Podcasters can capture clear, professional audio. Even casual users can enjoy superior sound for videos or live streaming. This guide will walk you through the simple steps to connect and use an audio interface with your iPhone.
You’ll learn what equipment you need and how to set it up. Let’s dive into the details and get you started on enhancing your iPhone’s audio capabilities.

Credit: www.youtube.com
Choosing The Right Audio Interface
Choosing the right audio interface for your iPhone can be a game-changer for your recording experience. There are several factors to consider to ensure you get the best performance and compatibility. Let’s break it down into key aspects you need to focus on.
Compatibility With Iphone
Your audio interface must be compatible with iPhone. Not all audio interfaces work with iOS devices. Check the manufacturer’s specifications to ensure it supports iPhone. Compatibility issues can lead to poor sound quality or no sound at all.
Look for audio interfaces that specifically mention iPhone support. Some interfaces come with Lightning connectors, which are ideal for direct connection. Others may require an adapter. Make sure the interface is compatible with the iOS version you are using.
| Audio Interface | iPhone Compatibility |
|---|---|
| Interface A | Yes, with Lightning connector |
| Interface B | Requires USB adapter |
Key Features To Look For
When selecting an audio interface, certain features are crucial. Here are some of the key features you should look for:
- Sound Quality: High-resolution audio is essential for professional recordings.
- Portability: A compact and lightweight interface is easier to carry.
- Inputs and Outputs: Ensure the interface has enough inputs and outputs for your needs.
- Phantom Power: Necessary if you use condenser microphones.
- Latency: Low-latency interfaces provide real-time monitoring without delays.
By focusing on compatibility and key features, you can choose the best audio interface for your iPhone. Your recordings will be clear and professional, enhancing your overall audio experience.
Necessary Cables And Adapters
Using an audio interface with an iPhone enhances sound quality. It’s important to have the right cables and adapters. This ensures compatibility and smooth operation. In this section, we will cover the necessary cables and adapters.
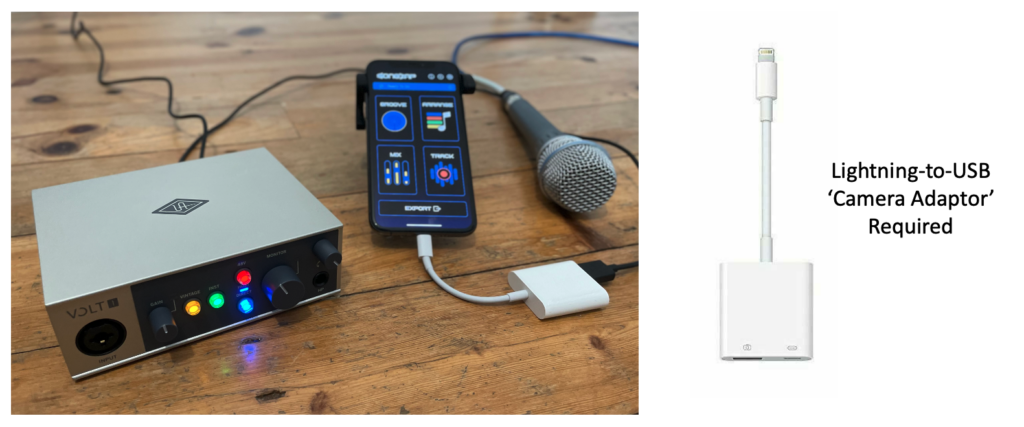
Lightning To Usb Adapter
The Lightning to USB Adapter is essential for iPhones with Lightning ports. This adapter connects the audio interface to the iPhone. It allows you to transfer audio data efficiently. Ensure the adapter is Apple-certified. This guarantees reliability and performance. The Lightning to USB Adapter usually comes with a USB-A port. Most audio interfaces use this port for connection.
Usb-c To Usb Adapter
For iPhones with USB-C ports, a USB-C to USB Adapter is needed. This adapter connects the audio interface to the iPhone. It ensures stable data transfer. Choose a high-quality adapter for best results. Many USB-C adapters also support fast charging. This keeps your iPhone powered during long sessions. Always check compatibility with your audio interface. This prevents any connection issues.
Setting Up The Audio Interface
Connecting an audio interface to your iPhone can enhance your sound recording quality. It is essential to set it up correctly to ensure smooth operation. This guide will help you through the process.
Connecting To Iphone
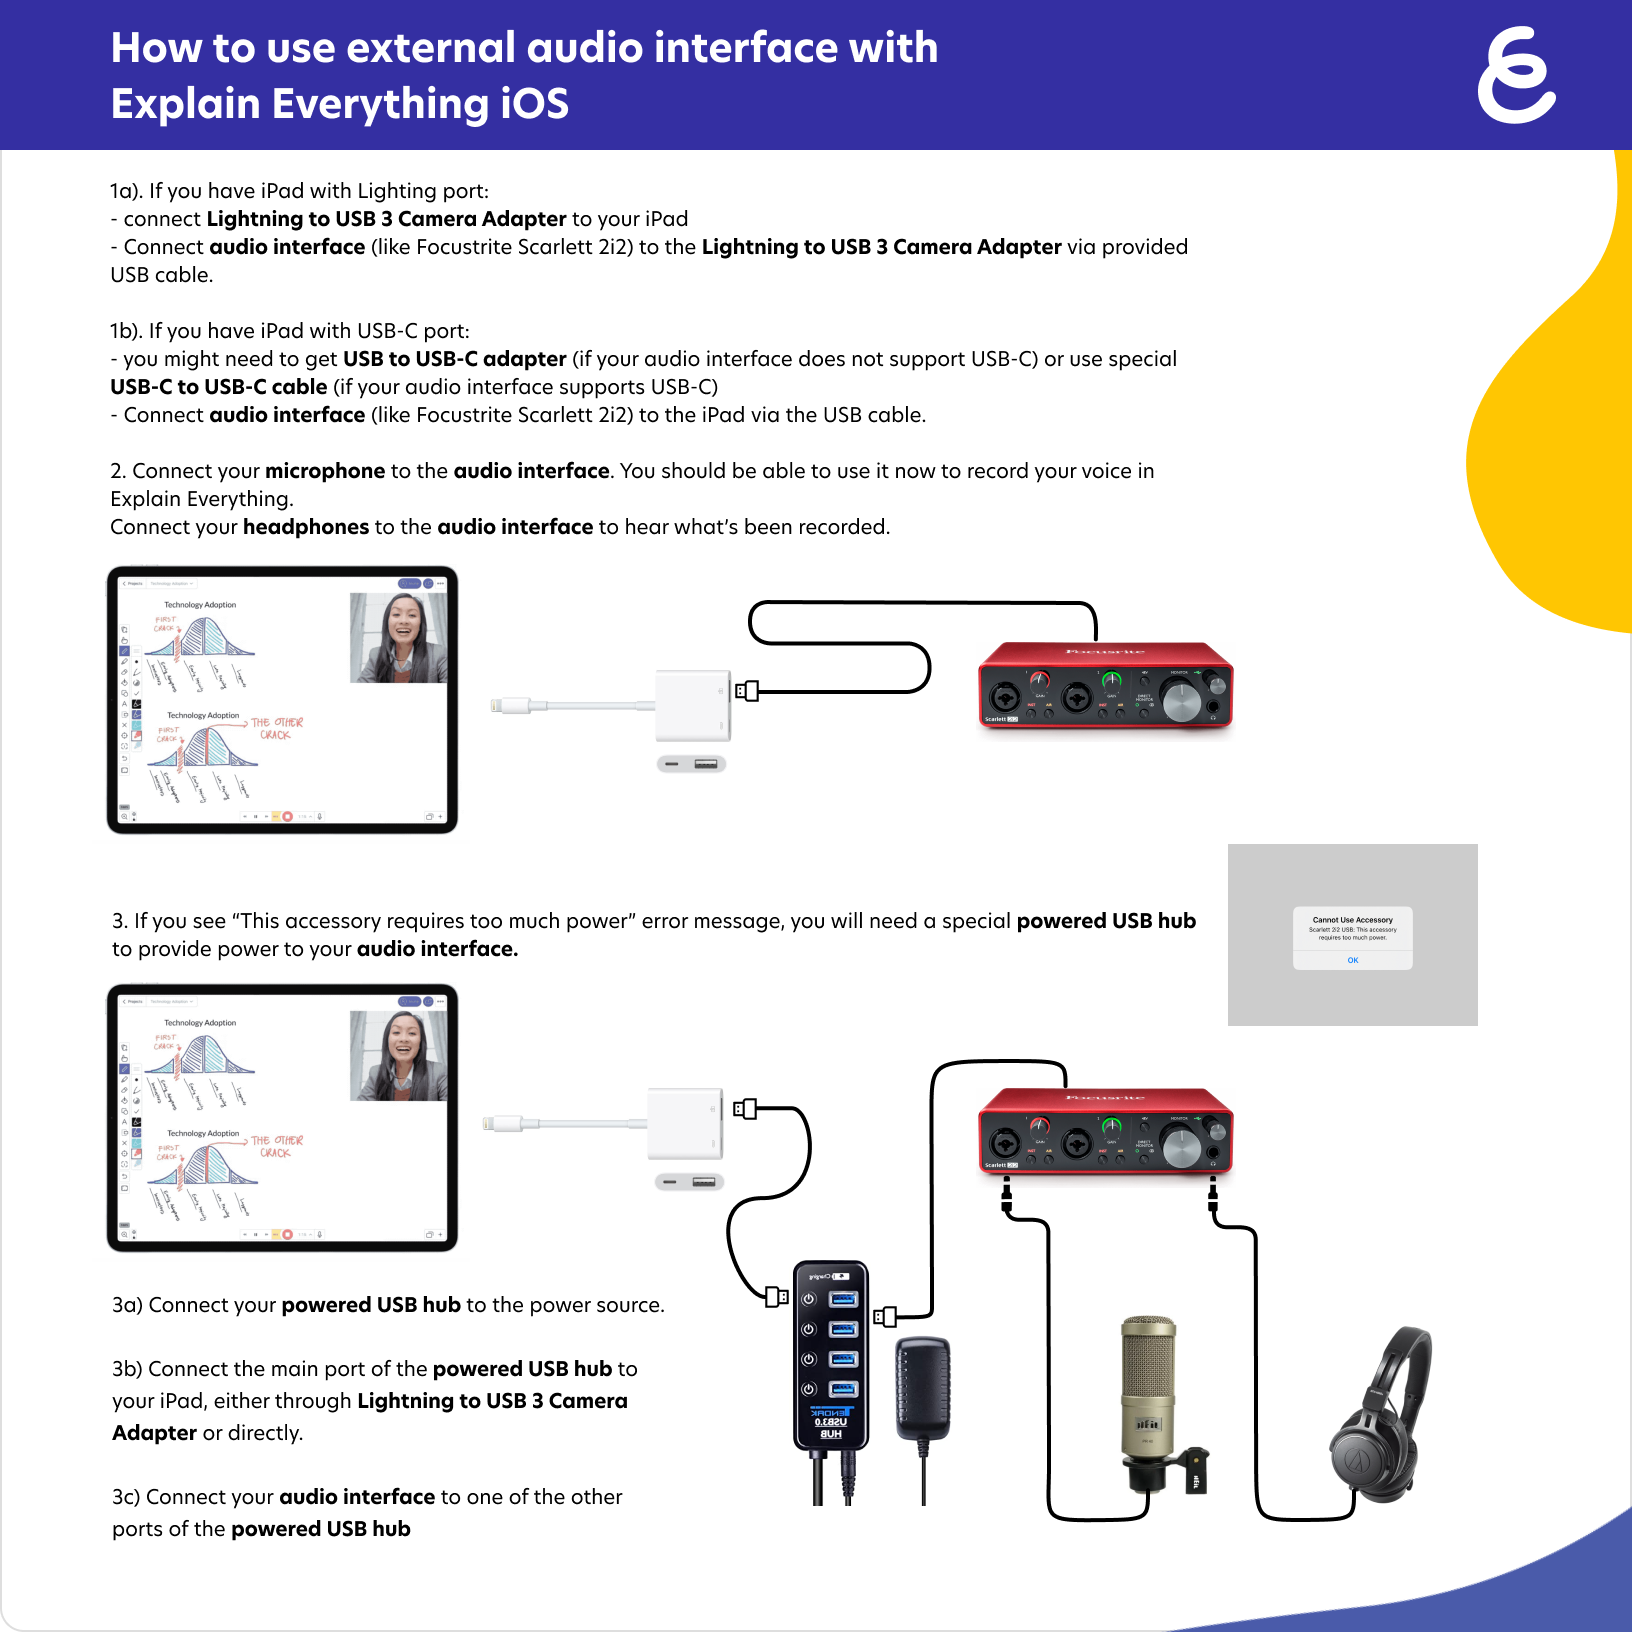
First, you need to connect the audio interface to your iPhone. Follow these steps:
- Check if your audio interface is compatible with your iPhone model.
- Use a compatible cable to connect the interface to the iPhone. This is usually a USB or Lightning cable.
- Insert one end of the cable into the audio interface.
- Insert the other end into your iPhone.
Make sure the connection is secure. A loose connection can lead to poor sound quality.
Powering The Interface
Your audio interface needs power to function. There are different ways to power it:
- Battery-operated: Some interfaces use batteries. Ensure they are charged.
- USB-powered: Connect the interface to a power source using a USB cable.
- External power supply: Some interfaces come with their own power adapters. Plug them into a power outlet.
Check your interface’s manual for specific power requirements. It helps avoid damage.
| Power Method | Description |
|---|---|
| Battery-operated | Uses batteries. Ensure they are charged. |
| USB-powered | Connect to a power source using a USB cable. |
| External power supply | Uses a power adapter. Plug into a power outlet. |
Once powered, your interface should be ready for use. Check the connection and power settings before recording.
Credit: songzap.app
Configuring Iphone Settings
Using an audio interface with your iPhone can enhance your recording and playback experience. To get the best results, you must configure your iPhone settings correctly. This guide will help you through the key steps of configuring your iPhone settings for optimal audio interface performance.
Audio Input Selection
First, you need to select the right audio input. Here’s how:
- Plug your audio interface into the iPhone using the appropriate cable.
- Open the Settings app on your iPhone.
- Scroll down and tap on Sounds & Haptics.
- Tap on Audio Input.
- Select your audio interface from the list of available devices.
By selecting the correct audio input, you ensure that your iPhone captures sound from the audio interface.
Adjusting Volume Levels
Next, adjust the volume levels to ensure clear sound. Follow these steps:
- Go to the Settings app.
- Tap on Sounds & Haptics.
- Use the sliders to adjust the input and output volume levels.
Ensure the levels are not too high to avoid distortion or too low to miss details.
For precise control, use the volume controls on your audio interface.
| Volume Setting | Recommendation |
|---|---|
| Input Volume | Set to a mid-range level |
| Output Volume | Adjust based on your headphones or speakers |
Using these settings, you can achieve better sound quality with your iPhone and audio interface.
Using Audio Recording Apps
Using audio recording apps with your iPhone can elevate your recording experience. These apps offer various features, from simple voice recording to professional audio editing. Understanding how to use these apps with an audio interface can help you achieve high-quality recordings with ease.
Popular Apps To Consider
Several audio recording apps are available for the iPhone. Here are some of the most popular options:
- GarageBand: This app is great for music production. It offers a wide range of instruments and effects.
- Voice Memos: Ideal for simple voice recordings. Easy to use with a clean interface.
- Ferrite Recording Studio: Perfect for podcasting. It provides advanced editing tools.
- AudioShare: Useful for organizing and sharing audio files. Supports multiple formats.
Setting Up The App
Setting up an audio recording app on your iPhone is straightforward. Follow these steps to get started:
- Download and install the app from the App Store.
- Open the app and grant the necessary permissions.
- Connect your audio interface to the iPhone using a compatible adapter.
- In the app, select the input source as your audio interface.
- Adjust the input levels to avoid clipping or distortion.
- Test the setup by recording a short clip.
Once the app is set up, you can begin recording. Ensure you monitor your audio levels to maintain quality. Happy recording!
Credit: help.explaineverything.com
Troubleshooting Common Issues
Using an audio interface with your iPhone can enhance your recording quality. But, issues can arise. Here are some common problems and their solutions.
No Sound Output
If your audio interface connects, but there’s no sound, try these steps:
- Check Connections: Ensure all cables are securely connected.
- Volume Settings: Increase the volume on your iPhone and interface.
- App Permissions: Allow the app to access the microphone. Go to Settings > Privacy > Microphone and enable access.
- Output Selection: Ensure the output device is selected correctly in your audio app.
Interface Not Recognized
If your iPhone does not recognize the audio interface, consider these solutions:
- Restart Devices: Restart both your iPhone and the audio interface.
- Update Software: Ensure your iPhone and app are updated to the latest versions.
- Check Compatibility: Confirm your audio interface is compatible with your iPhone model.
- Use Original Cables: Always use the original or certified cables for connections.
If these steps do not work, consult the user manual or contact the support team of your audio interface brand.
Optimizing Audio Quality
Using an audio interface with your iPhone can greatly improve sound quality. To get the best results, focus on optimizing audio quality. This involves fine-tuning different settings and conditions. By doing so, you can achieve clear and professional sound.
Adjusting Gain Levels
Gain control is crucial for good audio quality. Start by setting the gain level on your audio interface. Turn the gain knob until you hear a clear signal. Avoid setting the gain too high. This can lead to distortion. Distortion makes audio unclear and unpleasant. Check the input levels on your iPhone as well. Make sure they are not too low or too high.
Minimizing Background Noise
Background noise can ruin your recordings. Use a quiet room for recording. Turn off any noisy devices nearby. Fans and air conditioners can be problematic. Use a pop filter to reduce plosive sounds. Plosives are hard ‘p’ and ‘b’ sounds that can cause spikes in audio. A good pop filter can make a big difference. Position your microphone correctly. Point the mic away from noise sources. This simple trick can help minimize unwanted sounds.
Advanced Tips And Tricks
Using an audio interface with your iPhone opens up a world of possibilities for mobile recording. For those looking to get more out of their setup, here are some advanced tips and tricks. These will help you achieve professional-quality audio recordings with your iPhone.
Multi-track Recording
Multi-track recording allows you to record multiple instruments or vocals separately. This is particularly useful for bands, podcasters, and solo artists who want to layer different sounds. To get started:
- Ensure your audio interface supports multi-track recording.
- Use a DAW (Digital Audio Workstation) app that supports multi-track, such as GarageBand or Auria.
- Connect your instruments or microphones to different inputs on the audio interface.
- Assign each input to a separate track within your DAW.
- Press record and start playing or singing. Each input will be recorded on its own track.
Using Effects And Plugins
Effects and plugins can significantly enhance the quality of your recordings. They can add reverb, delay, compression, and many other effects. Here’s how to use them effectively:
- Choose a DAW app that supports plugins. GarageBand and Auria are good options.
- Download and install the necessary plugins. Many are available for free or at a low cost.
- Open your DAW and load the track you want to enhance.
- Select the plugin you wish to use from the DAW’s effects menu.
- Adjust the settings of the plugin to achieve the desired effect.
- Listen to the track with the effect applied. Make further adjustments if needed.
Using these tips, you can take your iPhone recordings to the next level. Experiment with different setups and find what works best for your needs. Happy recording!
Frequently Asked Questions
How To Connect Iphone To Audio Interface?
To connect your iPhone to an audio interface, use a Lightning to USB adapter. Plug the adapter into your iPhone, then connect the audio interface via USB. Ensure all devices are powered on.
Which Audio Interfaces Are Compatible With Iphones?
Several audio interfaces are compatible with iPhones, including Focusrite Scarlett, iRig, and Apogee. Always check the device specifications to ensure compatibility with your iPhone model.
Can You Record High-quality Audio On Iphone?
Yes, you can record high-quality audio on an iPhone using a compatible audio interface. Ensure you use a reliable recording app for the best results.
Do You Need Special Apps For Recording?
Yes, special apps like GarageBand, Auria, and Cubasis enhance recording quality. These apps offer advanced features and better control over audio settings.
Conclusion
Using an audio interface with your iPhone can improve your sound quality. It’s easy to set up and enhances your recording experience. Follow the steps mentioned to connect your audio interface. Always check compatibility and use the right cables. Enjoy clear audio for your projects.

Experiment with settings to find the best sound. With practice, you’ll achieve great results. Remember, good audio makes a difference. Happy recording!
{ “@context”: “https://schema.org”, “@type”: “FAQPage”, “mainEntity”: [ { “@type”: “Question”, “name”: “How to connect iPhone to audio interface?”, “acceptedAnswer”: { “@type”: “Answer”, “text”: “To connect your iPhone to an audio interface, use a Lightning to USB adapter. Plug the adapter into your iPhone, then connect the audio interface via USB. Ensure all devices are powered on.” } } , { “@type”: “Question”, “name”: “Which audio interfaces are compatible with iPhones?”, “acceptedAnswer”: { “@type”: “Answer”, “text”: “Several audio interfaces are compatible with iPhones, including Focusrite Scarlett, iRig, and Apogee. Always check the device specifications to ensure compatibility with your iPhone model.” } } , { “@type”: “Question”, “name”: “Can you record high-quality audio on iPhone?”, “acceptedAnswer”: { “@type”: “Answer”, “text”: “Yes, you can record high-quality audio on an iPhone using a compatible audio interface. Ensure you use a reliable recording app for the best results.” } } , { “@type”: “Question”, “name”: “Do you need special apps for recording?”, “acceptedAnswer”: { “@type”: “Answer”, “text”: “Yes, special apps like GarageBand, Auria, and Cubasis enhance recording quality. These apps offer advanced features and better control over audio settings.” } } ] }As an Amazon Associate, Cleanestor earns from qualifying purchases at no additional cost to you.