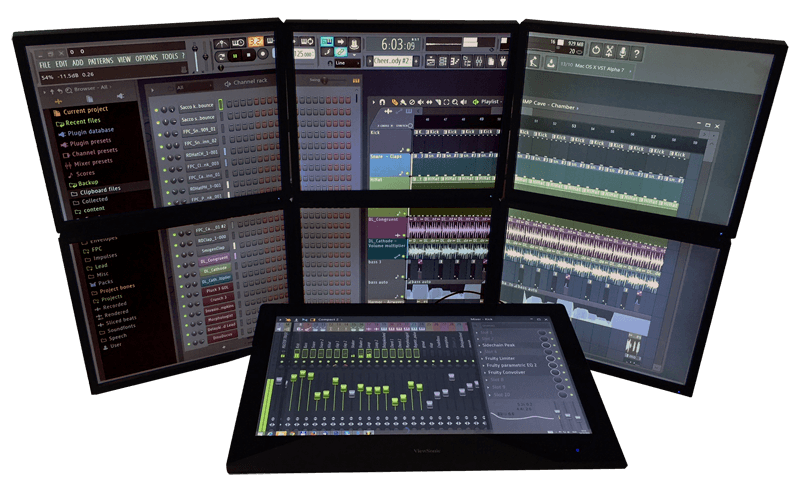
Using FL Studio on multiple monitors boosts productivity. You can manage tasks better and streamline your workflow.
FL Studio, a popular digital audio workstation, offers many features. Using multiple monitors can enhance your experience significantly. Imagine having your mixer on one screen, your playlist on another, and your piano roll on a third. This setup minimizes screen clutter and allows you to work more efficiently.
In this guide, you’ll learn how to set up and use FL Studio across multiple monitors. Whether you are a beginner or a seasoned producer, this setup can transform your music-making process. Ready to improve your workflow? Let’s dive into the steps and tips to make the most of your multi-monitor setup in FL Studio.
Credit: www.womenfutureconference.com
Introduction To Fl Studio
Welcome to our guide on using FL Studio on multiple monitors. FL Studio is a popular digital audio workstation (DAW). It’s perfect for music production, mixing, and recording. Many musicians and producers use it. Let’s start with an overview of FL Studio.
Overview Of Fl Studio
FL Studio offers a range of features. It includes virtual instruments, audio recording, and editing tools. You can create and mix music with ease. The user interface is intuitive. It helps both beginners and professionals. You’ll find everything you need in one place.
Benefits Of Multiple Monitors
Using multiple monitors with FL Studio has many benefits. First, it increases your workspace. You can view different parts of your project at once. This saves time. You don’t need to switch between windows. You can have the mixer on one screen. The playlist can be on another.
Second, it improves your workflow. You can drag and drop items more easily. Your projects become more organized. You can see more details without clutter. This leads to better focus and creativity. Lastly, it enhances your productivity. You finish projects faster.
Credit: www.theflipsideforum.com
Setting Up Your Monitors
Using FL Studio on multiple monitors can boost your productivity. You can see more of your project at once. This setup helps you work faster and more efficiently. But, setting up your monitors is key.
Choosing The Right Monitors
First, you need the right monitors. Look for monitors with high resolution. This ensures clear and sharp images. Bigger screens are better. They give you more space to work with. Make sure the monitors have the same size and resolution. This makes setting them up easier. Also, ensure they have the right ports for connection.
Connecting Multiple Monitors
Next, you need to connect the monitors. Start by turning off your computer. Connect the monitors to your computer’s video ports. Use HDMI, DisplayPort, or VGA cables. Each port and cable type has its pros and cons. HDMI is common and supports audio. DisplayPort is good for high resolutions. VGA is older but still works well.
Once connected, turn on your computer. Go to your display settings. In Windows, you can right-click on the desktop and select ‘Display settings’. Here, you can arrange the monitors. You can also set the primary monitor. This is where your main work will happen.
Finally, adjust the resolution of each monitor. Make sure they match. This ensures smooth cursor movement between screens. Now, your monitors are ready to use with FL Studio.
Configuring Fl Studio For Multiple Monitors
Configuring FL Studio for multiple monitors can greatly enhance your workflow. By spreading your workspace across two or more screens, you can see more of your project at once. This can make editing and mixing much easier. Let’s go through the steps to set up FL Studio for multiple monitors.
Adjusting Display Settings
First, make sure your monitors are correctly connected. Next, open your computer’s display settings. You’ll need to arrange your monitors in the desired order. Drag and drop the monitor icons to match their physical arrangement on your desk.
Set the resolution for each monitor. Make sure they match for a seamless experience. Click ‘Apply’ to save your changes.
Customizing Layout
Open FL Studio. Go to the ‘View’ menu and click on ‘Arrange Windows’. This will allow you to move the different windows of FL Studio across your monitors.
Drag the Mixer window to one monitor. Place the Playlist window on another. You can also move the Channel Rack and Piano Roll to separate screens.
Take your time to find the best layout for your workflow. Save your layout by going to ‘File’ and clicking ‘Save As’. This way, you can quickly load it in the future.
Utilizing Mixer And Playlist On Separate Screens
Working with multiple monitors in FL Studio can enhance your workflow. Separating the Mixer and Playlist onto different screens allows for a more organized workspace. It makes it easier to manage your music production tasks. Let’s explore how to effectively isolate the Mixer and expand the Playlist.
Isolating The Mixer
To isolate the Mixer on a separate screen, follow these steps:
- Open FL Studio and load your project.
- Press F9 to open the Mixer window.
- Drag the Mixer window to your secondary monitor.
- Adjust the size of the Mixer window to fit your screen.
By isolating the Mixer, you can see all the channels clearly. This makes it easier to mix your tracks. Adjust levels and add effects without flipping between windows.
Expanding The Playlist
Expanding the Playlist on your main screen can provide more space for editing and arranging:
- Press F5 to open the Playlist window.
- Maximize the Playlist to fill your primary monitor.
- Use zoom controls to focus on specific sections of your project.
With the Playlist expanded, you have a larger view of your arrangement. This allows for precise editing and better track management.
Here’s a quick summary:
| Task | Action |
|---|---|
| Isolate Mixer | Move Mixer to secondary monitor |
| Expand Playlist | Maximize Playlist on primary monitor |
Separating the Mixer and Playlist improves your efficiency. It keeps your workspace tidy and enhances your production experience.
Enhancing Workflow With Multiple Monitors
Using multiple monitors in FL Studio can greatly improve your workflow. With more screen space, you can manage your projects more efficiently. This setup allows you to spread out your tools and windows. This means less clicking and more producing. Let’s dive into how you can make the most of multiple monitors in FL Studio.
Improving Navigation
Navigating through different windows and tools can be time-consuming. With multiple monitors, you can dedicate each screen to different aspects of your project. For instance, you can have the main playlist on one monitor and the mixer on another. This setup allows you to see all your essential tools at a glance.
Here are some ways to improve navigation:
- Place the playlist on the primary monitor.
- Keep the mixer and channel rack on the secondary monitor.
- Use a third monitor for VST plugins and effects.
This setup minimizes switching between windows. You can focus more on creating music.
Streamlining Production
With multiple monitors, you can streamline your production process. You can work on different parts of your project simultaneously. For example, you can adjust a synth on one screen while mixing on another.
Consider this setup:
| Monitor | Function |
|---|---|
| Monitor 1 | Playlist and Arrangement |
| Monitor 2 | Mixer and Effects |
| Monitor 3 | VST Plugins and Browser |
You can switch between tasks more smoothly. This leads to a more efficient workflow.
Multiple monitors are especially useful for detailed tasks:
- Editing automation clips.
- Fine-tuning EQ settings.
- Monitoring levels and waveforms.
With this setup, you can keep everything organized. Your workspace remains tidy, and your mind stays focused.
Troubleshooting Common Issues
Using FL Studio on multiple monitors can greatly enhance your workflow. But it can also come with some challenges. This section will help you troubleshoot common issues that you might face.
Resolving Display Problems
Display problems are common when using multiple monitors. Here are some tips to fix them:
- Check Cables: Ensure all monitor cables are securely connected.
- Update Drivers: Make sure your graphics card drivers are updated.
- Adjust Resolution: Set all monitors to the same resolution in display settings.
Sometimes, windows within FL Studio may not appear where you expect. To fix this:
- Open FL Studio.
- Go to Options > General Settings.
- Check the box for Auto-Align Windows.
Fixing Performance Issues
Performance issues can also arise when using multiple monitors. Follow these steps to improve performance:
| Issue | Solution |
|---|---|
| Lagging | Lower the screen resolution or refresh rate. |
| Crashing | Increase the buffer size in FL Studio settings. |
| Freezing | Close other background applications. |
If performance issues persist, consider upgrading your hardware. A better graphics card or more RAM can help.
In summary, using FL Studio on multiple monitors can be a game-changer. But, you must be prepared to troubleshoot common issues. Follow these tips to get the most out of your multi-monitor setup.
Advanced Tips For Power Users
Using FL Studio on multiple monitors can greatly enhance your music production workflow. Power users can benefit from advanced tips to make the most out of their setup. These tips will help you work more efficiently and creatively.
Using Third-party Plugins
Third-party plugins can expand FL Studio’s capabilities. Many plugins offer unique features not found in the default setup. To use them effectively, place them on a separate monitor. This keeps your main screen clutter-free. It also allows quick access to plugin controls.
Organize your plugins by type or usage. For example, keep all your synths on one screen. Place effects and mixers on another. This setup can save you time and boost creativity.
Optimizing Performance
Optimizing performance is key to smooth operation. Start by adjusting your audio settings. Lower the buffer size for less latency. But be mindful, as too low can cause clicks and pops.
Use the “Smart Disable” feature for plugins. It reduces CPU load by disabling unused plugins. Also, keep your software and plugins updated. Updates often include performance improvements.
Consider your monitor setup. Use a high-resolution monitor for detailed tasks. A secondary monitor can handle less demanding tasks. This balance can make your workflow more efficient.

Credit: www.youtube.com
Frequently Asked Questions
How To Set Up Multiple Monitors In Fl Studio?
To set up multiple monitors, go to ‘Options’ in FL Studio. Select ‘General Settings’ and enable ‘Multiple Monitor Support’. Arrange your windows across monitors.
Can I Customize Windows On Different Monitors In Fl Studio?
Yes, you can. Drag and drop FL Studio’s windows, like the mixer and playlist, to different monitors as needed.
Is Using Multiple Monitors In Fl Studio Beneficial?
Yes, using multiple monitors enhances workflow. It allows you to have different FL Studio windows open simultaneously, improving productivity.
Does Fl Studio Support Multi-monitor Setups Natively?
Yes, FL Studio supports multi-monitor setups natively. This feature is built-in and easy to configure.
Conclusion
Using FL Studio on multiple monitors enhances your music production experience. It helps you stay organized and efficient. Follow the steps mentioned to set up your monitors correctly. Enjoy a more spacious and productive workspace. This setup can improve your workflow and creativity.

Start experimenting with your new setup today. Happy music making!
{ “@context”: “https://schema.org”, “@type”: “FAQPage”, “mainEntity”: [ { “@type”: “Question”, “name”: “How to set up multiple monitors in FL Studio?”, “acceptedAnswer”: { “@type”: “Answer”, “text”: “To set up multiple monitors, go to ‘Options’ in FL Studio. Select ‘General Settings’ and enable ‘Multiple Monitor Support’. Arrange your windows across monitors.” } } , { “@type”: “Question”, “name”: “Can I customize windows on different monitors in FL Studio?”, “acceptedAnswer”: { “@type”: “Answer”, “text”: “Yes, you can. Drag and drop FL Studio’s windows, like the mixer and playlist, to different monitors as needed.” } } , { “@type”: “Question”, “name”: “Is using multiple monitors in FL Studio beneficial?”, “acceptedAnswer”: { “@type”: “Answer”, “text”: “Yes, using multiple monitors enhances workflow. It allows you to have different FL Studio windows open simultaneously, improving productivity.” } } , { “@type”: “Question”, “name”: “Does FL Studio support multi-monitor setups natively?”, “acceptedAnswer”: { “@type”: “Answer”, “text”: “Yes, FL Studio supports multi-monitor setups natively. This feature is built-in and easy to configure.” } } ] }As an Amazon Associate, Cleanestor earns from qualifying purchases at no additional cost to you.