The Zoom H6 is a versatile audio recorder. It can also function as an audio interface.
Using your Zoom H6 as an audio interface can elevate your recordings. Whether you’re a podcaster, musician, or content creator, this guide will simplify the process. The Zoom H6 is packed with features that make it easy to connect to your computer.
This allows you to record directly into your favorite software. Setting it up might seem complex, but it’s straightforward with the right steps. You’ll unlock its full potential in no time. Ready to enhance your audio game? Let’s dive into using the Zoom H6 as an audio interface.
Introduction To Zoom H6
The Zoom H6 is a versatile audio recorder. It’s perfect for musicians, podcasters, and filmmakers. This handy device can also serve as an audio interface. This means you can connect it to your computer for recording and streaming.
The Zoom H6 is known for its high-quality recordings. It captures clear and detailed sound. This makes it an excellent choice for anyone serious about audio quality.
Key Features
The Zoom H6 has many impressive features. Here are some of the key highlights:
- Interchangeable Microphone Capsules: Swap out mics easily for different recording needs.
- Six Inputs: Record up to six tracks simultaneously.
- Four XLR/TRS Combo Jacks: Connect microphones or instruments directly.
- High-Quality Preamps: Ensure clear and noise-free recordings.
- Portable Design: Lightweight and easy to carry.
- Battery-Powered: Use it anywhere without needing an outlet.
Why Use Zoom H6 As An Audio Interface
Using the Zoom H6 as an audio interface has many benefits. Here’s why you might want to consider it:
- Excellent Sound Quality: The H6 offers top-notch recording quality. This is perfect for podcasts and music production.
- Multiple Inputs: Record multiple sources at once. Ideal for interviews and multi-person podcasts.
- Ease of Use: The Zoom H6 is user-friendly. Even beginners can operate it without issues.
- Versatility: Use it in the studio or on the go. It’s perfect for both situations.
Overall, the Zoom H6 is a powerful tool for any audio project. Its flexibility and quality make it a top choice for many users.

Credit: www.youtube.com
Getting Started
The Zoom H6 is a versatile and powerful audio recorder. It can also serve as an audio interface for your computer. This guide will help you get started with using the Zoom H6 in this role.
Unboxing And Components
Upon unboxing your Zoom H6, you will find several components. These include:
- Zoom H6 Recorder
- XYH-6 X/Y Mic Capsule
- USB Cable
- Foam Windscreen
- 4 AA Batteries
- Operation Manual
Ensure all components are present. If anything is missing, contact the seller.
Initial Setup
Follow these steps for the initial setup:
- Insert the four AA batteries into the recorder.
- Attach the XYH-6 mic capsule to the recorder.
- Connect the Zoom H6 to your computer using the USB cable.
- Turn on the Zoom H6 by sliding the power switch.
- Navigate to the Menu on the Zoom H6. Select “USB” and then “Audio Interface”.
- Choose the correct mode based on your operating system (PC/Mac).
Your computer should now recognize the Zoom H6 as an audio interface. You are ready to use it for recording or streaming.
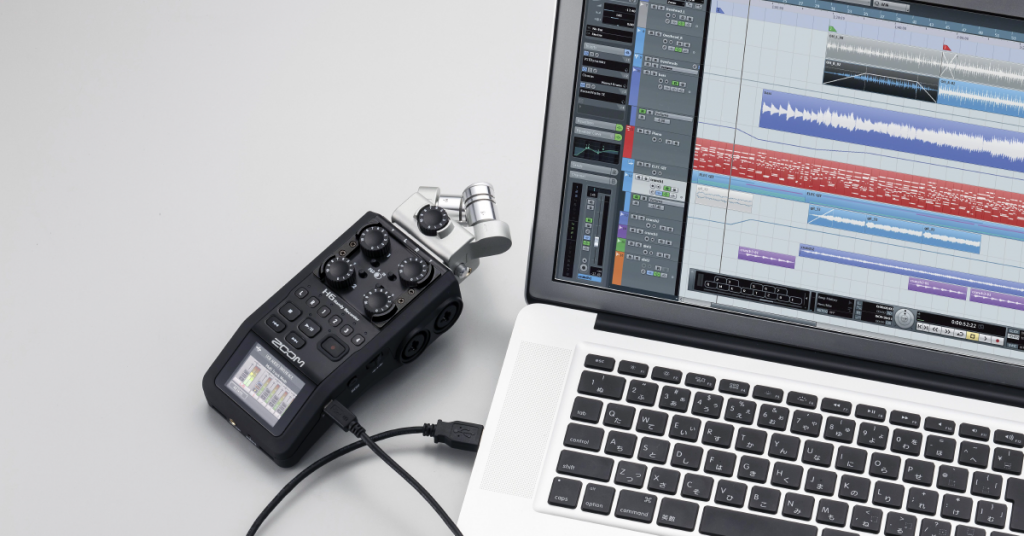
Connecting Zoom H6 To Your Computer
Connecting your Zoom H6 to your computer can enhance your audio projects. This handy device can serve as a reliable audio interface, providing high-quality sound. Let’s dive into how to connect it properly.
Required Cables And Adapters
Before starting, gather all necessary cables and adapters. You will need a USB cable that came with your Zoom H6. If it’s missing, a standard USB cable will work. Ensure your computer has a USB port available. If not, use a USB hub or adapter.
Usb Connection Process
First, power on your Zoom H6. Use the power button on the side. Next, connect the USB cable to the Zoom H6’s USB port. It’s located on the left side of the device. Then, plug the other end of the USB cable into your computer.
Once connected, the Zoom H6 screen will display options. Select ‘Audio Interface’ using the scroll knob. Choose ‘Stereo Mix’ or ‘Multi Track’ based on your needs. Confirm your selection by pressing the scroll knob.
On your computer, open your audio settings. Select Zoom H6 as your input and output device. Your computer should recognize the Zoom H6 immediately. If not, ensure drivers are up to date. Now, your Zoom H6 is ready as an audio interface.
Configuring Zoom H6 Settings
Configuring the Zoom H6 as an audio interface is a crucial step. This ensures you get the best sound quality for your recordings. Follow these steps to set up your Zoom H6 properly.
Audio Interface Mode
First, you need to put the Zoom H6 in Audio Interface Mode. Here’s how:
- Turn on your Zoom H6.
- Connect it to your computer using a USB cable.
- On the H6, select Menu.
- Navigate to USB and press the knob.
- Select Audio Interface.
- Choose the appropriate mode: PC/Mac or iPad.
Once selected, your Zoom H6 will be recognized by your computer as an audio interface.
Adjusting Input And Output Settings
Next, adjust the input and output settings to ensure proper audio levels. Follow these steps:
- On the Zoom H6, press the Menu button.
- Scroll to Input & Output and press the knob.
- Select Input Settings. Here, you can adjust the gain for each input channel.
- Set the gain levels to avoid peaking. Peaks cause distortion.
- For output settings, go back to the Input & Output menu.
- Select Output Settings. Adjust the output volume as needed.
Make sure the output volume is not too high. This will prevent clipping.
Use these settings to get the best sound quality. The right configuration makes a big difference.
Installing Necessary Drivers
Using the Zoom H6 as an audio interface requires installing the necessary drivers. These drivers ensure your computer recognizes the device. Without them, your computer might not communicate properly with the H6. Let’s break down the process for both Windows and Mac systems.
Driver Installation On Windows
First, download the latest driver from Zoom’s official website. Ensure you download the version specific to Windows. Open the downloaded file. Follow the on-screen instructions to install the driver. Restart your computer once the installation completes. Connect the Zoom H6 to your computer using a USB cable. Your Windows PC should now recognize the device as an audio interface.
Driver Installation On Mac
For Mac users, the process is slightly different. Visit Zoom’s official website and download the Mac-specific driver. Open the downloaded file. Follow the on-screen prompts to complete the installation. Restart your Mac once the installation finishes. Connect your Zoom H6 using a USB cable. Your Mac should now detect the device as an audio interface.
Setting Up Your Daw
Using the Zoom H6 as an audio interface can enhance your recording experience. To achieve the best results, you need to set up your Digital Audio Workstation (DAW) correctly. This process includes selecting the audio device and configuring input and output channels.
Selecting Audio Device
First, you need to select the Zoom H6 as your audio device. Open your DAW and navigate to the audio settings. Here’s a step-by-step guide:
- Go to Preferences or Settings.
- Find the Audio or Audio Devices section.
- Select Zoom H6 from the Input Device and Output Device dropdown menus.
Make sure your Zoom H6 is connected to your computer via USB. This ensures that your DAW can recognize the device.
Configuring Input And Output Channels
Next, configure the input and output channels. This step ensures the audio is routed correctly. Follow these steps:
- Go to the Audio Settings in your DAW.
- Find the section for Input Channels.
- Enable the channels you plan to use (e.g., 1, 2, 3, 4).
- Do the same for the Output Channels.
By default, the Zoom H6 offers six input channels. Select the ones you need for your recording session.
To ensure everything is set up correctly, create a test recording. Check both input and output levels. Adjust the volume settings if necessary.
With these steps, your Zoom H6 is ready to be used as an audio interface in your DAW.
Recording With Zoom H6
The Zoom H6 is a versatile audio recorder. It can also function as an audio interface. This makes it a great tool for podcasters, musicians, and content creators. Using the Zoom H6 for recording is straightforward. Follow these steps to get started.
Setting Levels And Gain
Properly setting levels and gain is crucial for clear recordings. Here’s how to do it:
- Connect the Zoom H6 to your computer using a USB cable.
- Open your recording software. Select the Zoom H6 as your audio input device.
- Adjust the gain knobs on the Zoom H6. Turn them until the signal levels are clear but not peaking.
- Check the level meters on the Zoom H6. They should be in the green zone. Avoid the red zone to prevent distortion.
Tip: Start with the gain knobs at the 12 o’clock position. Adjust from there.
Monitoring Your Audio
Monitoring your audio in real-time is important. It ensures you catch any issues as they happen.
- Plug in your headphones into the Zoom H6’s headphone jack.
- Adjust the headphone volume knob to a comfortable level.
- Listen for any unwanted noise or distortion.
- Make adjustments to the gain or mic position if needed.
Tip: Use closed-back headphones for better isolation.
With these steps, you can use the Zoom H6 as an audio interface effectively. Happy recording!
Troubleshooting Common Issues
Using the Zoom H6 as an audio interface can be a great way to enhance your recordings. But sometimes, you might run into issues. This section will help you troubleshoot common problems. We will focus on two main areas: connection problems and audio quality issues.
Connection Problems
First, check your USB cable. Make sure it is not damaged. A faulty cable can cause connection issues. If the cable is fine, check your computer’s USB port. Try a different port to see if it helps.
Next, look at your Zoom H6 settings. Ensure it is set to audio interface mode. You can do this by going to the menu and selecting the appropriate option. Sometimes, updating your device drivers can fix connection problems. Visit the Zoom website for the latest updates.
Audio Quality Issues
Start by checking your microphone. Make sure it is properly connected and positioned. A loose connection can lead to poor audio quality. Also, check the gain levels on your Zoom H6. Too high or too low gain can affect the sound.
Another tip is to check your recording environment. Background noise can affect audio quality. Try to record in a quiet place. Finally, look at your computer’s sound settings. Ensure the Zoom H6 is selected as the input device.
Tips For Optimal Performance
Using the Zoom H6 as an audio interface can greatly enhance your recordings. For the best results, follow these tips for optimal performance. Pay close attention to maintaining your equipment and best practices for recording.
Maintaining Your Equipment
Keep your Zoom H6 clean and dust-free. Use a soft, dry cloth to wipe it down regularly. Avoid using harsh chemicals. Store it in a protective case when not in use. This prevents damage and prolongs its lifespan.
Check the battery level before each use. Ensure you have spare batteries on hand. Consistent power supply is crucial. For long sessions, consider using an external power source.
Update the firmware regularly. Visit the Zoom website for the latest updates. These can fix bugs and improve performance. Follow the instructions carefully during the update process.
Best Practices For Recording
Set the gain levels properly. Start with the gain knobs at the lowest setting. Gradually increase while monitoring the levels. Avoid peaking to prevent distortion.
Use quality microphones. The built-in mics are good, but external mics can offer better sound. Test different positions for the best sound capture.
Minimize background noise. Record in a quiet environment. Turn off fans, air conditioners, and other noisy devices. Use soundproofing materials if possible.
Monitor your recordings with headphones. This helps catch any issues early. Adjust settings as needed during the recording process.
Save your recordings frequently. Use the SD card for storage. This ensures you don’t lose your work. Back up your recordings to a computer or external drive.
Credit: www.sweetwater.com

Credit: www.youtube.com
Frequently Asked Questions
How Do I Connect Zoom H6 To My Computer?
To connect your Zoom H6 to your computer, use the provided USB cable. Plug one end into the H6 and the other into your computer. Select “Audio Interface” mode on the H6 when prompted.
Can Zoom H6 Be Used With Any Daw?
Yes, the Zoom H6 is compatible with most DAWs. Simply connect it via USB and select it as your audio input device in your DAW settings.
What Settings Should I Choose On The Zoom H6?
Select “Audio Interface” mode when connecting to your computer. Choose “Stereo Mix” or “Multi Track” depending on your recording needs.
Does Zoom H6 Require Drivers For Use?
For Windows, you might need to download drivers from the Zoom website. Mac users typically do not need additional drivers.
Conclusion
The Zoom H6 makes audio recording easy and versatile. It serves as a reliable audio interface for various needs. Follow the steps outlined to connect and use it effectively. This ensures high-quality sound for your projects. Whether you are a podcaster, musician, or content creator, the Zoom H6 enhances your audio experience.

Practice and explore its features for better results. Soon, you will feel more comfortable and efficient with this device. Start now and see the difference it brings to your recordings. Happy recording!
{ “@context”: “https://schema.org”, “@type”: “FAQPage”, “mainEntity”: [ { “@type”: “Question”, “name”: “How do I connect Zoom H6 to my computer?”, “acceptedAnswer”: { “@type”: “Answer”, “text”: “To connect your Zoom H6 to your computer, use the provided USB cable. Plug one end into the H6 and the other into your computer. Select \”Audio Interface\” mode on the H6 when prompted.” } } , { “@type”: “Question”, “name”: “Can Zoom H6 be used with any DAW?”, “acceptedAnswer”: { “@type”: “Answer”, “text”: “Yes, the Zoom H6 is compatible with most DAWs. Simply connect it via USB and select it as your audio input device in your DAW settings.” } } , { “@type”: “Question”, “name”: “What settings should I choose on the Zoom H6?”, “acceptedAnswer”: { “@type”: “Answer”, “text”: “Select \”Audio Interface\” mode when connecting to your computer. Choose \”Stereo Mix\” or \”Multi Track\” depending on your recording needs.” } } , { “@type”: “Question”, “name”: “Does Zoom H6 require drivers for use?”, “acceptedAnswer”: { “@type”: “Answer”, “text”: “For Windows, you might need to download drivers from the Zoom website. Mac users typically do not need additional drivers.” } } ] }As an Amazon Associate, Cleanestor earns from qualifying purchases at no additional cost to you.