The notes on a violin are the building blocks of music. Understanding them is key for beginners.
A violin produces a wide range of notes that create beautiful melodies. Knowing these notes helps you play songs and improve your skills. The violin has four strings, each tuned to a specific note: G, D, A, and E. These strings are the foundation of your learning journey.
By pressing down on different spots along the strings, you can produce many other notes. This knowledge lets you play various tunes and harmonies. Whether you’re a beginner or looking to refine your skills, understanding the notes on a violin is essential for making lovely music.
Introduction To Violin Notes
The violin is a beautiful instrument. It produces enchanting sounds. To play the violin, you need to understand its notes. Violin notes are the foundation of playing melodies. In this post, we will explore the basics of violin notes. Let’s start with a brief history and understand their importance.
Brief History
The violin has a rich history. It dates back to the 16th century. The violin originated in Italy. Over time, it has evolved in design and sound. Early violins had gut strings. Today, synthetic and steel strings are common. Knowing its history helps appreciate the instrument.
Importance Of Notes
Understanding notes is crucial for violinists. Notes are the building blocks of music. Each note has a specific pitch. Violinists use these pitches to create melodies. Here are some key points about the importance of notes:
- Accuracy: Correct notes ensure the right melody.
- Expression: Notes help convey emotions.
- Technique: Knowing notes improves playing skills.
Let’s look at the basic notes on a violin. The four main strings are:
| String | Note |
|---|---|
| G | G3 |
| D | D4 |
| A | A4 |
| E | E5 |
These notes are the starting point. Violinists use these strings to play higher and lower notes. Understanding these basics is key to learning the violin.
Anatomy Of The Violin
The violin is a beautiful and complex instrument. Understanding its anatomy is crucial for any aspiring violinist. The violin has many parts, each playing a vital role in producing sound. Let’s explore the main components and their functions.
Parts Of The Violin
The violin consists of several key parts. These include the body, neck, fingerboard, and strings. Other parts are the bridge, tailpiece, and chin rest. Each part contributes to the violin’s sound and playability.
Role Of Each Part
The body of the violin amplifies the sound. It consists of the top plate, back plate, and ribs. The top plate is usually made of spruce, while the back plate and ribs are often made of maple.
The neck supports the fingerboard and strings. It is made of maple. The fingerboard is where the player presses the strings to change the pitch. It is typically made of ebony.
The strings are essential for producing sound. They are stretched over the fingerboard and bridge. The bridge transfers the vibrations to the body, which amplifies them.
The tailpiece anchors the strings at the bottom of the violin. The chin rest provides comfort and stability for the player.
Basic Violin Notes
Understanding the basic violin notes is essential for any beginner. These notes form the foundation of your musical journey. Learning the notes on the violin helps you play melodies, harmonies, and even create your own music.
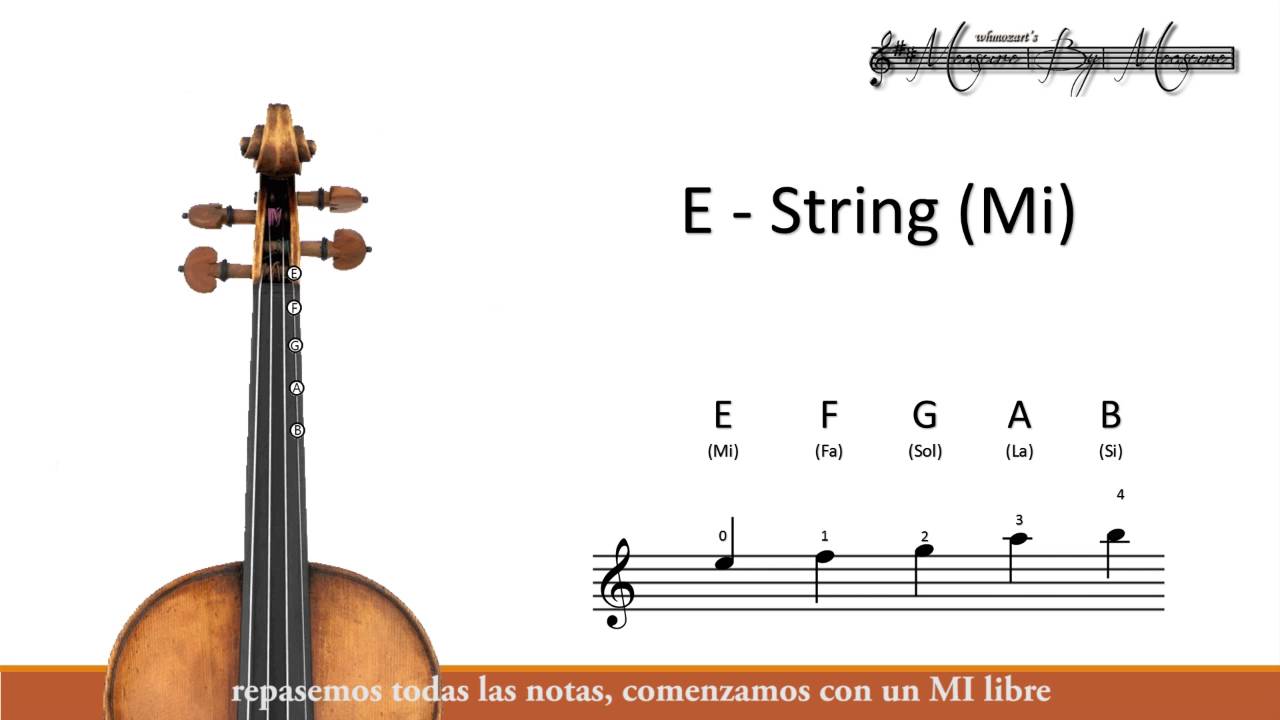
Open Strings
The violin has four open strings. These are the strings played without pressing down on the fingerboard. Here are the open strings:
- G – The thickest string, located closest to the violinist’s face.
- D – The next string, slightly thinner than G.
- A – The second thinnest string.
- E – The thinnest string, located farthest from the violinist’s face.
Practicing these open strings helps in understanding their unique sounds.
Natural Notes
Natural notes on the violin are played by pressing the fingerboard at specific positions. Here is a table showing the natural notes on each string:
| String | Natural Notes |
|---|---|
| G | G, A, B, C |
| D | D, E, F#, G |
| A | A, B, C#, D |
| E | E, F#, G#, A |
Use your index, middle, ring, and pinky fingers to play these notes. Start slowly and build your speed as you become more comfortable. Focus on each note’s pitch and tone.
Sharps And Flats
Understanding the notes on a violin can be challenging for beginners. Sharps and flats are important components of musical notation. They help in altering the pitch of the notes. Let’s dive into the world of sharps and flats.
Understanding Sharps
Sharps raise a note by a half step. This means the pitch becomes slightly higher. On the violin, you play a sharp note by moving your finger a bit closer to the bridge. For example, if you play an F note, moving your finger up slightly will produce an F sharp. Sharps are identified by the symbol “#”. Every natural note can have a sharp version, except E and B.
Understanding Flats
Flats lower a note by a half step. This means the pitch becomes slightly lower. On the violin, you play a flat note by moving your finger a bit closer to the scroll. For example, if you play a B note, moving your finger down slightly will produce a B flat. Flats are identified by the symbol “b”. Every natural note can have a flat version, except C and F.
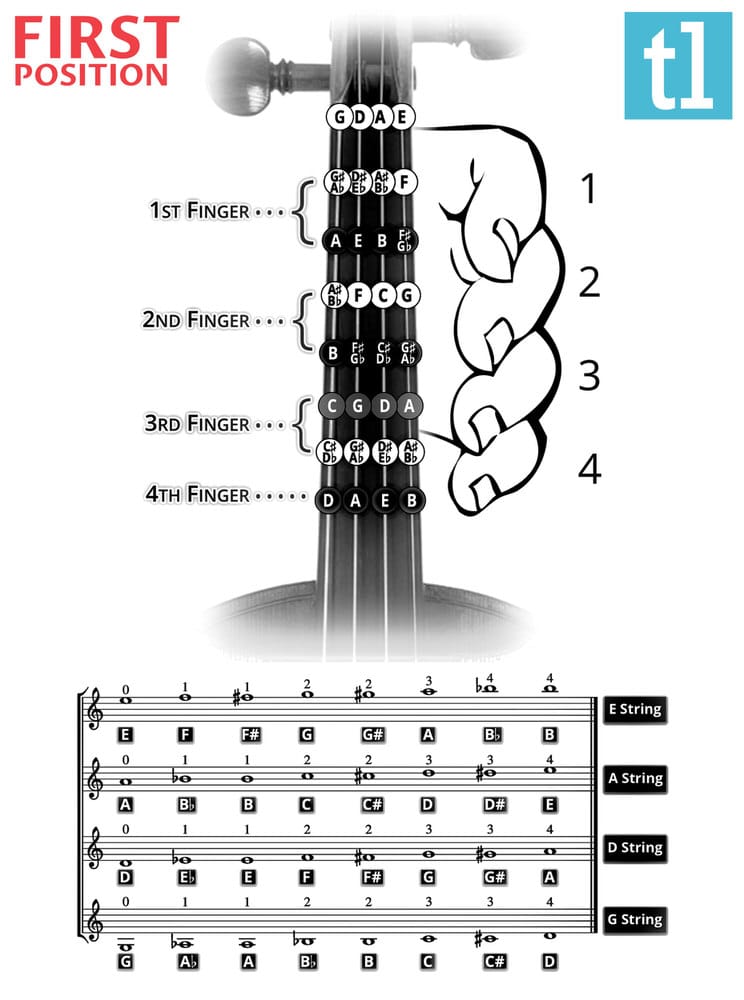
Finger Placement
Finger placement on the violin is crucial for producing the correct notes. Each finger must be placed precisely on the strings to create the desired pitch. This requires practice and an understanding of the different positions on the violin. Below, we explore two primary finger placements: First Position and Second Position.
First Position
First Position is the most basic and commonly used finger placement. It forms the foundation for beginners. Here, the fingers are placed close to the scroll. The first finger (index) is placed near the nut, and the other fingers follow in sequence.
In this position, each string has a specific note associated with each finger. For example, on the A string, the first finger plays B, the second plays C, the third plays D, and the fourth plays E. Mastering First Position is essential for playing simple melodies and scales.
Second Position
Second Position involves shifting the hand slightly up the fingerboard. This means the first finger moves to where the second finger was in First Position. This allows for a different range of notes and is useful for more advanced pieces.
In Second Position, the notes on each string change. For example, on the A string, the first finger now plays C, the second plays D, the third plays E, and the fourth plays F. Understanding this position expands the range and flexibility of playing different pieces.
Reading Violin Music
Reading violin music can seem challenging at first. But with practice, it gets easier. Understanding the basics is the key. Let’s explore staff notation and key signatures.
Staff Notation
Staff notation is the foundation of reading music. It consists of five lines and four spaces. Each line and space represents a different note. The notes on the lines from bottom to top are E, G, B, D, and F. The notes in the spaces from bottom to top are F, A, C, and E. Together, they form the musical alphabet.
Violin music often uses the treble clef. This clef tells you where G is on the staff. The G note is on the second line from the bottom. From G, you can find other notes. This system helps you understand the pitch of each note.
Key Signatures
Key signatures show the key of a piece of music. They appear right after the clef at the beginning of the staff. Key signatures tell you which notes are sharp or flat. This helps you play the correct notes throughout the piece.
There are major and minor key signatures. Each key signature has a unique set of sharps or flats. For example, G major has one sharp, F#. D major has two sharps, F# and C#. Knowing key signatures helps you play in tune and with the correct intonation.
Playing Techniques
Learning the notes on a violin is just the beginning. The way you play those notes can change the music. This is where playing techniques come into play. Different techniques can make your violin sing, dance, or cry. Two of the most common techniques are bow techniques and pizzicato.
Bow Techniques
The bow is essential for violin playing. It helps to produce a smooth sound. Here are some common bow techniques:
- Detache: Each note is played with a separate bow stroke.
- Legato: Multiple notes are played in one smooth bow stroke.
- Staccato: Short, sharp notes with space in between.
- Spiccato: The bow bounces lightly off the string.
Pizzicato
Pizzicato means plucking the strings with your finger. It creates a different sound than using the bow. Here are some types of pizzicato:
- Arco: Switching between bowing and plucking.
- Left-hand Pizzicato: Using the left hand to pluck the strings while fingering.
Both bow techniques and pizzicato add variety to your playing. They help you express different emotions through your music.
Credit: www.youtube.com
Advanced Violin Notes
Learning the advanced notes on a violin can take your playing to the next level. Once you master the basics, these advanced techniques can help you play more complex and beautiful music.
Third Position
The third position on a violin is an important step in advanced playing. Moving your hand up the neck of the violin changes the pitch of the notes you play.
In third position, you place your first finger where your third finger would go in the first position. This allows you to play higher notes with more ease. Here is a simple table showing finger placements:
| Finger | Note in First Position | Note in Third Position |
|---|---|---|
| 1st | B (A string) | D (A string) |
| 2nd | C (A string) | E (A string) |
| 3rd | D (A string) | F (A string) |
| 4th | E (A string) | G (A string) |
Harmonics
Harmonics are special notes that sound different from normal notes. They are produced by lightly touching the string at specific points.
These notes have a bell-like quality and can add a magical sound to your playing. There are two types of harmonics:
- Natural Harmonics: Produced by lightly touching open strings at specific points like halfway or a third of the way up the string.
- Artificial Harmonics: Created by pressing down one finger and lightly touching the string with another finger.
Here’s how to play a simple natural harmonic:
- Place your finger lightly on the D string, halfway between the nut and the bridge.
- Draw the bow smoothly across the string.
- You should hear a clear, ringing note.
Practicing these techniques will make you a more versatile violinist. Start slow, and gradually build your skills.
Practice Tips
Practicing the violin can be challenging but rewarding. Consistent and focused practice is key to mastering the notes on a violin. Here are some practice tips to help you improve your skills and make the most of your practice time.
Daily Exercises
Daily exercises are essential for any violinist. These exercises help build strength and improve technique. Here are some simple exercises to include in your daily practice routine:
- Scales: Play major and minor scales to enhance finger placement.
- Arpeggios: Practice arpeggios to improve your intonation and agility.
- Bowing Techniques: Focus on different bowing techniques like staccato and legato.
- Finger Exercises: Use finger exercises to strengthen your fingers and improve speed.
Commit to at least 15 minutes of these exercises daily. Consistency is crucial for progress.
Common Mistakes To Avoid
Many beginners make mistakes that hinder their progress. Here are some common mistakes to avoid:
| Mistake | Description |
|---|---|
| Improper Posture | Sit or stand with a straight back. Avoid slouching. |
| Incorrect Finger Placement | Ensure fingers are placed correctly on the fingerboard. |
| Ignoring Tuning | Always check and tune your violin before playing. |
| Skipping Warm-ups | Warm-up your hands and fingers before starting practice. |
| Rushing Through Pieces | Play slowly to maintain accuracy and improve gradually. |
By avoiding these mistakes, you can ensure steady progress and develop better playing habits.
Remember, practice makes perfect. Stay focused, be patient, and enjoy the process of learning and improving your violin skills.
Credit: teds-list.com
Frequently Asked Questions
What Are The Open Strings On A Violin?
The open strings on a violin are G, D, A, and E. These are tuned from lowest to highest pitch.
How Many Notes Are On A Violin?
A violin typically has 24 notes. These range from the open G string to the highest note on the E string.
What Is The Highest Note On A Violin?
The highest note on a violin is typically an E7. This note is found on the E string.
How Do You Memorize Violin Notes?
Memorize violin notes by practicing scales and using visual aids. Consistent practice helps in faster memorization.
Conclusion
Understanding the notes on a violin is essential for every player. It helps create beautiful music. Practice regularly to master the basics. Use this knowledge to improve your skills. Remember, patience and consistency are key. Enjoy the journey of learning and playing the violin.

Keep exploring and discovering new notes. Happy playing!
As an Amazon Associate, Cleanestor earns from qualifying purchases at no additional cost to you.