MIDI stands for Musical Instrument Digital Interface. In FL Studio, MIDI is crucial for music production.
It allows digital instruments and devices to communicate. FL Studio users often leverage MIDI to create, edit, and arrange music. This powerful tool helps in controlling software instruments and effects. It captures musical performances and translates them into digital data.
This data can then be edited to perfection. Musicians and producers enjoy the flexibility and precision MIDI offers. It enables intricate compositions without the need for live recordings. Whether you’re tweaking notes or adding layers, MIDI in FL Studio offers endless creative possibilities. Understanding MIDI can significantly enhance your music production skills. Dive in and discover how MIDI can transform your musical ideas into reality.
Credit: musictech.com
Introduction To Midi
MIDI in FL Studio allows musicians to control virtual instruments and record musical performances. This digital protocol helps create, edit, and produce music efficiently.
MIDI stands for Musical Instrument Digital Interface. It is a protocol that allows electronic instruments and computers to communicate. MIDI does not create sound itself. It sends data to control sound-producing devices.
Midi Basics
MIDI messages are packets of information. They tell a device what notes to play. They also include how loud to play them. MIDI can also control other elements like pitch and modulation. These messages are precise and allow detailed control.
In FL Studio, MIDI is crucial. It helps create complex music patterns. Users can edit MIDI data easily. This makes FL Studio a powerful tool for music production.
Importance Of Midi In Music Production
MIDI simplifies the music creation process. You can change instruments without re-recording. It allows for quick edits and adjustments. This flexibility saves time and effort.
MIDI also enables creativity. It allows you to experiment with different sounds. You can try new ideas without limitations. This makes it easier to produce unique music.
FL Studio makes MIDI accessible. Its user-friendly interface helps beginners. Experienced producers also find it useful. MIDI in FL Studio bridges the gap between ideas and final products.
“`
Midi In Fl Studio
MIDI in FL Studio is a crucial aspect of music production. MIDI stands for Musical Instrument Digital Interface. It allows electronic musical instruments to communicate with computers and other devices. FL Studio, a popular digital audio workstation (DAW), offers robust MIDI capabilities. These features enable users to create, edit, and perform music with ease.
Fl Studio Midi Features
FL Studio boasts a wide range of MIDI features. Users can easily connect MIDI controllers and instruments. This connectivity ensures seamless music production.
Some key features include:
- MIDI Mapping: Assign MIDI controllers to FL Studio functions.
- MIDI Channels: Use multiple channels for different instruments.
- MIDI Automation: Automate parameters for dynamic changes.
- MIDI Clock Sync: Synchronize FL Studio with external hardware.
- MIDI Recording: Record MIDI data for precise editing.
Midi Compatibility
MIDI compatibility in FL Studio ensures users can work with various devices. It supports a wide range of MIDI controllers and keyboards. This flexibility allows for a customized setup.
Here is a table showcasing some common MIDI devices compatible with FL Studio:
| Device Type | Example Models |
|---|---|
| MIDI Keyboards | Akai MPK Mini, Novation Launchkey |
| MIDI Controllers | Akai APC40, Novation Launchpad |
| MIDI Drum Pads | Akai MPD218, Korg padKONTROL |
| MIDI Guitars | Jamstik Studio, Fishman TriplePlay |
FL Studio’s compatibility extends to virtual instruments and software plugins. Users can integrate VSTs, AUs, and other formats. This integration enables a comprehensive music production experience.
Setting Up Midi
Setting up MIDI in FL Studio can greatly enhance your music production workflow. MIDI, short for Musical Instrument Digital Interface, allows you to control virtual instruments and hardware devices seamlessly. Let’s dive into how you can set up MIDI in FL Studio to take your music production to the next level.
Connecting Midi Devices
First, connect your MIDI device to your computer. Use a USB cable or a MIDI interface for this connection. Ensure that the device is powered on and ready to use.
Here’s a step-by-step guide to connect your MIDI device:
- Plug the MIDI device into your computer using the appropriate cable.
- Turn on the MIDI device.
- Wait for your computer to recognize the device.
After connecting, your MIDI device should be ready to configure in FL Studio.
Configuring Midi Settings
Open FL Studio and go to Options > MIDI Settings. This window allows you to configure your MIDI device.
Here’s a simple table to understand the MIDI settings:
| Setting | Description |
|---|---|
| Input | Select your MIDI device from the list. |
| Output | Choose the MIDI output device if needed. |
| Controller Type | Specify the type of MIDI controller you are using. |
Make sure to enable your MIDI device by clicking the Enable button next to its name. This will allow FL Studio to receive MIDI signals from your device.
Adjust other settings as needed, such as MIDI clock sync, to ensure everything runs smoothly. Once done, your MIDI device is set up and ready to use in FL Studio.
Credit: www.youtube.com
Midi Controllers
MIDI Controllers are essential tools for modern music production. They allow musicians to interact with their digital audio workstations (DAWs) more intuitively. In FL Studio, MIDI controllers can help create, mix, and edit music more efficiently. These devices come in various forms, each catering to different needs and preferences.
Types Of Midi Controllers
MIDI controllers vary in size, functionality, and design. Here are some common types:
- Keyboard Controllers: These resemble traditional keyboards. They often have additional controls like knobs and sliders.
- Drum Pads: These are great for creating beats. They have pressure-sensitive pads.
- Control Surfaces: These offer multiple faders, knobs, and buttons. They are ideal for mixing tracks.
- Wind Controllers: Designed for wind instrument players. They mimic the feel of traditional wind instruments.
- Guitar MIDI Controllers: Allow guitarists to control MIDI data. They look and feel like regular guitars.
Integrating Controllers With Fl Studio
Integrating a MIDI controller with FL Studio is straightforward. Follow these steps:
- Connect your MIDI controller to your computer using a USB cable.
- Open FL Studio and go to Options > MIDI Settings.
- In the MIDI Settings window, find your controller under Input and enable it.
- Set the controller type if it is listed. Otherwise, leave it as Generic Controller.
- Click Enable to start using your controller with FL Studio.
You can now use your controller to play instruments, control parameters, and navigate your projects. Experiment with different settings to find what works best for your workflow.
| Controller Type | Best For |
|---|---|
| Keyboard Controllers | Melody creation, chord progressions |
| Drum Pads | Beat making, percussion |
| Control Surfaces | Mixing, automation |
| Wind Controllers | Wind instrument emulation |
| Guitar MIDI Controllers | Guitar-based MIDI control |
Midi Recording
MIDI Recording in FL Studio is a powerful feature for music producers. It allows you to capture performances and ideas using MIDI controllers. This process involves playing notes and recording them as MIDI data. MIDI data is essential for creating and editing music in a digital format.
Recording Midi Data
To start recording MIDI data in FL Studio, connect your MIDI controller. Ensure your controller is recognized by the software. Then, select a channel or instrument in the Channel Rack. Click on the record button in the transport panel.
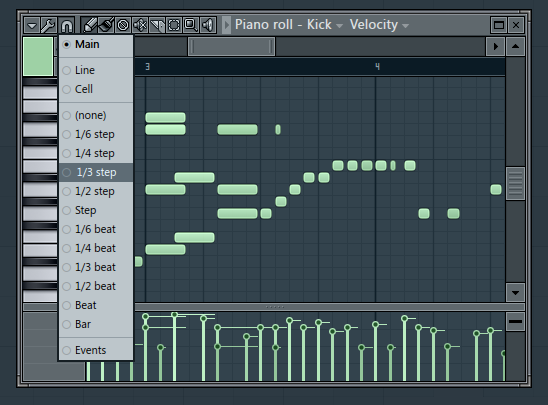
Play the notes on your MIDI controller. FL Studio will capture the performance in real time. You can see the recorded notes in the Piano Roll. This is where your MIDI data is stored. Each note you play is represented as a block in the Piano Roll.
After recording, you can play back the MIDI data. Make sure everything sounds as expected. If necessary, you can re-record or adjust the notes to improve your performance.
Editing Midi Recordings
Editing MIDI recordings in FL Studio is straightforward. Open the Piano Roll to view your MIDI data. Here, you can edit each note individually. Drag notes to change their pitch or length. You can also add new notes or delete unwanted ones.
Use the quantize feature to correct timing issues. Quantizing aligns notes to the nearest beat or grid line. This ensures your performance is rhythmically accurate. You can also adjust the velocity of each note. Velocity controls the volume and intensity of the notes.
Use the Piano Roll tools to enhance your MIDI recordings. The paint tool allows you to draw notes quickly. The slice tool lets you cut notes into smaller pieces. Experiment with these tools to create complex and dynamic MIDI sequences.
Midi Patterns
MIDI Patterns in FL Studio are essential for music production. They help create and arrange music ideas quickly. MIDI stands for Musical Instrument Digital Interface. It allows electronic musical instruments to communicate. In FL Studio, MIDI patterns control virtual instruments. They can trigger sounds, notes, and effects. MIDI patterns are versatile. They can be edited, looped, and arranged. This makes them perfect for creating complex music projects.
Creating Midi Patterns
Creating MIDI patterns in FL Studio is simple. First, open the Piano Roll. This is where you draw your notes. Select a virtual instrument. Then, click on the grid to place notes. You can adjust the length and pitch of each note. Use tools like the Brush or Pencil for quick note placement. The Piano Roll has many features. You can copy, paste, and move notes. This makes it easy to experiment with different ideas.
Quantize your notes for perfect timing. This ensures all notes play in sync. Use the Snap to Grid feature. It aligns your notes to the nearest beat. This creates a tight and professional sound. Add dynamics to your patterns. Change the velocity of each note. This affects how loud or soft the note plays. Experiment with different patterns. Create a unique rhythm and melody. Save your patterns for future use. This makes your workflow efficient and organized.
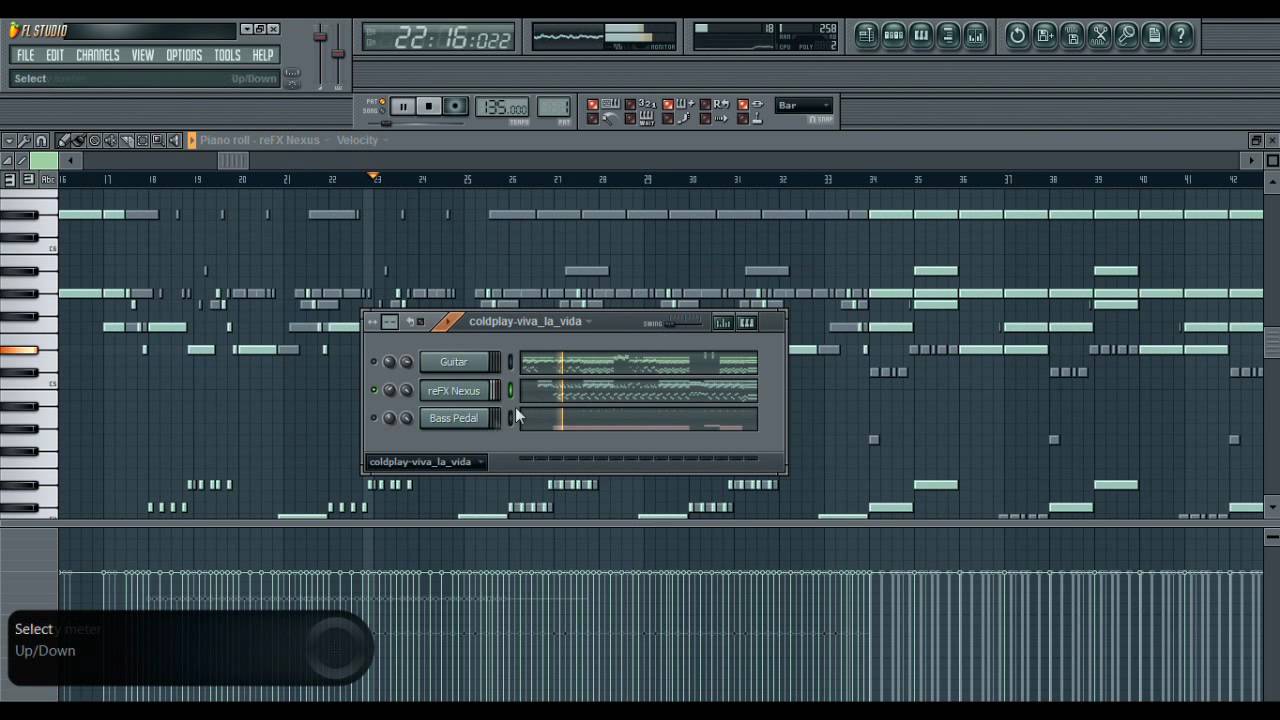
Using Patterns In Projects
Patterns are the building blocks of your project. Arrange them in the Playlist window. This is where you build your song structure. Drag and drop patterns to create verses, choruses, and bridges. You can loop patterns for repetition. This helps create a consistent rhythm. Add variety by using different patterns. This keeps your music interesting.
You can also layer patterns. Combine multiple patterns to create a full sound. For example, layer a drum pattern with a bass pattern. This creates a rich and dynamic track. Use automation to change pattern parameters over time. This adds movement and interest to your project. Save your project regularly. This ensures you don’t lose your work. Export your project to share with others. FL Studio supports various formats like MP3 and WAV.
Midi Effects
MIDI Effects in FL Studio open up a world of creative possibilities. These effects let you manipulate MIDI data to enhance your musical ideas. They can transform simple melodies into complex compositions.
Applying Midi Effects
Applying MIDI effects in FL Studio is straightforward. First, load a MIDI instrument in the channel rack. Then, navigate to the mixer and select the channel with your MIDI instrument. Add a MIDI effect plugin from the available options. Adjust the settings to fit your needs. You can experiment with different effects to find the perfect sound.
Common Midi Plugins
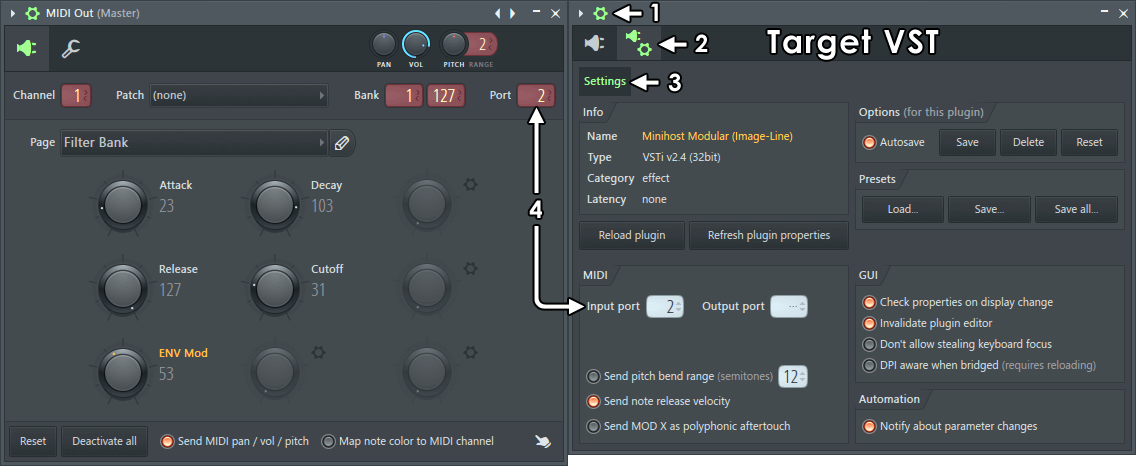
Several MIDI plugins are popular in FL Studio. One common plugin is the Arpeggiator. It helps to create rhythmic patterns from simple chords. Another useful plugin is the MIDI Out. It sends MIDI data to external hardware or other software. The MIDI Velocity plugin adjusts the volume dynamics of your notes. The MIDI Delay plugin adds echoes to your MIDI signals, creating a layered sound.
Each of these plugins offers unique features. Try them out to see how they can enhance your music production. With practice, you can master MIDI effects and create stunning musical pieces.
Advanced Midi Techniques
Advanced MIDI Techniques can elevate your music production in FL Studio. Knowing these techniques can help you create more dynamic and expressive tracks. Let’s dive into some of these advanced methods.
Midi Automation
MIDI Automation allows you to control parameters automatically over time. This means you can change volume, panning, and effects without manual intervention. Here’s how you can use it:
- Open the Automation Clip in the Playlist.
- Select the parameter you want to automate.
- Draw the automation curve to define changes.
You can create smooth transitions or sudden changes. This adds depth and interest to your tracks. Use it for filter sweeps, volume fades, or any other parameter.
Midi Mapping
MIDI Mapping links your MIDI controller to FL Studio controls. This makes it easier to perform live or adjust parameters quickly. Follow these steps:
- Connect your MIDI controller to your computer.
- Open Options and select MIDI Settings.
- Choose your controller from the Input list.
- Right-click on a control in FL Studio and select Link to controller.
- Move the control on your MIDI device to link it.
Now, your MIDI controller can manage FL Studio’s parameters. This is helpful for live performances or recording sessions. It brings a hands-on feel to your production process.
Troubleshooting Midi Issues
Dealing with MIDI issues in FL Studio can be frustrating. Whether it’s your MIDI controller not responding or notes not playing correctly, these problems can disrupt your creative flow. Understanding common MIDI issues and how to fix them is crucial for a smooth music production experience.
Common Problems
MIDI controller not connecting: Sometimes your MIDI device won’t connect to FL Studio. This can happen due to driver issues or incorrect settings.
Latency problems: High latency makes it hard to play in time with your project. It can ruin your recording sessions.
Stuck notes: Notes may sometimes get stuck and keep playing even after you release the key. This can be very annoying during recording.
Incorrect mapping: Your controller buttons or knobs may not work as intended. This usually happens due to incorrect mapping settings.
Solutions And Tips
Check connections: Ensure your MIDI controller is properly connected. Use a different USB port if needed.
Update drivers: Make sure your MIDI controller’s drivers are up to date. Visit the manufacturer’s website for the latest drivers.
Adjust latency settings: Go to Options > Audio Settings. Lower the buffer length to reduce latency.
Reset MIDI: In FL Studio, go to Options > MIDI Settings. Click on the “Reset” button to refresh the MIDI connection.
Remap controls: Use the “Link to controller” feature to correctly map your controller’s buttons and knobs. This ensures they work as expected.
Check power supply: Ensure your MIDI controller is getting enough power. Some controllers may require an external power source.
Use MIDI monitor: Utilize the MIDI monitor in FL Studio to check if your controller is sending the correct signals.
Credit: www.image-line.com
Frequently Asked Questions
What Is Midi In Fl Studio?
MIDI in FL Studio is a digital protocol that allows communication between instruments and software. It controls virtual instruments, records musical performances, and triggers sounds.
How Do I Use Midi In Fl Studio?
To use MIDI in FL Studio, connect your MIDI device, configure settings, and use the piano roll for composing. MIDI files can be imported and edited.
Why Is Midi Important In Music Production?
MIDI is important because it allows precise control over virtual instruments, easy editing, and efficient workflow in music production. It also enables complex arrangements.
Can I Edit Midi Files In Fl Studio?
Yes, you can edit MIDI files in FL Studio using the piano roll. You can adjust notes, velocities, and other parameters.
Conclusion
Midi in FL Studio is essential for music production. It allows easy control of instruments. You can create unique sounds with simple steps. Midi helps streamline the workflow. Experimenting with Midi can enhance your creativity. Beginners can quickly grasp its basics.
FL Studio’s interface makes using Midi straightforward. Dive into Midi to elevate your music projects. Explore, create, and enjoy the process.

As an Amazon Associate, Cleanestor earns from qualifying purchases at no additional cost to you.