A notch filter in Audacity is a powerful audio tool. It helps remove specific frequencies from your audio tracks.
This can be useful for eliminating unwanted noise or hums. Audacity is a popular, free audio editing software. Many users love its features, including the notch filter. This filter is great for cleaning up recordings. It targets and reduces specific frequencies without affecting the rest of the audio.
Whether you’re a podcaster, musician, or hobbyist, understanding the notch filter can improve your audio quality. In this post, we’ll explore what a notch filter is, how it works in Audacity, and why it’s useful. Ready to make your audio sound better? Let’s dive in!

Credit: www.youtube.com
Introduction To Notch Filters
Understanding audio effects can be challenging. One important tool is the notch filter. In Audacity, a notch filter helps remove unwanted frequencies from your audio. This is crucial for creating clear and professional sound.
Purpose Of Notch Filters
A notch filter targets and removes specific frequencies. These frequencies often cause problems in recordings. For example, a common issue is hum from electrical devices. The notch filter can eliminate this noise without affecting other parts of the audio.
Notch filters are precise. They cut a narrow band of frequencies. This makes them different from other filters that affect a wider range of frequencies. The goal is to keep the audio quality high.
Common Applications
Notch filters are used in various scenarios:
- Removing electrical hum: Commonly at 50 Hz or 60 Hz.
- Eliminating feedback: Useful in live sound settings.
- Clearing up recordings: Removing specific noises.
These filters are essential in audio production. They help in delivering clear and professional sound. Whether you are recording a podcast or cleaning up a live performance, notch filters are very useful.
Credit: forum.audacityteam.org
Basics Of Audio Filtering
Audio filtering is a key part of sound editing. It helps improve audio quality. Filters remove unwanted sounds. They also enhance important parts of the audio. Understanding the basics of audio filtering is crucial. Especially for those new to sound editing.
Types Of Filters
There are various types of audio filters. Each serves a different purpose. One common type is the low-pass filter. It lets low frequencies pass through. It blocks high frequencies.
Another type is the high-pass filter. It does the opposite. It allows high frequencies to pass. It blocks low frequencies. A band-pass filter is another type. It allows a specific range of frequencies to pass. It blocks frequencies outside this range.
The notch filter is also important. It targets a narrow frequency band. It removes unwanted frequencies. While leaving other frequencies unchanged. This is useful in many audio projects.
Importance In Audio Processing
Audio filters are vital in audio processing. They help clean up recordings. Removing unwanted noise is essential. It makes the audio clearer and more professional.
Notch filters are especially useful. They remove specific problem frequencies. This is helpful in live recordings. Where background noise can be an issue. Notch filters can also correct feedback problems.
Using filters correctly improves the overall sound. It makes listening more enjoyable. It also helps in making professional-quality recordings. Understanding and using filters is key. It enhances the final audio product.
How Notch Filters Work
A notch filter in Audacity is a powerful tool for audio editing. It helps to remove specific frequencies from your audio track. This filter is useful for eliminating unwanted noise or hums without affecting the rest of the audio.
Frequency Rejection
The primary function of a notch filter is to target and reject a specific frequency. This frequency is often referred to as the “notch frequency.” By removing this frequency, you can improve the overall quality of your audio.
Here are the key points about frequency rejection:
- The notch filter targets a single frequency.
- It reduces or eliminates this frequency.
- The rest of the audio remains mostly unaffected.
Imagine you have a recording with a persistent hum at 60 Hz. You set the notch filter to 60 Hz. The filter will then remove this hum, leaving the rest of your recording intact.
Technical Specifications
Understanding the technical specifications of a notch filter can help you use it effectively. Here are some important terms and their meanings:
| Term | Definition |
|---|---|
| Notch Frequency | The specific frequency that the filter targets and removes. |
| Bandwidth | The range of frequencies around the notch frequency that the filter affects. |
| Q Factor | A measure of how narrow or broad the notch is. A higher Q factor means a narrower notch. |
For example, a high Q factor would target a very narrow band of frequencies. This is useful for removing a specific hum without affecting nearby frequencies. A lower Q factor would affect a broader range of frequencies.
In Audacity, you can set these parameters manually. Adjust the notch frequency, bandwidth, and Q factor to suit your needs. This flexibility makes the notch filter a versatile tool for audio editing.
Using Notch Filters In Audacity
Using a Notch Filter in Audacity can help you remove unwanted frequencies from your audio. This is particularly useful if you have persistent noise or hum at a specific frequency. By applying a notch filter, you can clean up your audio and improve its overall quality. Let’s dive into how you can use this tool in Audacity.
Accessing The Tool
First, you need to locate the notch filter tool within Audacity. Here’s how:
- Open Audacity and load your audio file.
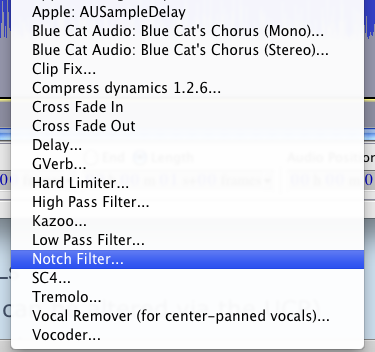
- Click on the Effect menu at the top.
- Scroll down and select Notch Filter.
Step-by-step Guide
Follow these steps to apply a notch filter to your audio:
- Select the Part: Highlight the section of your audio where you want to apply the filter.
- Open Notch Filter: Go to Effect > Notch Filter.
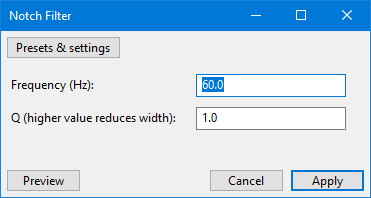
- Adjust Settings: Set the frequency and Q factor. The frequency is the specific tone you want to remove. The Q factor determines the bandwidth of the frequencies affected.
- Preview: Click on the Preview button to listen to a sample of the filtered audio.
- Apply: If you are satisfied with the preview, click OK to apply the notch filter.
Using a notch filter in Audacity is a straightforward process. It can make a significant difference in the quality of your audio. By following these steps, you can effectively remove unwanted frequencies and achieve a cleaner sound.
Practical Examples
Audacity is a popular audio editing software. One of its useful tools is the notch filter. This tool helps to remove specific frequencies from audio recordings. Let’s explore practical examples of using the notch filter in Audacity.
Removing Hum
Electrical hum can ruin a good recording. This hum often occurs at 50 Hz or 60 Hz. With the notch filter, you can target and remove this hum. First, identify the hum frequency. Then, apply the notch filter at that frequency. This will help clean up the audio, making it clearer and more pleasant to listen to.
Eliminating Specific Frequencies
Sometimes, a recording might have unwanted noise at specific frequencies. These could be background noises, like a fan or air conditioner. Use the notch filter to remove these frequencies. Identify the noise frequency first. Then, apply the notch filter to that frequency. This will help isolate and remove the unwanted noise. The result is a cleaner and more professional audio recording.
Advanced Tips
Looking to dive deeper into the Notch Filter in Audacity? These advanced tips can help you make the most out of this powerful tool. Learn how to customize settings for precise control. Combine the Notch Filter with other filters for enhanced audio quality. These techniques can elevate your audio editing skills.
Customizing Settings
Fine-tuning the Notch Filter settings can yield better results. Start by adjusting the frequency. This targets the specific noise you want to eliminate. Set the frequency just above the unwanted sound. Next, tweak the Q factor. A higher Q factor narrows the filter’s range. This is useful for isolating very specific frequencies.
Don’t forget the gain. Reducing the gain lowers the targeted frequency’s volume. Be careful not to overdo it. Too much reduction can affect the audio quality. Experiment with these settings. Listen to the changes. Find the perfect balance for your audio project.
Combining With Other Filters
The Notch Filter works well with other Audacity filters. Try combining it with the High-Pass Filter. This removes low-frequency noise. Use the Low-Pass Filter to eliminate high-frequency disturbances.
Another great combination is with the Equalization Filter. This allows for more detailed adjustments. You can boost or reduce specific frequencies. This combination gives you more control over the audio. Experiment with different combinations. Test your results. Find the best setup for your needs.
Benefits Of Using Notch Filters
Notch filters in Audacity offer several benefits that can greatly enhance your audio editing process. They are designed to eliminate specific frequencies, allowing you to clean up your audio tracks effectively. Let’s explore the key advantages of using notch filters.
Enhanced Audio Quality
Notch filters improve the clarity of your audio. They remove unwanted noise, such as hums or buzzes. This makes your recordings sound cleaner and more professional. With fewer distractions, listeners can focus on the main content.
Precision In Editing
Notch filters allow precise frequency targeting. You can isolate and remove specific sounds without affecting the rest of the track. This precision is ideal for removing feedback or electrical interference. It helps in maintaining the integrity of the original recording.
Common Challenges
Using a notch filter in Audacity can improve audio quality. Yet, it can present some common challenges. These challenges can affect your workflow and final output. Understanding them will help you use the filter effectively.
Potential Issues
The first issue is finding the right frequency to target. This can be difficult, especially for beginners. Another problem is overusing the filter. This can make the audio sound unnatural. You may also experience a loss of some important frequencies. This can affect the overall quality of your recording.
Troubleshooting Tips
First, use a spectrum analyzer. This tool helps identify the unwanted frequency. Second, apply the filter in small amounts. This prevents the audio from sounding hollow. Third, check the audio regularly. Make sure you are not removing important frequencies. Lastly, save a backup of your original file. This allows you to revert to the original if needed.
Credit: manual.audacityteam.org
Frequently Asked Questions
What Is A Notch Filter In Audacity?
A notch filter in Audacity removes specific frequency ranges from audio. It’s useful for eliminating unwanted sounds like hums or buzzes.
How Do I Use A Notch Filter In Audacity?
To use a notch filter, select your audio track, then navigate to “Effect” > “Notch Filter. ” Adjust the frequency settings and apply.
Why Use A Notch Filter In Audio Editing?
A notch filter is used to remove specific, unwanted frequencies. It’s ideal for cleaning up audio recordings.
Can A Notch Filter Remove Background Noise?
A notch filter can remove certain background noises. It’s effective for constant, narrowband noise like electrical hums.
Conclusion
Understanding the notch filter in Audacity is essential for clear audio. This tool helps you remove unwanted frequencies. It’s great for eliminating hums or specific noises. Easy to use, it improves your sound quality. Regular practice will make you comfortable with it.

Experiment with different settings for best results. Keep refining your skills. Your audio projects will sound much better. Happy editing with Audacity!
{ “@context”: “https://schema.org”, “@type”: “FAQPage”, “mainEntity”: [ { “@type”: “Question”, “name”: “What is a notch filter in Audacity?”, “acceptedAnswer”: { “@type”: “Answer”, “text”: “A notch filter in Audacity removes specific frequency ranges from audio. It’s useful for eliminating unwanted sounds like hums or buzzes.” } } , { “@type”: “Question”, “name”: “How do I use a notch filter in Audacity?”, “acceptedAnswer”: { “@type”: “Answer”, “text”: “To use a notch filter, select your audio track, then navigate to \”Effect\” > \”Notch Filter.\” Adjust the frequency settings and apply.” } } , { “@type”: “Question”, “name”: “Why use a notch filter in audio editing?”, “acceptedAnswer”: { “@type”: “Answer”, “text”: “A notch filter is used to remove specific, unwanted frequencies. It’s ideal for cleaning up audio recordings.” } } , { “@type”: “Question”, “name”: “Can a notch filter remove background noise?”, “acceptedAnswer”: { “@type”: “Answer”, “text”: “A notch filter can remove certain background noises. It’s effective for constant, narrowband noise like electrical hums.” } } ] }As an Amazon Associate, Cleanestor earns from qualifying purchases at no additional cost to you.