Patcher in FL Studio is a powerful tool. It allows users to create complex chains of plugins.
FL Studio, a popular digital audio workstation, offers many features to enhance music production. One such feature is Patcher. Patcher provides a visual way to connect different plugins and effects. This helps in creating unique sounds and workflows. Musicians and producers can easily manage their plugin chains with Patcher.
It simplifies the process of routing audio and MIDI signals. With Patcher, you can experiment and innovate without limitations. Understanding Patcher can greatly improve your music production skills. So, let’s dive into what makes Patcher in FL Studio so essential.
Introduction To Patcher
Patcher in FL Studio allows users to create complex chains of effects and instruments. It helps in organizing and simplifying workflows. Ideal for sound design and music production.
FL Studio users often seek tools to enhance their creativity. One powerful tool is Patcher. It can transform your workflow and music production process. Patcher allows you to connect multiple plugins and effects. This gives you great flexibility in creating complex sounds.What Is Patcher?
Patcher is a modular environment within FL Studio. It enables the user to create complex plugin chains. You can route audio and control signals in many ways. This helps to design intricate setups that would be hard otherwise. It can host both instruments and effects.Why Use Patcher?
Patcher saves time and simplifies complex tasks. You can reuse your favorite chains in different projects. This boosts productivity and ensures consistency. Patcher also reduces CPU load. It processes multiple plugins within a single instance. This improves performance, especially on large projects. Patcher also supports visual programming. You can see the flow of audio and control signals. This makes it easier to troubleshoot and refine your setup. It is a valuable tool for both beginners and advanced users. Using Patcher, you can push the boundaries of your creativity. “`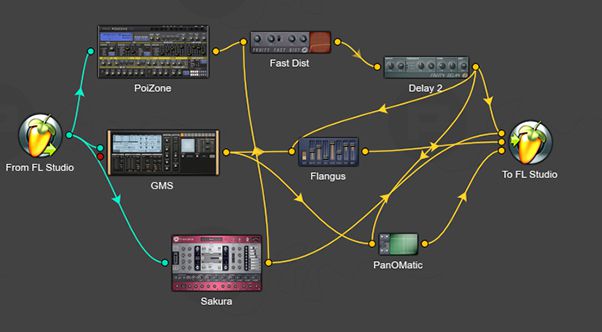
Credit: www.macprovideo.com
Setting Up Patcher
Patcher is a powerful tool in FL Studio. It helps in creating complex chains of effects and instruments. This guide will show you how to set up Patcher quickly and easily.
Accessing Patcher
To start, open FL Studio. Click on the ‘Add’ menu at the top. Select ‘Patcher’ from the list. This action will open the Patcher window on your screen. You can also access Patcher by pressing the F8 key. This is a quicker way to open it.
Basic Interface Overview
The Patcher interface might look complex at first. But it is quite simple once you get used to it. The main window has three parts. The top section is the Toolbar. Here you will find options like ‘Add Plugin’, ‘Save’, and ‘Load’. The middle section is the main workspace. This is where you add and connect plugins. The bottom section is the Properties panel. It shows the settings for the selected plugin.
To add a plugin, right-click on the workspace. Choose ‘Add Plugin’ from the menu. Select the plugin you need. It will appear in the workspace as a colored box. You can drag it around and connect it to other plugins. These connections create the signal flow for your audio.
Understanding this interface is key to using Patcher effectively. Spend some time exploring and experimenting. You will soon feel comfortable with it.
Creating Patcher Presets
Creating Patcher presets in FL Studio can elevate your music production. It allows you to save complex chains of effects and instruments. With these presets, you can streamline your workflow.
Building A Simple Preset
To start, open Patcher and add an instrument or effect. Connect the nodes by dragging lines between them. Experiment with different combinations. Adjust the parameters to your liking.
You can also add control surfaces. Use them to change multiple parameters at once. This makes your preset more dynamic and versatile.
Saving And Loading Presets
Once you have your preset, save it for future use. Click the disk icon in Patcher. Choose a name and location for your preset. This way, you can easily access it later.
To load a saved preset, open Patcher again. Click the folder icon and browse to your preset. Select it and your setup will be ready. This saves time and keeps your projects consistent.
Using Patcher With Effects
Patcher is a powerful tool in FL Studio, allowing you to create complex effect chains. This tool helps you manage multiple effects and instruments in one place. Whether you want to experiment with sound or streamline your workflow, Patcher can help you achieve your goals.
Connecting Effects
To start using Patcher with effects, first, open Patcher from the plugin menu. Once Patcher is open, you can begin adding effects. Click the ‘+’ button to add a new effect. You will see a list of all available effects. Select the one you want to use.
After adding the effect, you need to connect it. Drag a line from the ‘Output’ node of your instrument to the ‘Input’ node of the effect. This connection allows the audio signal to pass through the effect.
Chaining Multiple Effects
Patcher allows you to chain multiple effects in a single instance. To do this, add another effect by clicking the ‘+’ button again. Connect the ‘Output’ of the first effect to the ‘Input’ of the second effect.
Repeat this process to add more effects to your chain. Each effect will process the audio signal in the order you connect them. This chaining method allows you to create complex soundscapes.
For example, you can connect a reverb effect to a delay effect. The audio signal will first go through the reverb, then pass to the delay. This setup can produce unique and interesting sounds.
| Effect | Order |
|---|---|
| Reverb | 1 |
| Delay | 2 |
Experiment with different combinations to find the perfect sound for your project. Patcher gives you the flexibility to try new things without cluttering your workspace.
Using Patcher With Instruments
Patcher in FL Studio is a powerful tool. It allows users to create complex instrument setups. This tool can combine several plugins into one. This blog section will explain how to use Patcher with instruments. We will cover loading instruments and layering sounds.
Loading Instruments
Loading instruments in Patcher is simple. First, open Patcher in FL Studio. Next, right-click on the Patcher interface. Choose “Add plugin” from the menu. Select the instrument you want to load. The plugin will appear in the Patcher window.
You can load multiple instruments in Patcher. Just repeat the steps above. This allows you to create unique sound combinations. Each instrument can be connected in various ways. Experiment with different setups for unique sounds.
Below is a table showing common instruments you can load in Patcher:
| Instrument | Use |
|---|---|
| Synthesizer | Create electronic sounds |
| Sampler | Play recorded sounds |
| Drum Machine | Create drum patterns |
Layering Sounds
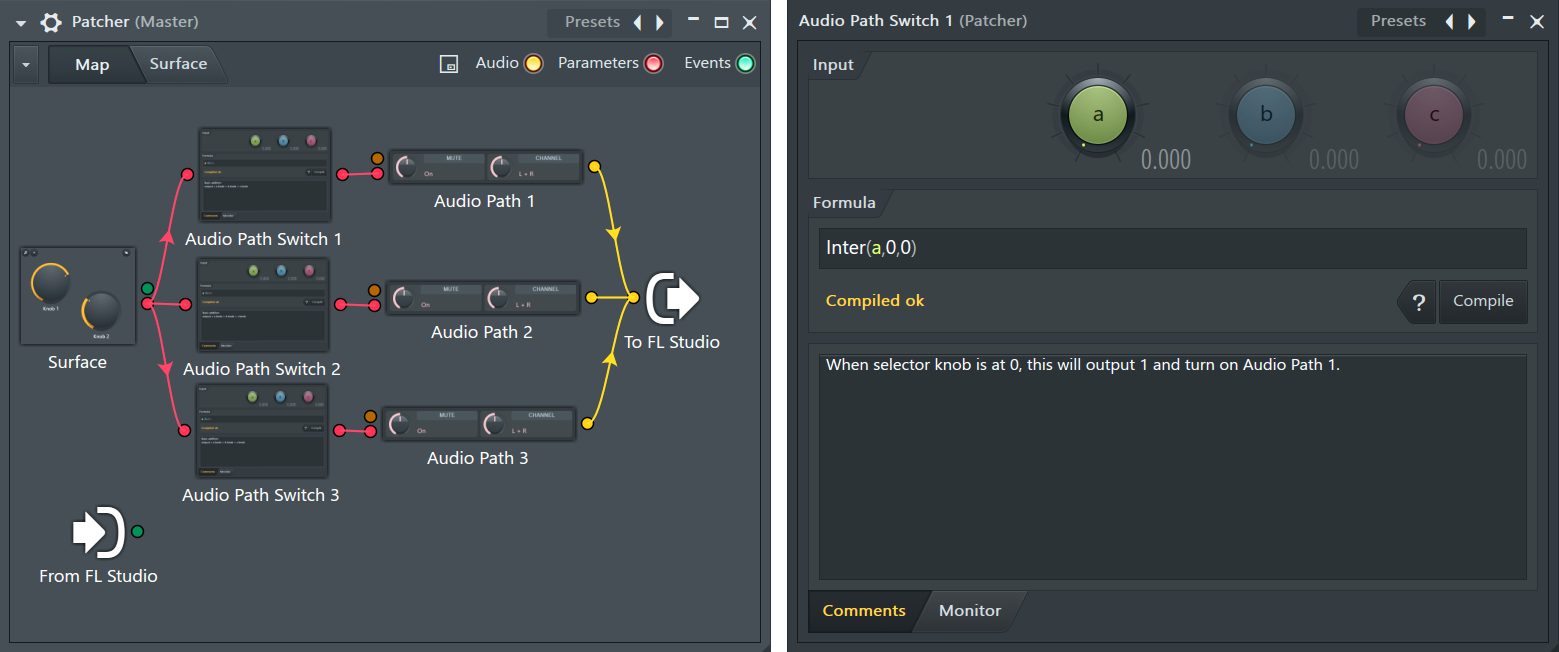
Layering sounds in Patcher adds depth to your music. First, load two or more instruments. Connect them to the same MIDI input. This allows you to play multiple instruments together. You can adjust each instrument’s volume and effects.
Use the Control Surface to manage your layers. Add sliders and knobs to control different parameters. This gives you more control over your sound.
Here are steps to layer sounds:
- Load multiple instruments in Patcher.
- Connect each instrument to the same MIDI input.
- Adjust volume and effects for each instrument.
- Use Control Surface for real-time adjustments.
Layering sounds can create rich and complex textures. Experiment with different instruments and settings. Patcher offers endless possibilities for sound design.
Advanced Routing Techniques
FL Studio’s Patcher is a powerful tool for creating complex signal chains. It allows you to route audio and control signals in advanced ways. These techniques can elevate your music production skills. This section covers two advanced routing techniques: Parallel Processing and Sidechaining in Patcher.
Parallel Processing
Parallel processing is a technique used to apply different effects to copies of the same signal. Patcher makes this easy and intuitive. You can split your audio signal into multiple paths. Each path can have its own set of effects. This allows you to blend the processed signals back together. The result is a richer and more dynamic sound.
To set up parallel processing in Patcher, start by adding a plugin. Then, create multiple output paths from that plugin. Add different effects to each path. Finally, use a mixer to combine the signals. You can adjust the levels to taste. This method is great for adding depth and complexity to your tracks.
Sidechaining In Patcher
Sidechaining is a popular technique used in many music genres. It involves using one audio signal to control another. In Patcher, you can set up sidechaining easily. Start by adding two plugins: one for the source signal and one for the target signal. Connect the source to a sidechain input on the target plugin.
For example, to create a pumping effect, use a kick drum as the source. Route it to a sidechain input on a compressor. Place the compressor on a bass track. Each time the kick drum hits, the bass volume will duck. This creates a rhythmic pulsing effect. Sidechaining can also help you create space in your mix. It ensures that important elements like vocals stand out.
With Patcher, the creative possibilities are endless. These advanced routing techniques can add new dimensions to your music. Experiment with different setups. Find what works best for your style.
Automation In Patcher
Automation in Patcher is a powerful feature in FL Studio. It allows producers to make their sounds dynamic and expressive. By automating parameters, you can create evolving sounds that add depth to your music.
Automating Parameters
In Patcher, automating parameters is simple and effective. Here’s how you can do it:
- Open Patcher in FL Studio.
- Add any plugin you want to automate.
- Right-click on the parameter you wish to automate.
- Select “Create Automation Clip” from the menu.
The automation clip will appear in the playlist. You can now draw automation curves to control the parameter over time. This method works for any parameter in your plugin, making it highly versatile.
Using Control Surface
The Control Surface in Patcher is a handy tool. It helps you manage multiple parameters easily.
Here’s how to set it up:
- Open Patcher and add the Control Surface.
- Add knobs, sliders, or buttons to the Control Surface.
- Link these controls to your plugin parameters.
To link a control, right-click on it and choose “Link to Parameter.” Then select the desired parameter from your plugin. This setup allows you to control several parameters from one place, making automation more intuitive and organized.
Using the Control Surface can simplify complex automation tasks. It provides a visual interface for your controls, which is very helpful.
| Control Type | Best Use |
|---|---|
| Knobs | Fine adjustments |
| Sliders | Linear control |
| Buttons | Toggle functions |
By using these tools effectively, you can bring your music to life. Automation in Patcher offers endless possibilities for creativity. Whether you automate parameters directly or use the Control Surface, you will find it a valuable feature in your music production toolkit.
Credit: www.image-line.com
Best Practices And Tips
Understanding how to use Patcher in FL Studio can elevate your music production. This tool offers flexibility and creativity. Following best practices ensures you make the most out of it. Here are some tips to help you optimize your Patcher usage effectively.
Optimizing Cpu Usage
Managing CPU usage is key. Patcher allows you to combine multiple plugins. This can be CPU intensive. Use Patcher only when needed. Avoid overloading with too many plugins at once. This keeps your project running smoothly.
Freeze tracks when you finish editing. This reduces CPU load. Use the “Smart Disable” feature. It turns off unused plugins. This helps manage CPU usage better. Regularly monitor your CPU meter. This helps identify and address issues early.
Organizing Your Patcher
Keeping your Patcher organized is important. Use color coding for different sections. This makes navigation easier. Label your connections clearly. This helps you understand your setup at a glance. Group similar elements together. This keeps your workspace tidy.
Use sub-Patchers for complex setups. This breaks down large projects into manageable parts. Save your Patcher presets. This saves time in future projects. Regularly clean up unused elements. This maintains an efficient workflow. An organized Patcher boosts productivity.
Common Issues And Troubleshooting
Patcher in FL Studio is a powerful tool for creating complex signal chains. However, like any sophisticated software, it can come with its own set of issues. Understanding common problems and troubleshooting tips can enhance your workflow. Let’s explore some solutions to typical issues users face.
Solving Audio Dropouts
Audio dropouts can disrupt your creative process. Often, these occur due to high CPU usage. Lowering your buffer size can help. Navigate to Options, then Audio Settings. Adjust the buffer length to a higher value. This gives your CPU more time to process audio.
Another common cause is plugin compatibility. Ensure all your plugins are up-to-date. Outdated plugins can cause instability. Also, check your CPU usage meter in FL Studio. If it is spiking, consider freezing some tracks. This converts them to audio, reducing CPU load.
Fixing Routing Problems
Routing problems can confuse even experienced users. Always double-check your signal paths. In Patcher, each connection line represents a signal path. Make sure they are correctly linked. Incorrect routing can lead to no sound or unexpected results.
Sometimes, routing issues stem from complex setups. Simplify your signal chain to identify the problem. Start with a basic setup and gradually add elements. This helps isolate the faulty link. Finally, remember to save your work frequently. This lets you revert to a previous state if needed.

Credit: www.youtube.com
Frequently Asked Questions
What Is Patcher In Fl Studio?
Patcher in FL Studio is a plugin that allows users to create complex effect chains and instrument setups. It offers a modular interface where you can link various plugins and effects together. This helps in creating intricate audio processing setups.
How To Use Patcher In Fl Studio?
To use Patcher, load it as an instrument or effect. Then, drag and drop plugins within the Patcher interface. Connect them as needed to create your desired audio effect chain or instrument setup.
Can Patcher Improve Workflow In Fl Studio?
Yes, Patcher can significantly improve workflow by organizing complex plugin chains into a single unit. This makes it easier to manage, adjust, and recall intricate setups during music production.
Is Patcher Free In Fl Studio?
Patcher is included with FL Studio Producer Edition and above. It comes at no additional cost, providing powerful modular routing and processing capabilities.
Conclusion
Patcher in FL Studio is a powerful tool for music producers. It allows complex effects and instrument chains. You can save time and enhance creativity. With Patcher, your workflow becomes smoother. Beginners and pros alike benefit from it. Experiment with different sounds and setups.

Discover new ways to shape your music. Patcher’s versatility makes it a valuable part of FL Studio. Explore it today and elevate your music production skills. Happy creating!
{ “@context”: “https://schema.org”, “@type”: “FAQPage”, “mainEntity”: [ { “@type”: “Question”, “name”: “What is Patcher in FL Studio?”, “acceptedAnswer”: { “@type”: “Answer”, “text”: “Patcher in FL Studio is a plugin that allows users to create complex effect chains and instrument setups. It offers a modular interface where you can link various plugins and effects together. This helps in creating intricate audio processing setups.” } } , { “@type”: “Question”, “name”: “How to use Patcher in FL Studio?”, “acceptedAnswer”: { “@type”: “Answer”, “text”: “To use Patcher, load it as an instrument or effect. Then, drag and drop plugins within the Patcher interface. Connect them as needed to create your desired audio effect chain or instrument setup.” } } , { “@type”: “Question”, “name”: “Can Patcher improve workflow in FL Studio?”, “acceptedAnswer”: { “@type”: “Answer”, “text”: “Yes, Patcher can significantly improve workflow by organizing complex plugin chains into a single unit. This makes it easier to manage, adjust, and recall intricate setups during music production.” } } , { “@type”: “Question”, “name”: “Is Patcher free in FL Studio?”, “acceptedAnswer”: { “@type”: “Answer”, “text”: “Patcher is included with FL Studio Producer Edition and above. It comes at no additional cost, providing powerful modular routing and processing capabilities.” } } ] }As an Amazon Associate, Cleanestor earns from qualifying purchases at no additional cost to you.