The sample rate in FL Studio refers to the number of samples of audio carried per second. It affects the quality and clarity of the sound you produce.
In music production, understanding the sample rate is crucial. It determines how detailed and accurate your audio recordings will be. A higher sample rate means better sound quality but also larger file sizes. Conversely, a lower sample rate can save space but might compromise the audio quality.
FL Studio, a popular digital audio workstation, allows users to adjust the sample rate to suit their needs. Knowing how to set and optimize the sample rate in FL Studio can significantly enhance your music production process, ensuring that your tracks sound professional and polished. Let’s dive into the details to understand the importance of sample rate in FL Studio.

Credit: www.youtube.com
Introduction To Sample Rate
Understanding the concept of sample rate is crucial for anyone involved in music production. Whether you are a beginner or an experienced producer, knowing how sample rate impacts your audio quality can make a significant difference. FL Studio, a popular digital audio workstation (DAW), allows you to adjust the sample rate to fit your needs.
Definition Of Sample Rate
The sample rate refers to the number of samples of audio taken per second, measured in Hertz (Hz). In simpler terms, it is how often the audio is captured. For instance, a sample rate of 44.1 kHz means 44,100 samples per second.
This rate determines the frequency range that can be captured in your recording. The higher the sample rate, the more detailed the sound. Common sample rates include 44.1 kHz, 48 kHz, and 96 kHz.
Importance In Music Production
Sample rate plays a vital role in music production. It affects the quality and clarity of the audio. A higher sample rate can capture more detail, making the sound more natural and clear. Here are some key points:
- Clarity: Higher sample rates capture more detail, leading to clearer audio.
- Editing: Higher rates provide more data, making editing easier and more precise.
- Compatibility: Different projects may require different sample rates for compatibility.
In FL Studio, you can choose the sample rate that best suits your project. For most music production, 44.1 kHz is standard. For more detailed work, 96 kHz may be preferable.
| Sample Rate | Common Use |
|---|---|
| 44.1 kHz | Standard for music production |
| 48 kHz | Video production |
| 96 kHz | High-resolution audio |
Choosing the right sample rate in FL Studio can enhance your music production. It ensures that your audio is clear, precise, and compatible with other projects. By understanding the basics of sample rate, you can make informed decisions to improve the quality of your music.
Credit: www.image-line.com
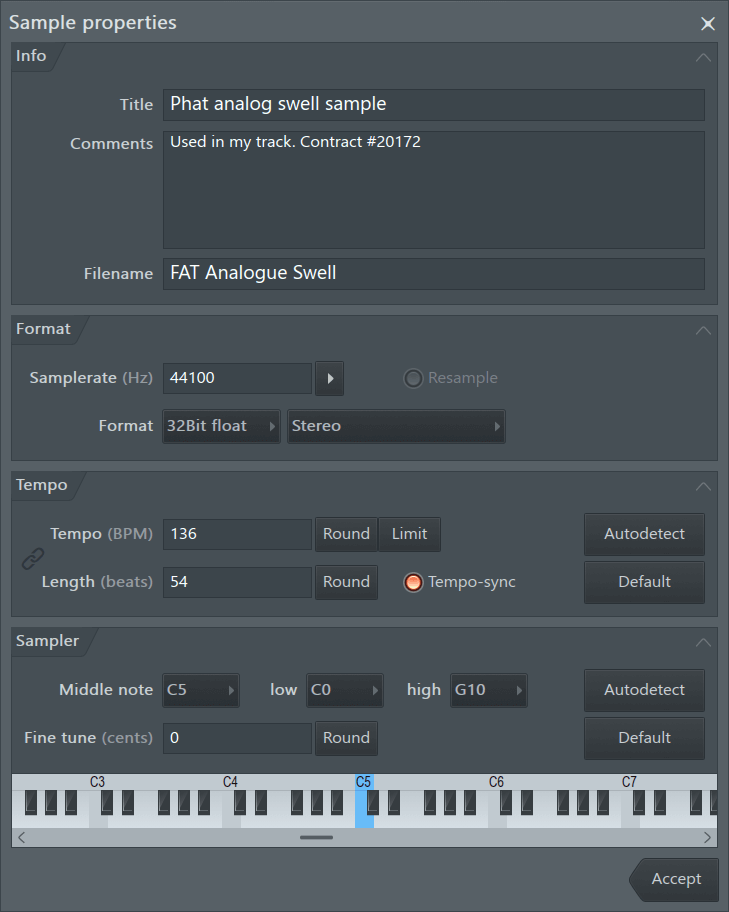
Sample Rate In Fl Studio
The sample rate is crucial in digital audio production. It determines how often audio samples are taken per second. In FL Studio, the sample rate affects audio quality and performance.
Default Settings
FL Studio has a default sample rate setting. It is usually set to 44100 Hz. This setting balances audio quality and system performance.
Below is a table showing common sample rates and their uses:
| Sample Rate (Hz) | Common Use |
|---|---|
| 44100 | CD Audio |
| 48000 | DVD Audio, Video |
| 96000 | High-Resolution Audio |
| 192000 | Professional Audio |
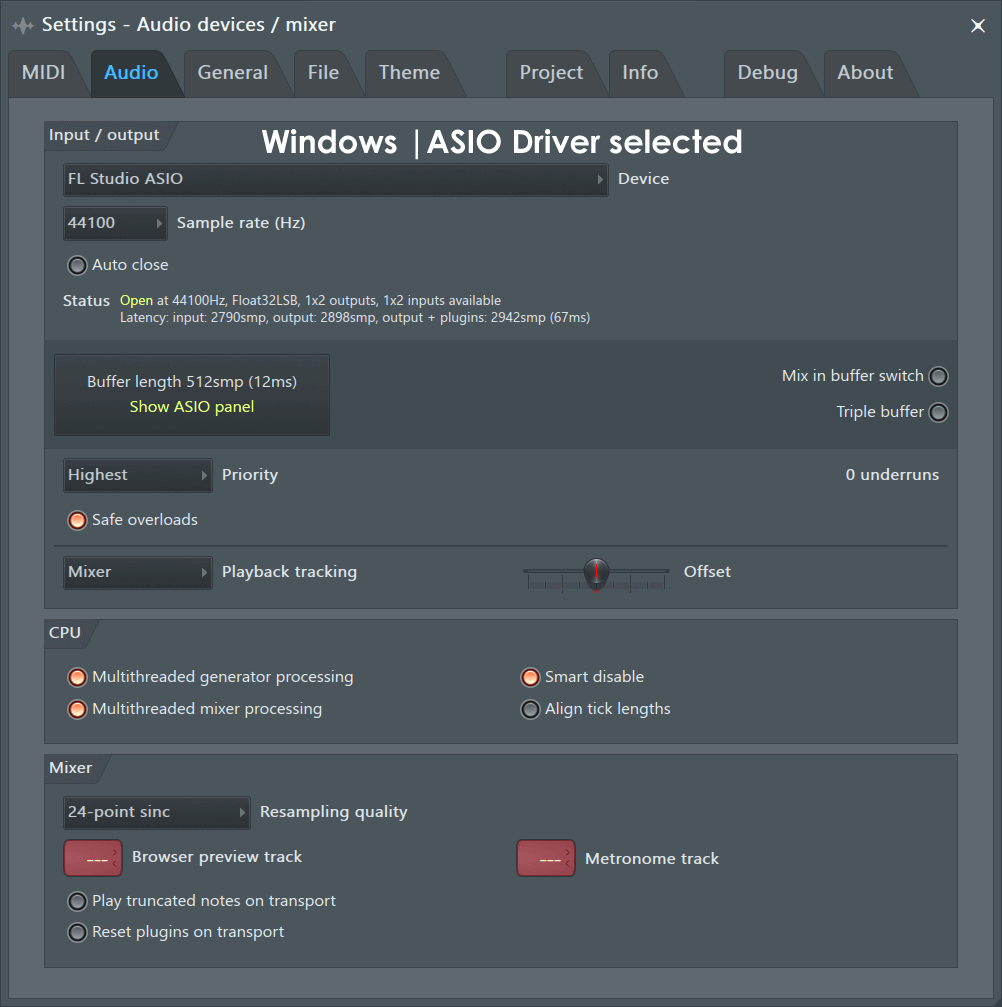
How To Adjust
To adjust the sample rate in FL Studio, follow these steps:
- Open FL Studio.
- Go to Options in the top menu.
- Select Audio Settings.
- Locate the Sample Rate dropdown menu.
- Choose your desired sample rate.
- Click Apply to save changes.
Higher sample rates improve audio quality. They also increase CPU load. Choose a rate that fits your project’s needs and your computer’s capabilities.
Here are some tips for choosing the right sample rate:
- Use 44100 Hz for general projects.
- Use 48000 Hz for video projects.
- Use 96000 Hz for high-quality audio projects.
Remember, higher sample rates mean larger file sizes. Balance quality and performance for the best results in FL Studio.
Impact On Sound Quality
Understanding the sample rate in FL Studio is crucial for any music producer. The sample rate directly affects the sound quality of your recordings and productions. This section will explore how different sample rates impact sound quality.
High Sample Rates
High sample rates, such as 96kHz or 192kHz, capture more audio detail. This results in a more accurate representation of the original sound. High sample rates are ideal for professional recordings. They provide greater clarity and depth. Some benefits of high sample rates include:
- Reduced aliasing
- Better high-frequency response
- Improved dynamic range
However, using high sample rates also means larger file sizes. This can lead to increased CPU load. It’s essential to balance quality and performance.
Low Sample Rates
Low sample rates, such as 44.1kHz or 48kHz, are commonly used in many productions. They are sufficient for most music genres. Low sample rates offer several advantages:
- Smaller file sizes
- Reduced CPU usage
- Faster processing times
But, low sample rates may miss some audio details. This could result in less accurate sound reproduction. For most users, a 44.1kHz sample rate is a good compromise between quality and performance.
| Sample Rate | Audio Quality | File Size |
|---|---|---|
| 44.1kHz | Standard | Small |
| 48kHz | Good | Medium |
| 96kHz | High | Large |
| 192kHz | Very High | Very Large |
Choosing the right sample rate in FL Studio depends on your needs. For most users, 44.1kHz or 48kHz provides a good balance. Professional recordings may benefit from higher sample rates. Always consider your system’s performance and storage capabilities.
Choosing The Right Sample Rate
Choosing the right sample rate in FL Studio is crucial for your music production. The sample rate determines the audio quality and file size. Higher sample rates capture more detail but require more processing power and storage. Lower sample rates save space but may compromise quality.
Factors To Consider
Several factors influence the choice of sample rate in FL Studio. These include your project needs, system capabilities, and final output format. Understanding these factors helps you make an informed decision.
- Project Needs: Different projects require different levels of audio quality. A podcast might need a lower sample rate compared to a high-fidelity music track.
- System Capabilities: Your computer’s processing power affects your choice. Higher sample rates demand more CPU and RAM.
- Final Output Format: Consider where your audio will be used. Streaming services, CDs, and DVDs have different requirements.
Common Practices
In the music production industry, certain sample rates are commonly used. Understanding these practices can guide your choices.
| Sample Rate | Common Use |
|---|---|
| 44.1 kHz | CD Quality Audio |
| 48 kHz | Standard for Video |
| 96 kHz | High-Resolution Audio |
These common practices ensure compatibility and quality. For most music projects, 44.1 kHz is sufficient. For video work, consider 48 kHz. For studio recordings, 96 kHz can be used for higher detail.
- Assess your project’s requirements.
- Check your system’s capabilities.
- Choose a sample rate that matches your final output format.
Optimizing Performance
Optimizing the performance of FL Studio is crucial for producing high-quality music. Many factors influence performance, but sample rate settings are key. Adjusting these settings can significantly affect CPU usage and latency. Let’s explore these aspects in detail.
Cpu Usage
CPU usage is a critical factor in FL Studio’s performance. A higher sample rate demands more processing power. This can lead to higher CPU usage, causing your system to slow down.
Lowering the sample rate can help reduce CPU usage. For instance, a sample rate of 44.1 kHz is less demanding than 96 kHz. Experiment with different settings to find a balance that works for your system.
| Sample Rate | CPU Usage |
|---|---|
| 44.1 kHz | Low |
| 48 kHz | Moderate |
| 96 kHz | High |
Latency Issues
Latency is the delay between input and output. High latency can disrupt the creative process. Adjusting sample rate settings can help manage latency issues.
- Higher sample rates can reduce latency but increase CPU load.
- Lower sample rates reduce CPU load but may increase latency.
Finding the right balance is key. Test different settings to see what works best for your needs. Use a sample rate that keeps latency low without overloading your CPU.
Consider using an audio interface with dedicated drivers. These can help manage latency more effectively. They often provide better performance than built-in sound cards.
Credit: www.image-line.com
Common Mistakes To Avoid
Understanding the sample rate in FL Studio is crucial for producing high-quality audio. Yet, many users make common mistakes that can impact their projects. Let’s explore some of these pitfalls and learn how to avoid them.
Overcompensation
One frequent mistake is setting the sample rate too high. This doesn’t always mean better sound quality. Instead, it can lead to unnecessary CPU usage and larger file sizes. For most projects, a sample rate of 44.1 kHz or 48 kHz is sufficient. These settings balance quality and performance.
Overcompensation can also cause compatibility issues with other software and hardware. Always check the requirements of your devices and software to ensure they can handle high sample rates. Otherwise, you might face unexpected problems during the production process.
Ignoring Project Requirements
Another mistake is not considering the specific requirements of your project. Different projects may need different sample rates. For example:
- Music Production: 44.1 kHz or 48 kHz.
- Film Scoring: 48 kHz, often required for video sync.
- Professional Audio: 96 kHz, for high-end audio production.
Failing to match the sample rate to the project’s needs can result in suboptimal quality or technical issues. Always plan your sample rate based on the end use of your project.
To summarize, avoid overcompensating with excessively high sample rates and always consider the specific needs of your project. This ensures efficient and high-quality audio production in FL Studio.
Real-world Examples
Understanding the sample rate in FL Studio can be crucial for achieving high-quality audio. Real-world examples can help you grasp this concept better. Let’s explore how professionals set their sample rates and common mistakes beginners make.
Professional Setups
Professionals often use higher sample rates to capture more audio detail. In FL Studio, a common setting is 48kHz or even 96kHz. These settings provide a broader frequency range.
Here’s a table to illustrate common professional sample rates and their benefits:
| Sample Rate | Benefits |
|---|---|
| 48kHz | Good balance of quality and performance |
| 96kHz | Even higher audio detail, used in professional recordings |
Professionals also ensure their entire setup matches this rate. This avoids sample rate conversion issues. Consistency is key.
Beginner Mistakes
Beginners often overlook sample rates. They might leave the default setting, which can lead to lower-quality audio. For instance, using 44.1kHz can be limiting if your audio source is recorded at 96kHz.
Common mistakes include:
- Not matching the sample rate of the audio source and project
- Using a low sample rate for high-quality recordings
- Ignoring the importance of sample rate in the final mix
By understanding and correctly setting the sample rate, beginners can significantly improve their audio quality. Always check your sample rate settings before starting a new project.
Frequently Asked Questions
What Is The Sample Rate In Fl Studio?
The sample rate in FL Studio is the number of samples per second in digital audio. It’s crucial for audio quality.
How To Change Sample Rate In Fl Studio?
To change the sample rate in FL Studio, go to Options > Audio Settings. Adjust the sample rate as needed.
Why Is Sample Rate Important In Fl Studio?
Sample rate determines the audio quality and clarity in FL Studio. Higher rates provide better quality but use more resources.
What Sample Rate Should I Use In Fl Studio?
A common sample rate in FL Studio is 44. 1 kHz. For professional projects, consider 48 kHz or higher.
Conclusion
Understanding sample rate in FL Studio is crucial for your music production. It affects sound quality and file size. Choosing the right sample rate ensures optimal performance. Experiment with different rates to find what works best. Remember, higher rates mean better quality but larger files.

Lower rates save space but may reduce clarity. Balance is key. With this knowledge, you can improve your tracks. Happy producing!
{ “@context”: “https://schema.org”, “@type”: “FAQPage”, “mainEntity”: [ { “@type”: “Question”, “name”: “What is the sample rate in FL Studio?”, “acceptedAnswer”: { “@type”: “Answer”, “text”: “The sample rate in FL Studio is the number of samples per second in digital audio. It’s crucial for audio quality.” } } , { “@type”: “Question”, “name”: “How to change sample rate in FL Studio?”, “acceptedAnswer”: { “@type”: “Answer”, “text”: “To change the sample rate in FL Studio, go to Options > Audio Settings. Adjust the sample rate as needed.” } } , { “@type”: “Question”, “name”: “Why is sample rate important in FL Studio?”, “acceptedAnswer”: { “@type”: “Answer”, “text”: “Sample rate determines the audio quality and clarity in FL Studio. Higher rates provide better quality but use more resources.” } } , { “@type”: “Question”, “name”: “What sample rate should I use in FL Studio?”, “acceptedAnswer”: { “@type”: “Answer”, “text”: “A common sample rate in FL Studio is 44.1 kHz. For professional projects, consider 48 kHz or higher.” } } ] }As an Amazon Associate, Cleanestor earns from qualifying purchases at no additional cost to you.