The Master Track in GarageBand is a key feature for audio control. It allows users to manage overall sound levels and effects.
GarageBand is a popular tool for music creation. Among its many features, the Master Track stands out. But what exactly is it? In simple terms, the Master Track helps you control the final mix of your song. It lets you adjust volume, add effects, and ensure your track sounds polished.
This feature is essential for both beginners and advanced users. Understanding how to use the Master Track can make a huge difference in your music production. Let’s dive deeper into what the Master Track in GarageBand is and how it can enhance your music projects.
Introduction To Master Track
GarageBand is a user-friendly digital audio workstation (DAW) for macOS and iOS users. It allows you to create, edit, and share music. One essential feature in GarageBand is the Master Track. This feature plays a crucial role in polishing your projects. It helps you achieve a professional sound quality.
Purpose Of Master Track
The Master Track in GarageBand serves a specific role. It combines all the individual tracks in your project. This unified track then becomes the final mix. The Master Track lets you adjust the overall volume of your song. It also allows you to apply global effects like compression and equalization.
Importance In Music Production
The Master Track holds significant value in music production. It ensures that all elements in your song blend well together. The Master Track also helps in maintaining consistent sound levels. Without it, your final product may sound unbalanced or unprofessional.
Using the Master Track can make your music sound cohesive. It can enhance the listening experience for your audience. Understanding how to use it effectively is key for any music producer.
Credit: www.idownloadblog.com
Accessing The Master Track
The Master Track in Garageband is a powerful tool. It allows you to control the overall sound of your project. This includes volume, panning, and effects. Understanding how to access and use the Master Track can greatly enhance your music production.
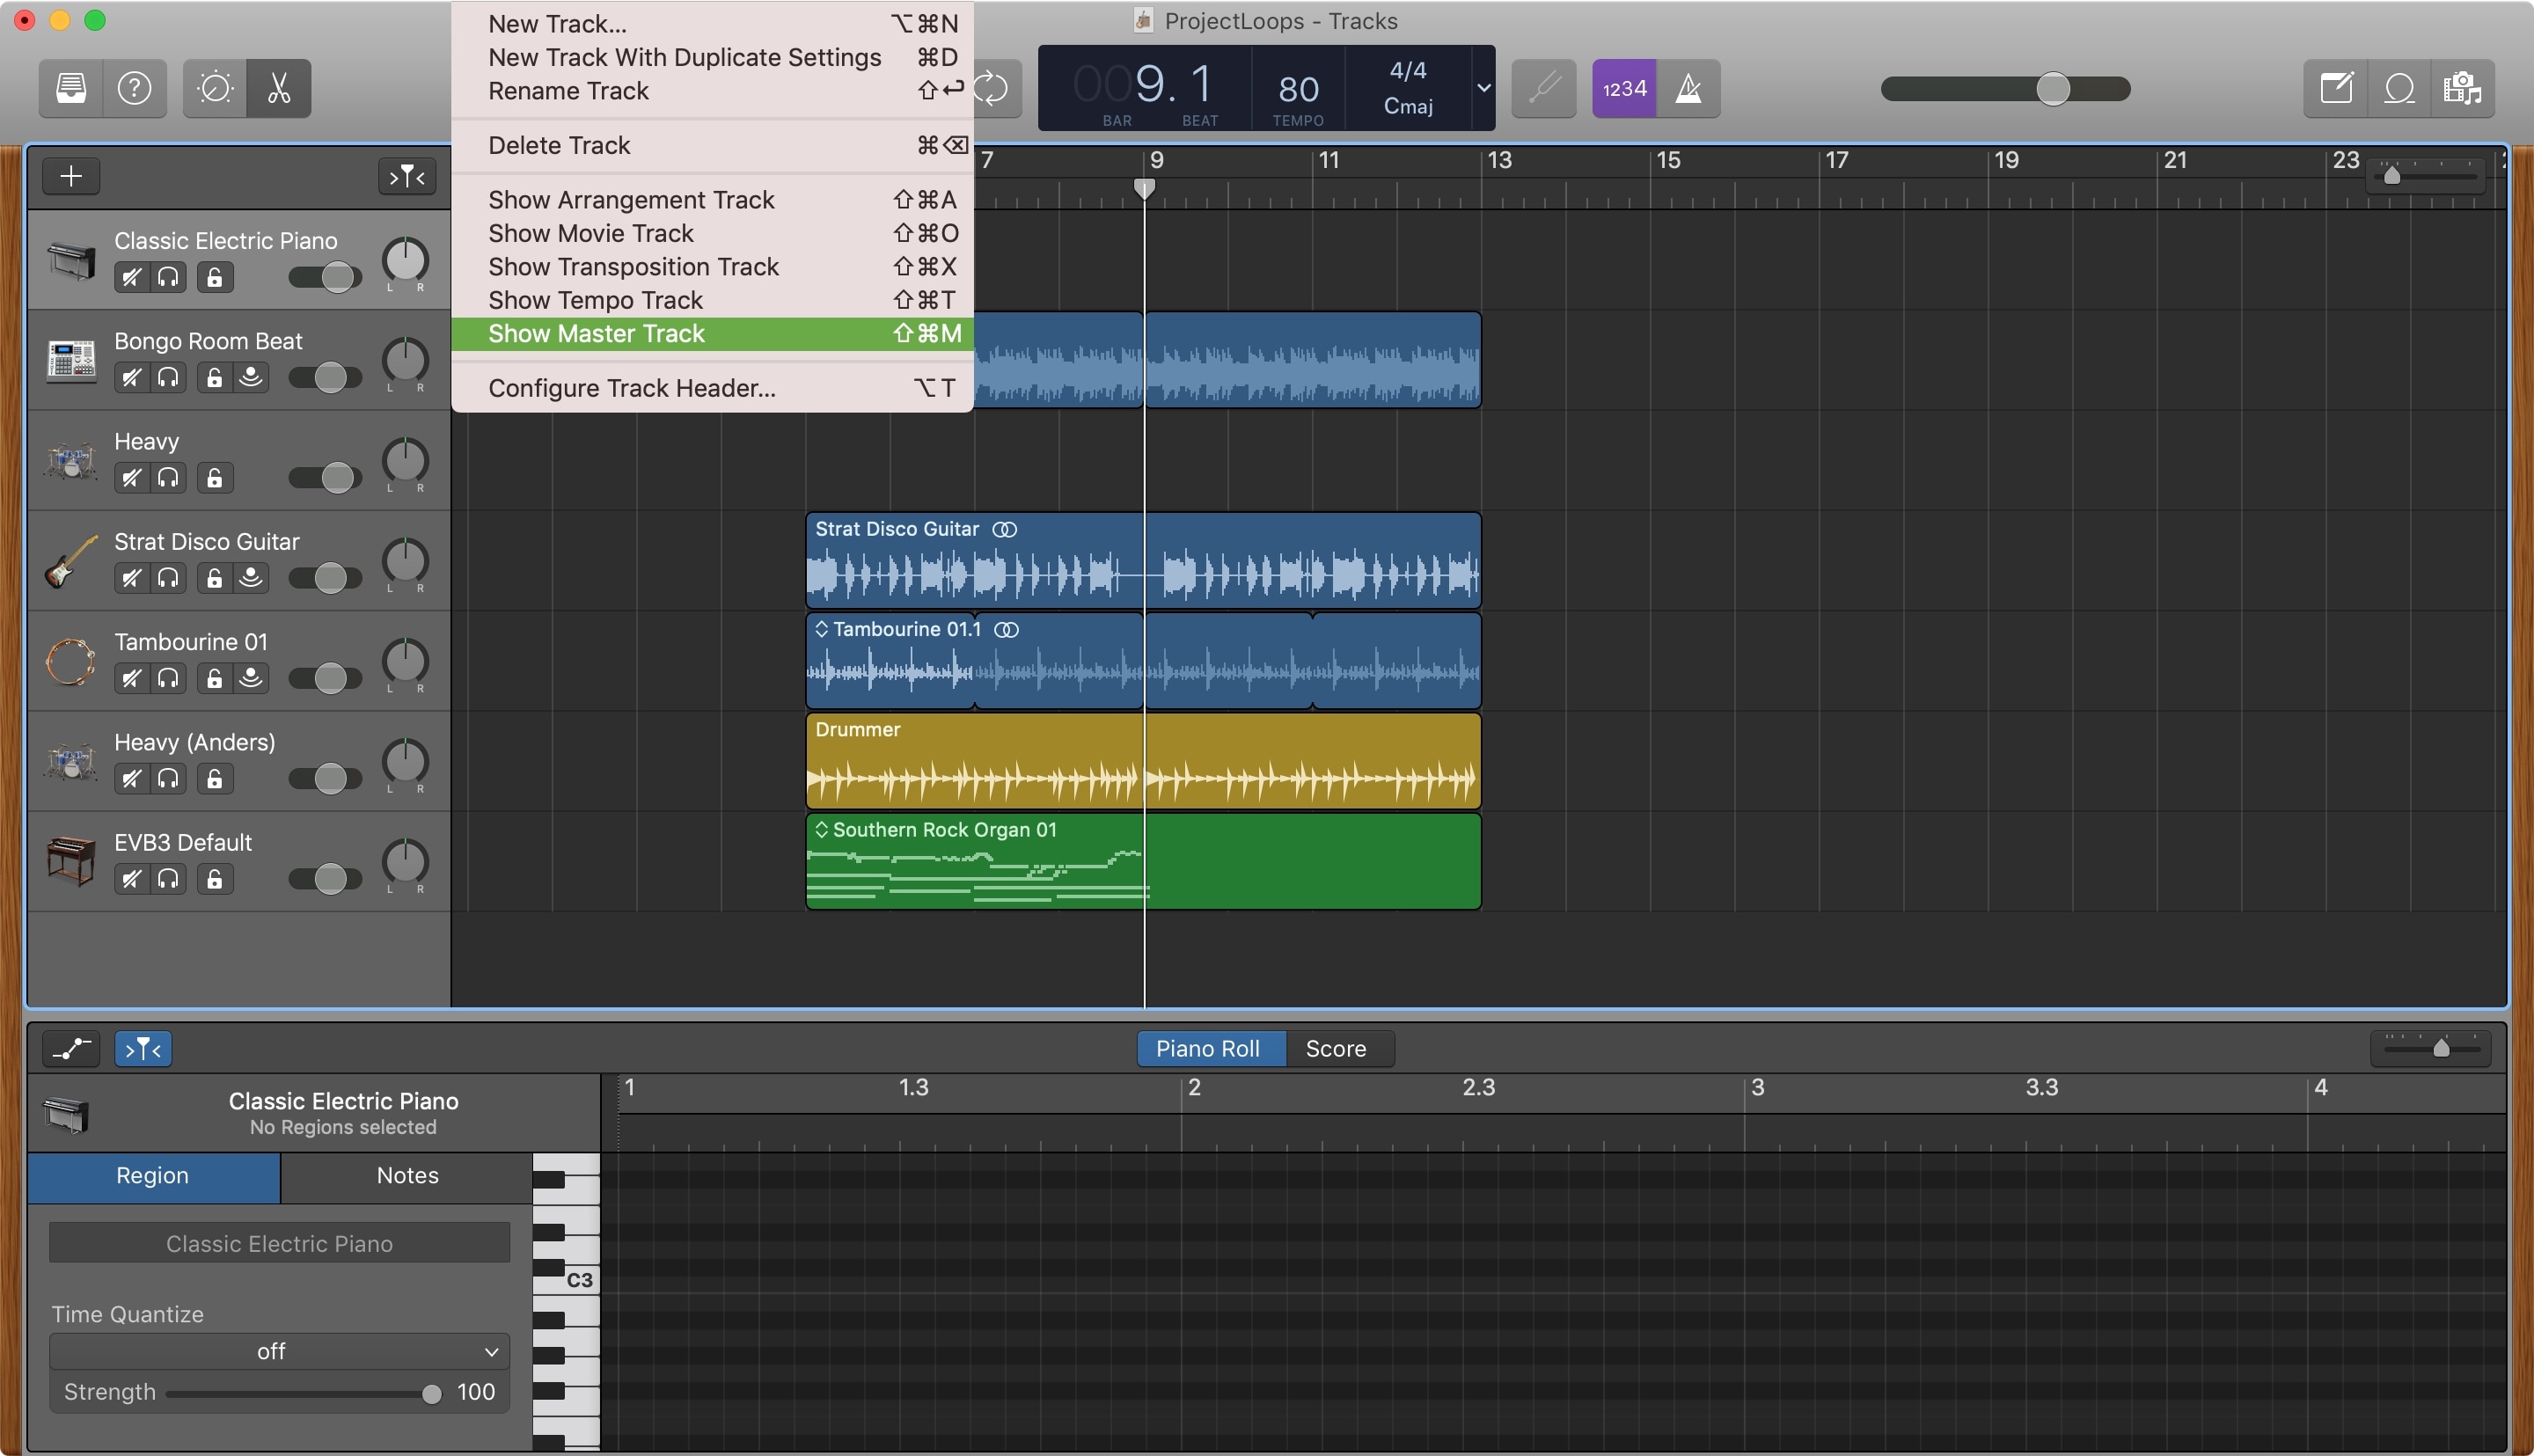
Locating In Garageband
To find the Master Track, open your Garageband project. Look at the top of your workspace. You will see several icons and menus. The Master Track is not visible by default. You need to enable it first.
Enabling The Master Track
To enable the Master Track, follow these steps:
- Click on the “Track” menu at the top.
- Select “Show Master Track” from the dropdown menu.
- The Master Track will appear at the bottom of your track list.
Now you can see and adjust the Master Track. This track allows you to manage the overall mix of your project.
Remember, enabling the Master Track gives you more control. You can adjust the final output of your music easily.
Components Of The Master Track
The Master Track in Garageband is a powerful tool for finalizing your music projects. It allows you to manage the overall sound of your track. Understanding its components is key to producing a polished final product. Let’s dive into the main elements of the Master Track.
Volume Control
Volume Control is essential for balancing the loudness of your track. It ensures that all elements of your mix are heard clearly. The Master Track’s volume fader lets you adjust the overall level of your mix.
| Feature | Description |
|---|---|
| Volume Fader | Controls the loudness of the entire track. |
| Automation | Allows dynamic volume changes over time. |
Pan Settings
Pan Settings help you position sounds within the stereo field. This means you can place sounds to the left, center, or right of the mix. Proper panning creates a more immersive listening experience.
- Left Pan: Moves the sound towards the left speaker.
- Center Pan: Keeps the sound balanced in both speakers.
- Right Pan: Moves the sound towards the right speaker.
Using these panning options, you can create space for each instrument. This makes your mix sound clear and professional.
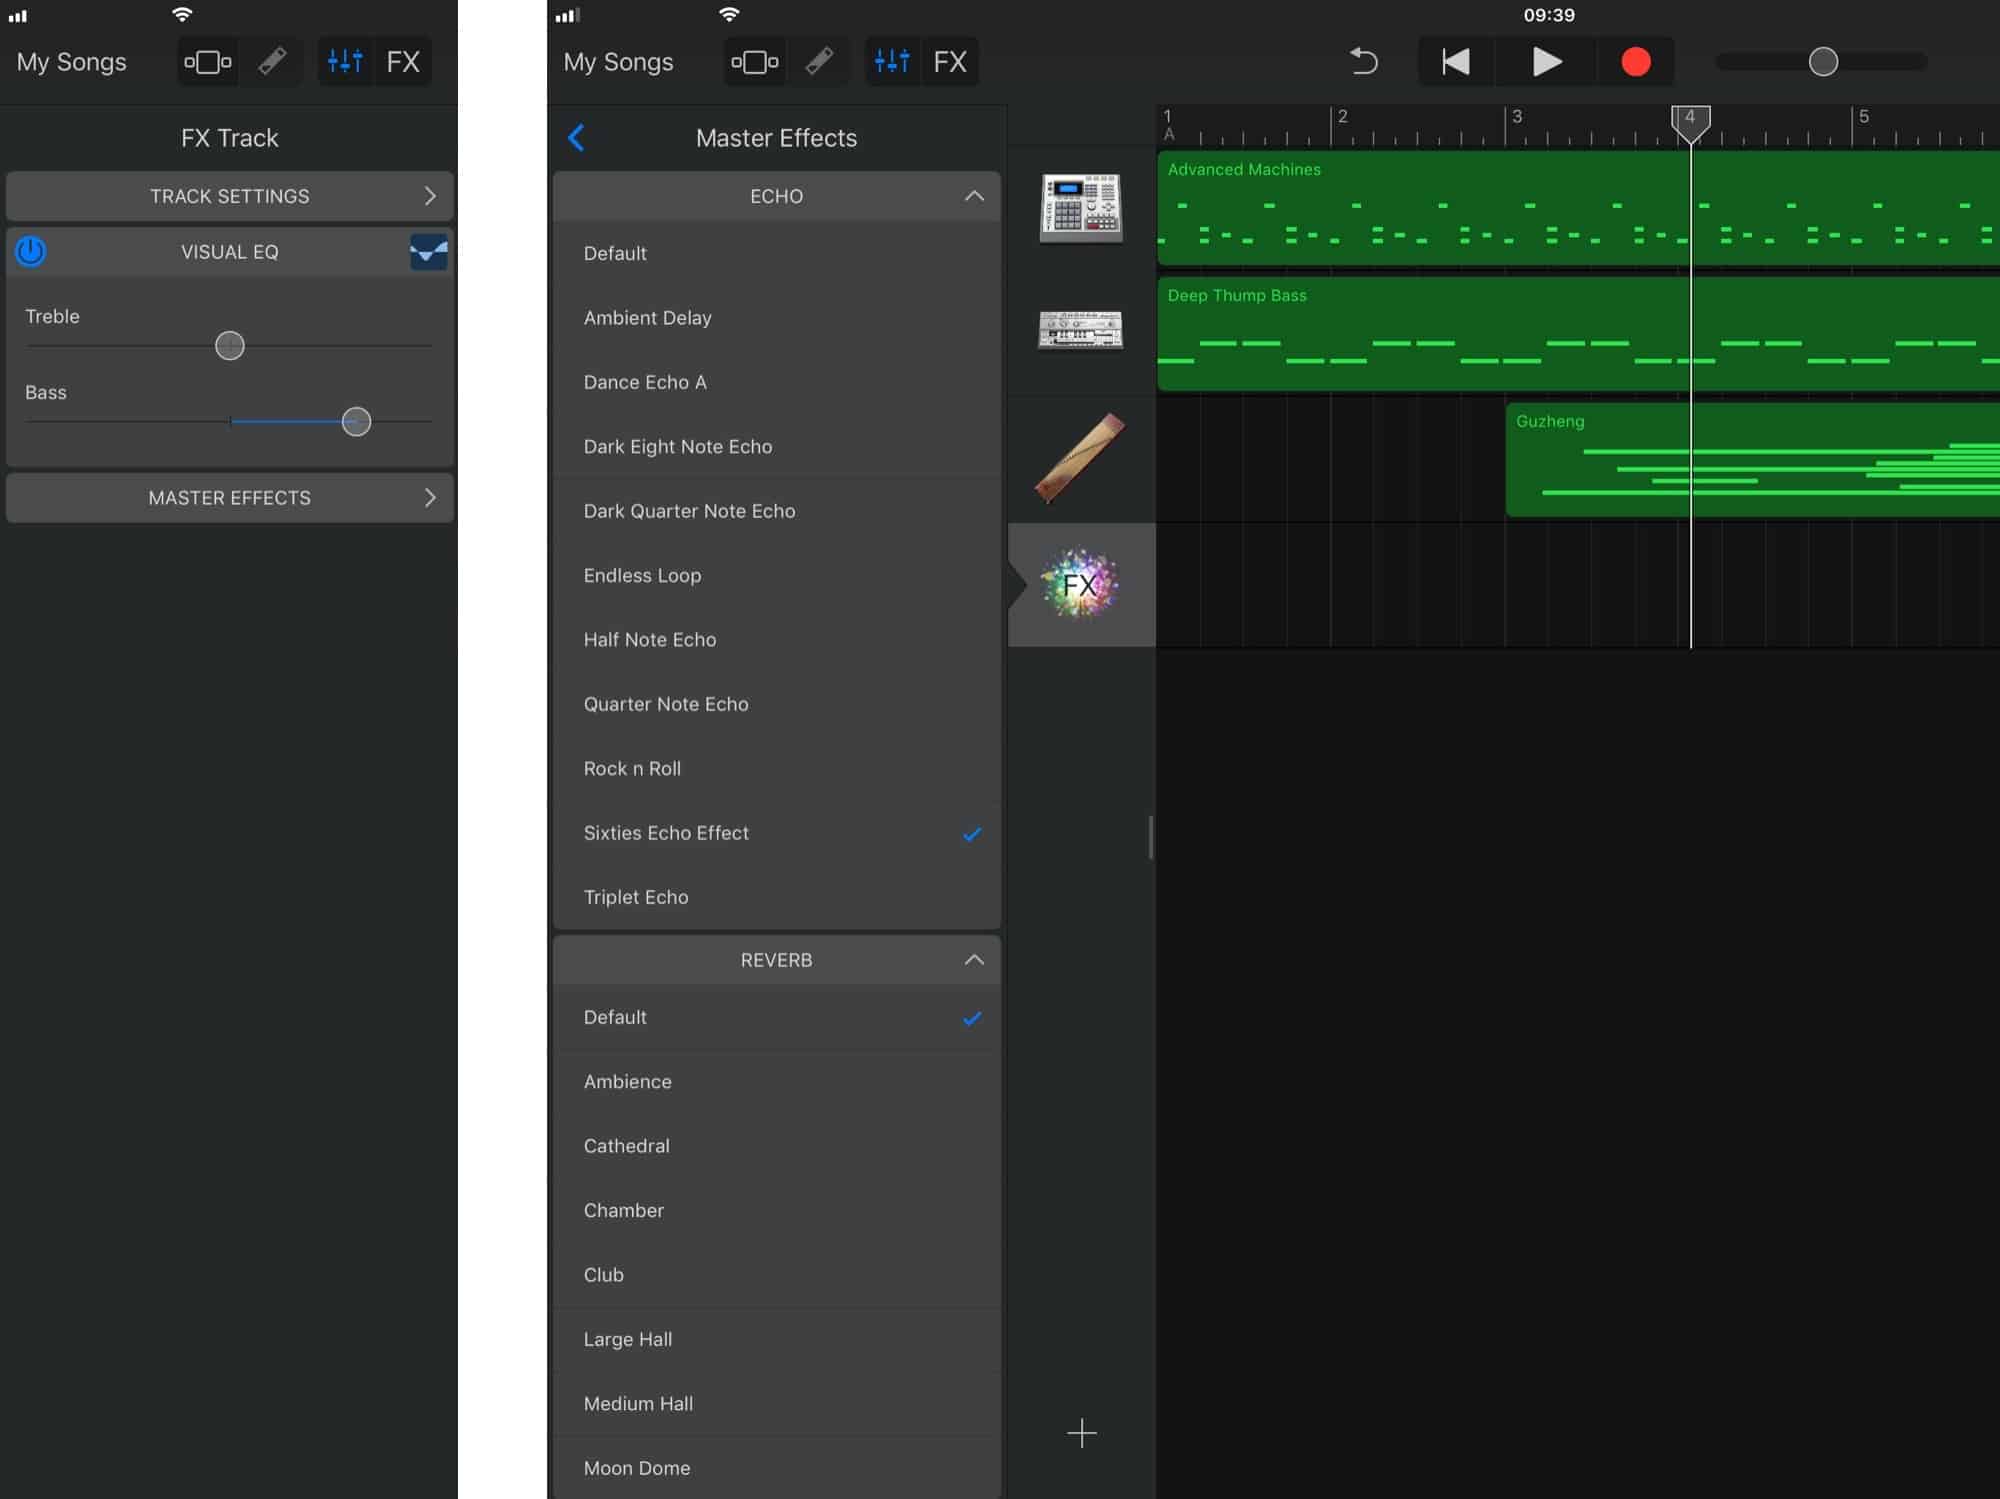
Using Effects On The Master Track
Using effects on the Master Track in Garageband can enhance your entire mix. This gives your project a polished and professional sound. By applying different effects, you can tweak the overall balance and tone of your track. Here are some key effects you can use on the Master Track.
Applying Equalizer
An equalizer (EQ) helps balance the frequency range of your track. You can use EQ to boost or cut specific frequencies. This ensures that your mix sounds clear and balanced. For instance, you might boost the bass for a fuller sound. Or, you can cut the midrange to reduce muddiness. Experiment with different EQ settings to find what works best for your track.
Adding Compression
Compression controls the dynamic range of your track. It makes the loud parts quieter and the quiet parts louder. This results in a more consistent sound. To add compression in Garageband, first select the Master Track. Then, choose the compressor effect. Adjust the threshold, ratio, and makeup gain to your liking. A well-compressed track will sound smooth and professional.
Automation On The Master Track
Automation on the Master Track in GarageBand allows you to adjust the overall volume, pan, and effects of your project. This powerful feature ensures that your mix sounds balanced and professional. Let’s dive into how you can create and edit automation on the master track.
Creating Volume Automation
To create volume automation, follow these steps:
- Open your project and select the master track.
- Click on the Automation button located at the top of the track area.
- In the automation editor, select Volume from the dropdown menu.
- Click on the track to create control points.
- Drag the control points up or down to adjust the volume.
Volume automation helps manage the dynamics of your mix. This keeps the overall sound level consistent.
Editing Pan Automation
Editing pan automation is similar to volume automation:
- Select the master track and open the automation editor.
- Choose Pan from the dropdown menu.
- Click on the track to add control points.
- Move the control points left or right to adjust the pan.
Pan automation allows you to create movement and space in your mix. This makes your music sound more dynamic and interesting.

Credit: www.youtube.com
Mixing With The Master Track
Mixing with the Master Track in Garageband is a crucial step. It helps you create a polished and professional-sounding recording. The Master Track allows you to control the overall sound of your mix. Below, we explore how to balance levels and fine-tune your mix.
Balancing Levels
Start by adjusting the volume of each track. Ensure no single track overpowers the rest. Listen carefully to the blend of instruments and vocals. The goal is to achieve a harmonious balance. Use the volume sliders to make subtle changes. Too much volume can cause distortion. Too little can make elements disappear.
Fine-tuning The Mix
Once the levels are balanced, focus on the finer details. Use the Master Track’s EQ to adjust frequencies. Boost the bass if it feels weak. Cut the highs if they sound harsh. Add reverb to create depth in your mix. A little goes a long way here. Too much reverb can muddy the sound. Listen to your mix on different devices. This ensures it sounds good everywhere.
Exporting Your Final Mix
Exporting your final mix in GarageBand is an essential step. It ensures that your hard work can be enjoyed by others. The Master Track in GarageBand plays a key role in this process. It helps you fine-tune your mix before exporting.
Setting Export Preferences
Before exporting, set your preferences. This ensures your mix sounds the best.
- Go to Share in the top menu.
- Select Export Song to Disk.
- Choose the desired file format. Options include MP3, AAC, and AIFF.
- Set the audio quality. Higher quality means larger file size.
Setting these preferences correctly is vital. It affects the final sound of your mix.
Saving And Sharing
After setting preferences, save your file. Choose a location on your computer.
- Click Export.
- Wait for the export to complete.
- Find your file in the selected location.
Now, you can share your mix with others. Upload it to platforms like SoundCloud or YouTube. Or, share it directly with friends.
GarageBand makes exporting simple. Follow these steps to ensure your final mix is ready for the world.
Credit: www.cultofmac.com
Tips And Best Practices
Using the Master Track in Garageband can significantly enhance your audio projects. Proper use of this feature can lead to a more polished and professional sound. Below are some tips and best practices to help you make the most out of the Master Track in Garageband.
Avoiding Common Mistakes
Begin by setting the correct tempo for your project. Many users forget this step and struggle with synchronization. Always check the tempo first.
Next, ensure your levels are balanced. Avoid having any track too loud or too quiet. This helps maintain a consistent volume throughout your project.
Additionally, avoid overloading the Master Track with too many effects. Too many effects can distort the final mix and reduce clarity.
Enhancing Audio Quality
Use the EQ (equalizer) settings to fine-tune your audio. Adjusting the EQ can highlight important frequencies and make your mix sound clearer.
Consider using compression on the Master Track. Compression helps manage volume peaks and ensures a more consistent sound.
Finally, apply reverb sparingly. A touch of reverb can add depth, but too much can make the mix sound muddy.
Following these tips can help you get the best results from the Master Track in Garageband. Happy mixing!
Frequently Asked Questions
What Is The Master Track In Garageband?
The Master Track in Garageband is a powerful tool. It allows you to control the overall sound of your project. You can adjust volume, add effects, and automate changes.
How Do I Use The Master Track?
To use the Master Track, open Garageband and select your project. Click on ‘Track’ and then ‘Show Master Track’. This reveals the Master Track for editing.
Can I Add Effects To The Master Track?
Yes, you can add effects to the Master Track. Open the Smart Controls and navigate to the Master Effects section. Apply desired effects to enhance your project.
What Is Automation In The Master Track?
Automation in the Master Track allows you to make dynamic changes. You can automate volume, panning, and effects. This makes your project sound more professional.
Conclusion
The Master Track in Garageband is a powerful tool for music production. It helps you control the final sound of your project. You can easily adjust volume, effects, and more. This feature ensures your music sounds polished and professional. Experiment with different settings to find your perfect mix.

Remember, practice makes perfect. With time, you will get better at using the Master Track. Enjoy creating your music and let your creativity flow. Happy producing!
As an Amazon Associate, Cleanestor earns from qualifying purchases at no additional cost to you.