Trim PDC Silence in FL Studio is a useful feature. It helps manage audio latency issues.
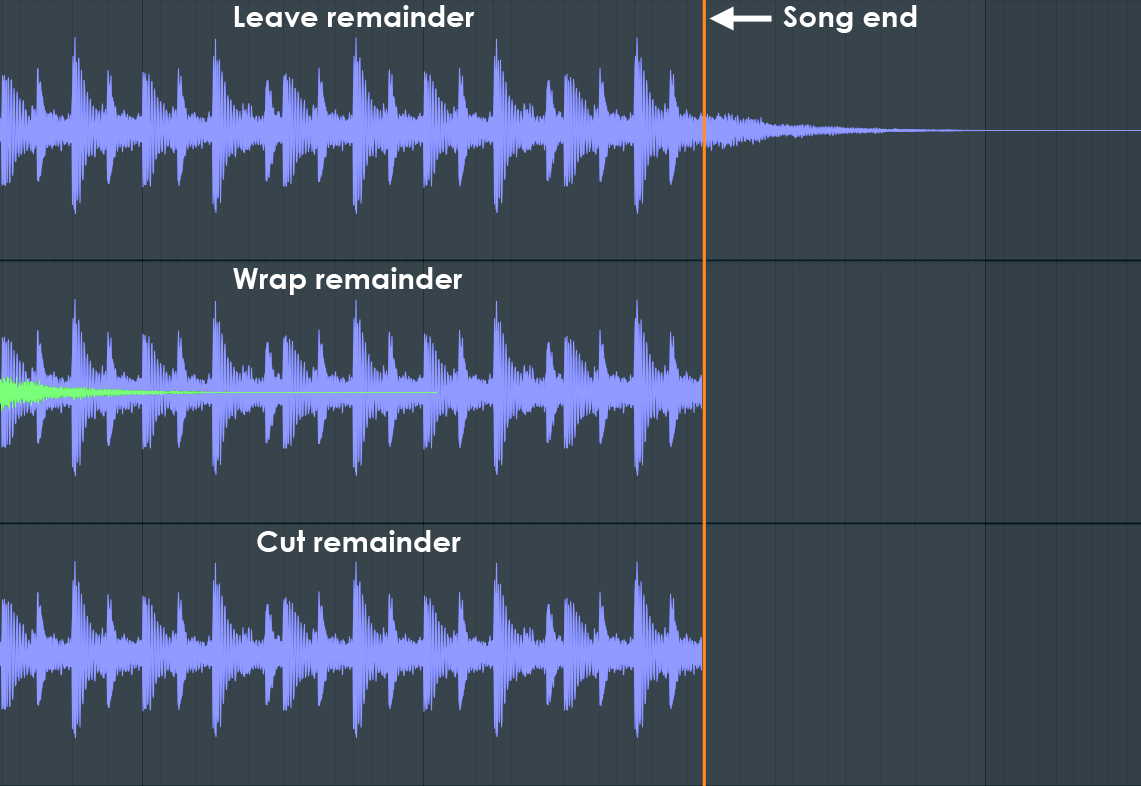
FL Studio is a popular digital audio workstation (DAW). It has many features that enhance music production. One such feature is Trim PDC Silence. PDC stands for Plugin Delay Compensation. This feature adjusts the timing of your tracks. It ensures they sync perfectly.
Trim PDC Silence removes unwanted silence caused by PDC. This results in a cleaner and more precise sound. Understanding this tool can improve your workflow. It can also make your music sound more professional. Let’s explore how this feature works and why it is important.

Credit: www.reddit.com
Introduction To Trim Pdc Silence
FL Studio is a popular digital audio workstation (DAW) used by music producers worldwide. One of its features is Trim PDC Silence. This tool helps clean up audio tracks by removing unwanted silence. Understanding this feature can enhance your workflow and improve your sound quality.
Purpose And Benefits
Trim PDC Silence is designed to manage silence in audio tracks. It helps you maintain a clean, noise-free environment. By trimming silence, you can reduce unnecessary data in your projects. This can lead to a more efficient and organized workspace.
Using Trim PDC Silence can also improve your mix. It eliminates gaps that can disrupt the flow of your music. This helps in creating a smoother listening experience for your audience. It also allows for better synchronization of tracks.
Common Uses
Producers often use Trim PDC Silence in vocal recordings. It removes pauses and background noise between phrases. This results in a cleaner, more professional sound. Another common use is in instrument tracks. It cuts out silent sections to keep the audio tight and focused.
Trim PDC Silence is also handy in live recordings. It helps to clean up the audio by removing unintended silences. This makes the final mix more polished and cohesive. Whether you are working on a podcast, a song, or a soundtrack, this tool can be incredibly useful.
Setting Up Trim Pdc Silence
Setting up Trim PDC Silence in FL Studio helps in managing audio latency. This feature ensures that your audio tracks align perfectly. It is essential for achieving professional sound quality. Let’s dive into how you can set up Trim PDC Silence in FL Studio.
Accessing The Feature
First, open FL Studio on your computer. Locate the mixer window. You will find this in the main toolbar. Click on the mixer icon to open it. In the mixer window, look for the “View” menu. Click on it. From the dropdown, select “View extra volume and pan settings.” This will reveal additional options.
Basic Configuration Steps
Once the extra settings are visible, locate the “Trim PDC Silence” option. Click on it to enable the feature. You may need to adjust the settings based on your project needs. Start by setting a small trim value. Listen to your audio tracks and fine-tune the setting. Make sure the tracks are in sync.
If you experience any latency issues, adjust the trim value again. Repeat until you achieve perfect alignment. This process might take a few tries. Patience is key. Once set, your audio will sound clear and professional.
Using Trim Pdc Silence In Fl Studio
Using Trim PDC Silence in FL Studio is essential for achieving a cleaner mix. It helps you remove unwanted silence from your tracks, keeping your project tidy and efficient. This feature ensures that your audio clips are free from unnecessary pauses, leading to a smoother listening experience. Let’s dive into how you can use Trim PDC Silence in FL Studio effectively.
Step-by-step Guide
First, open your project in FL Studio. Select the audio clip you want to edit. Right-click on the clip to open the context menu. Choose the ‘Edit in Audio Editor’ option to launch Edison.
In Edison, find the ‘Trim PDC Silence’ button. Click on it to remove the silent parts from your audio clip. You can preview the changes before applying them. If satisfied, click on ‘Accept’ to confirm.
Tips For Effective Use
Ensure your audio clips are well-recorded. Clean recordings make the trimming process easier and more accurate. Adjust the sensitivity settings in Edison to get the best results. Higher sensitivity can detect even the smallest silent parts.
Use Trim PDC Silence on individual clips rather than the whole track. This gives you more control over the editing process. Regularly check your clips for unwanted silence to keep your project clean.
Advanced Techniques
Advanced techniques in FL Studio’s Trim PDC Silence can elevate your music production. These methods help in refining your tracks and removing unwanted silence. You can achieve a cleaner and more professional sound. Let’s explore some advanced techniques.
Customizing Settings
Customizing settings in Trim PDC Silence can improve your workflow. Adjust the threshold to determine the level of silence to trim. Use the attack and release settings to control how quickly the silence is removed. This fine-tuning helps in maintaining the natural flow of your audio. Experiment with different settings to find the best fit for your project.
Integrating With Other Tools
Integrate Trim PDC Silence with other FL Studio tools for better results. Use it alongside EQ and compression to enhance your tracks. Combining these tools can give you a cleaner and more polished sound. You can also automate the Trim PDC Silence for dynamic control during playback. This integration can make your music production process smoother and more efficient.
Common Issues And Solutions
Trim Pdc Silence in FL Studio is a useful feature. It helps in cleaning up your audio tracks. But many users face common issues while using it. Here, we will discuss these issues and offer simple solutions.
Troubleshooting Tips
Trim Pdc Silence may not work as expected sometimes. Make sure your plugins are up to date. Outdated plugins can cause problems. Check your audio settings. Incorrect settings can also cause issues. If the problem persists, restart FL Studio. This can fix many small bugs.
Avoiding Common Pitfalls
Many users forget to check their buffer size. A large buffer size can cause latency issues. Always set a smaller buffer size. Also, avoid using too many plugins. This can slow down your system. Keep your project organized. Label your tracks. This helps in managing your project better.
Credit: www.image-line.com
Best Practices
Trim PDC Silence in FL Studio is a useful tool for music producers. It helps improve audio quality and workflow. Let’s explore some best practices for using Trim PDC Silence effectively.
Optimizing Workflow
Using Trim PDC Silence can save time. It removes unnecessary silences in your tracks. This makes your project cleaner and easier to manage. With fewer silent gaps, your timeline looks organized. You can focus on the active parts of your music. This keeps your creative process smooth and efficient. Always trim silences before mixing. It helps to maintain a clear overview of your project.
Maintaining Audio Quality
Trimming silences also helps in maintaining audio quality. It ensures that only relevant audio is processed. This can reduce potential noise and artifacts. Clean tracks lead to a cleaner mix. Use Trim PDC Silence to ensure every element in your track sounds crisp. This practice also helps in reducing CPU load. Your computer will thank you for it. Maintain high audio standards by keeping your tracks free from unnecessary silence.
Comparing Trim Pdc Silence With Other Tools
Trim PDC Silence in FL Studio helps reduce latency issues during music production. This tool stands out for its simplicity and effectiveness. Comparing it with other tools reveals its unique advantages for smoother audio processing.
Trim PDC Silence in FL Studio is an essential tool for music producers. It ensures precise audio synchronization. Many other tools offer similar functionality. This section compares Trim PDC Silence with other popular tools.Key Differences
Different tools offer various features. Here are the key differences:| Feature | Trim PDC Silence | Other Tools |
|---|---|---|
| Ease of Use | High | Varies |
| Integration with FL Studio | Seamless | Limited |
| Precision | Excellent | Good |
| Support | Extensive | Depends |
Pros And Cons
Here are some pros and cons of using Trim PDC Silence:- Pros
- High accuracy in audio synchronization.
- Easy to use interface.
- Works seamlessly with FL Studio.
- Extensive support and documentation.
- Cons
- Limited to FL Studio users.
- May not support all third-party plugins.
- Pros
- Compatibility with multiple DAWs.
- Variety of features for different needs.
- Cons
- Steeper learning curve.
- Less seamless integration with FL Studio.

Credit: itsgratuitous.com
Frequently Asked Questions
What Is Trim Pdc Silence In Fl Studio?
Trim Pdc Silence in FL Studio removes unnecessary silence caused by plugin delay compensation. It helps to keep your project clean and efficient.
How Does Trim Pdc Silence Work?
Trim Pdc Silence analyzes and removes silent gaps introduced by plugin delay compensation. This ensures smoother playback and better performance.
Why Use Trim Pdc Silence In Fl Studio?
Using Trim Pdc Silence optimizes your project, reducing latency and improving overall performance. It keeps your workflow smooth and efficient.
Can Trim Pdc Silence Improve Audio Quality?
Trim Pdc Silence doesn’t directly improve audio quality. However, it helps maintain a clean, efficient project which can indirectly enhance your production.
Conclusion
Trim PDC Silence in FL Studio helps clean your audio. It removes unwanted noises and ensures smooth playback. This feature is simple to use and very effective. By using it, you can improve your music production. No more distractions from random clicks or pops.

Your tracks will sound cleaner and more professional. Give it a try in your next project. You’ll notice the difference. Happy producing!
{ “@context”: “https://schema.org”, “@type”: “FAQPage”, “mainEntity”: [ { “@type”: “Question”, “name”: “What is Trim Pdc Silence in FL Studio?”, “acceptedAnswer”: { “@type”: “Answer”, “text”: “Trim Pdc Silence in FL Studio removes unnecessary silence caused by plugin delay compensation. It helps to keep your project clean and efficient.” } } , { “@type”: “Question”, “name”: “How does Trim Pdc Silence work?”, “acceptedAnswer”: { “@type”: “Answer”, “text”: “Trim Pdc Silence analyzes and removes silent gaps introduced by plugin delay compensation. This ensures smoother playback and better performance.” } } , { “@type”: “Question”, “name”: “Why use Trim Pdc Silence in FL Studio?”, “acceptedAnswer”: { “@type”: “Answer”, “text”: “Using Trim Pdc Silence optimizes your project, reducing latency and improving overall performance. It keeps your workflow smooth and efficient.” } } , { “@type”: “Question”, “name”: “Can Trim Pdc Silence improve audio quality?”, “acceptedAnswer”: { “@type”: “Answer”, “text”: “Trim Pdc Silence doesn’t directly improve audio quality. However, it helps maintain a clean, efficient project which can indirectly enhance your production.” } } ] }As an Amazon Associate, Cleanestor earns from qualifying purchases at no additional cost to you.