
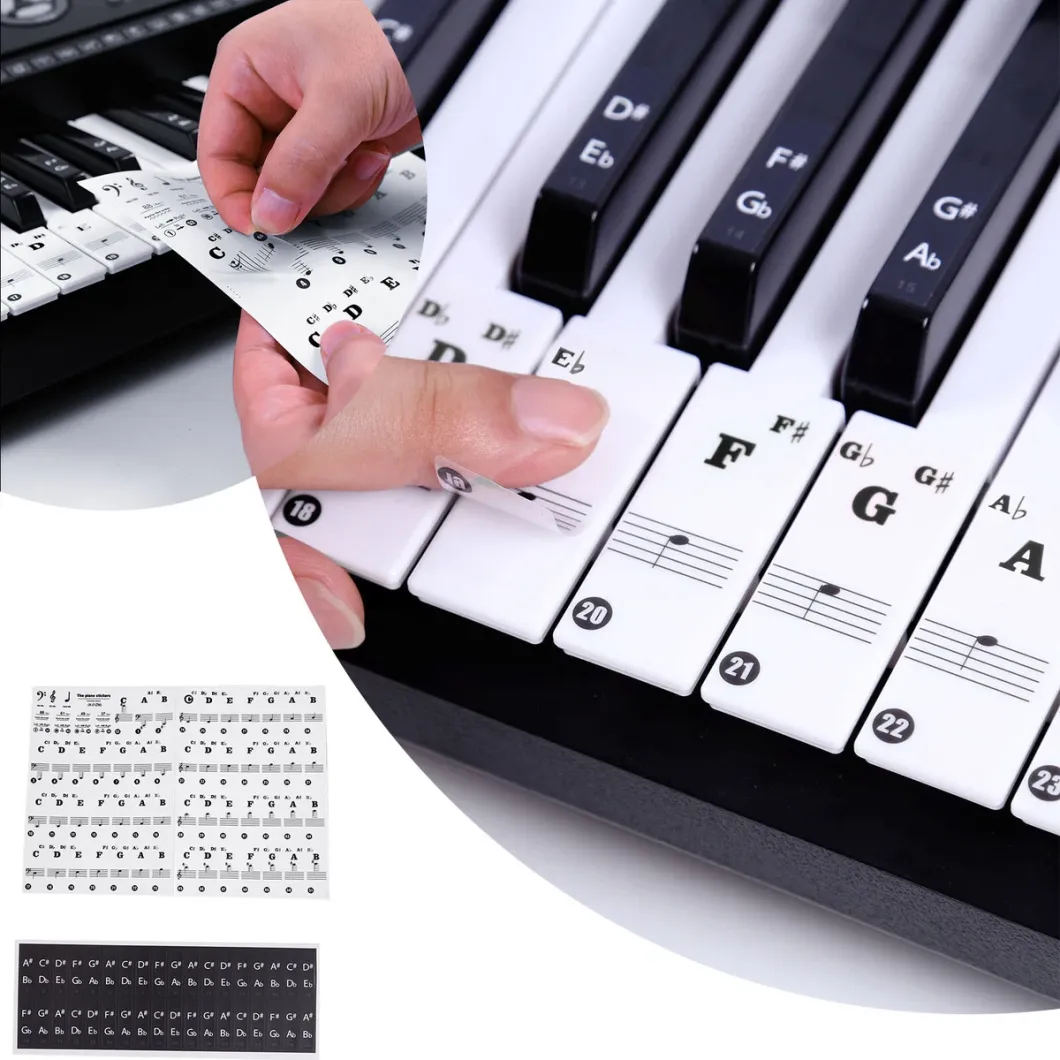
Piano stickers are typically placed directly on the keys. They align with the corresponding notes to assist beginners in learning.
Discovering the layout of a piano keyboard can be challenging for beginners. Piano stickers serve as a guide, simplifying the process of learning the names and positions of the notes. By labeling each key with a sticker that denotes its note, learners can more quickly familiarize themselves with the keyboard.
This visual aid accelerates the memorization process and helps build a strong foundation in music theory. Ideal for both children and adults, these stickers are an excellent tool for making the first steps in piano education less daunting and more enjoyable.
Credit: www.ebay.com
Introduction To Piano Stickers
Exploring the world of music can be thrilling and piano stickers are a fantastic learning tool. Essentials for any novice, they act as a roadmap on the keyboard. Piano stickers guide fingers to the correct keys, easing the initial learning curve. These tiny aids accelerate memory retention of notes and their placements.
Benefits For Beginners
- Visual Learning: Colorful stickers make finding notes simpler.
- Improved Accuracy: They help in hitting the right notes without confusion.
- Enhanced Confidence: Beginners play more confidently, knowing they’re on track.
- Quicker Learning: Memorization of notes becomes faster and more fun.
Types Of Piano Stickers
| Sticker Type | Description | Best For |
|---|---|---|
| Transparent | Blend with keys, showing only letters or symbols. | Minimalists and intermediate players |
| Colored | Bright and varied hues for easy differentiation. | Children and visual learners |
| Removable | Adhesive that leaves no residue when removed. | Temporary use and rental instruments |
| Full-Set | Covers all octaves, detailing every note. | Complete beginners |
Key Placement Fundamentals
Learning piano made simpler: Understanding where stickers go on your keyboard is crucial. It helps beginners familiarize themselves with the notes. Let’s get started with the basics.
Identifying The Keyboard Layout
A standard piano keyboard comprises 88 keys. There are 52 white and 36 black keys. The keys are arranged in a repeating pattern. Let’s identify where each sticker should sit.
White Keys Stickers
White keys represent natural notes. Starting from the note C, locate the set of two black keys. The white key immediately to the left is C. Here, you’ll place the sticker for C. Follow the sequence:
- C – left of the two black keys
- D – between the two black keys
- E – right of the two black keys
- F, G, A, B – use the set of three black keys as a guide
Black Keys Stickers
Black keys denote sharp (#) and flat (b) notes. They lie between white keys. Place stickers indicating the sharp or flat note they represent. Here’s a quick guide:
| Black Key Position | Note |
|---|---|
| Left of 2 black keys | C# / Db |
| Right of 2 black keys | D# / Eb |
| Left of 3 black keys | F# / Gb |
| Middle of 3 black keys | G# / Ab |
| Right of 3 black keys | A# / Bb |
Step-by-step Guide To Applying Stickers
Welcome to our ‘Step-by-Step Guide to Applying Stickers’ that will help you install your piano keyboard stickers with ease. This guide ensures that beginners can set up their learning aids efficiently. Let’s turn those blank keys into a navigable map of notes!
Cleaning The Keys
Starting with a clean surface is crucial for sticker adhesion. Follow these steps:
- Use a soft, damp cloth to wipe each key.
- Avoid excess water that may seep into the keyboard.
- Let the keys dry completely before proceeding.
Aligning Stickers With Notes
Correct placement corresponds to easier learning. Here’s how to align your stickers:
- Identify the middle C as your starting reference point.
- Each sticker should sit just above the bottom of the white keys.
This ensures clear visibility while playing.
Securing The Stickers
Finally, securing the stickers properly will maintain their longevity. Follow these tips:
- Press each sticker firmly from one end to the other.
- Avoid air bubbles by applying smooth, even pressure.
- Check alignment once more before the final press.
With these steps, your piano keys will be well-equipped for effective practice sessions.

Credit: www.ebay.com
Practical Tips For Sticker Use
If you’ve decided to learn the piano, congratulations! Stickers on piano keys can help beginners. They mark the notes on the keyboard. Proper use ensures quick learning. Here are practical tips.
Choosing The Right Sticker Size
Size matters for piano stickers. You need to pick the right one for your keyboard. Sticker size depends on the piano type. Grand pianos will have larger keys than keyboards. Be sure to measure your keys before purchasing stickers.
- For 88-key pianos: Standard size stickers work best.
- For smaller keyboards: Look for smaller or cuttable stickers.
Stickers should fit the white keys. They shouldn’t overlap or interfere with key action. Ensure each label is centered.
Avoiding Common Application Mistakes
Applying piano key stickers seems simple. Yet, it’s easy to make mistakes. Here’s a list of things to avoid.
| Mistake | Tip |
|---|---|
| Not cleaning keys | Wipe the keys with a damp cloth before application. |
| Rushing the process | Take your time. Align stickers carefully. |
| Not pressing firmly | Press down on each sticker to ensure it sticks. |
| Using permanent stickers | Choose removable stickers. They won’t damage the keys. |
In summary, select the correct size and take your time during application. Follow these tips for the best results. Happy learning!
Transitioning Away From Stickers
As piano students grow in their musical journey, the transition away from using stickers on their keyboard is an essential step. It’s a sign of progress and independence. Let’s delve into how and when to peel away these visual aids for a more mature approach to piano playing.
Knowing When To Remove Stickers
Identifying the right time to remove piano stickers is crucial for development. It hinges on a couple of key factors:
- Notation Familiarity: Once the notes and their positions are easily recognized.
- Piano Proficiency: Ability to play simple pieces without aid.
These milestones indicate readiness. Trust in this guide for an effortless transition.
Building Confidence Without Visual Aids
Confidence at the keyboard blooms when reliance on stickers fades.
| Technique | Benefit |
|---|---|
| Regular Practice | Reinforces note memory. |
| Ear Training | Enhances sound recognition. |
| Flashcards | Supports visual note learning. |
Interact with these methods for a smooth transition from stickers to sticker-free piano playing.
Maintaining Your Piano Post-stickers
After mastering the keys with piano stickers, it’s time for the next step. Removing those helpful guides is a milestone. Yet, maintenance after the big peel is crucial. A sticker-free piano still requires love and care to ensure continued musical joy and skill progression. Follow these tips to keep your instrument in its best condition without the training wheels!
Cleaning After Sticker Removal
Sticky residue is a pianist’s nightmare. It can attract dust and dirt, affecting your piano’s appearance and performance. Here’s a simple method to clean your keys post-stickers:
- Gently peel off the stickers from each key, making sure not to use sharp objects that could scratch the surface.
- Prepare a soft cloth dampened with water; for tougher residue, a mild soap solution works wonders. Avoid soaking the keys.
- Wipe each key carefully, moving from the back of the keys to the front to avoid liquid seeping in between the keys.
- Use a separate dry cloth to remove any moisture, ensuring no water stays on the surface.
- Buff the keys to a sparkle, restoring their natural shine.
Continuing To Practice Without Stickers
Transitioning from sticker-assisted playing to remembering the notes can be a challenge. But, it’s a crucial step towards piano proficiency. To ease into this new phase:
- Start with simple scales to train your memory. Familiar tunes help build confidence in note recognition.
- Gradually move to songs you played with stickers. This will reinforce your knowledge of where each note is.
- Practice daily, even if it’s just for a few minutes. Consistency reinforces learning and muscle memory development.
- Be patient with yourself. It’s natural to hit the wrong note occasionally while your fingers learn to find their way.
Remember, every pianist starts somewhere. Saying goodbye to your stickers is a significant step. With diligent care and practice, you’ll continue to enjoy beautiful music, sticker-free!
Can I Use Piano Stickers to Help Learn “When the Party’s Over”?
Piano stickers can be a valuable tool for learning “When the Party’s Over.” By providing visual cues, they simplify note recognition and enhance memorization. As you practice, you can more easily explore the emotions in when the party’s over, allowing for a deeper connection to the music’s poignant themes.
Frequently Asked Questions Of Where Do Piano Stickers Go
Where Do You Put Piano Stickers?
Place piano stickers directly above the keyboard, aligning them with the corresponding keys to guide finger placement and note identification.
Are Piano Stickers A Good Idea?
Piano stickers can benefit beginners by guiding finger placement and note recognition, thus enhancing learning. However, they should be temporary, as reliance on stickers can hinder sight-reading development.
Where Can I Label Piano Keys?
Label piano keys by placing stickers or using a marker directly on the keys. Online tutorials often have printable guides for reference.
Where Do The Letters Go On A Piano?
The letters on a piano keyboard correspond to the musical notes A-G and repeat across the octaves, starting with the note A to the right of the group of two black keys.
Conclusion
Embarking on your piano learning journey has now become simpler with piano key stickers. They serve as guides, boosting confidence and fostering independence as you master each note. Keep practicing, and soon, the stickers will be your stepping stones to playing the piano with ease and flair.

Keep the music flowing!
As an Amazon Associate, Cleanestor earns from qualifying purchases at no additional cost to you.