Are you struggling with FL Studio not recording? This can be frustrating, especially when you want to capture your creative ideas.
FL Studio is a popular digital audio workstation used by many music producers. It offers a wide range of features for creating music. But sometimes, it can run into issues. One common problem is the software not recording audio. This issue can have several causes, from settings errors to hardware problems.
Understanding why this happens can help you fix it quickly. In this blog post, we will explore the common reasons behind this recording issue and offer solutions to get you back on track. Stay tuned to learn how to troubleshoot and resolve FL Studio recording problems.

Credit: www.reddit.com
Common Recording Issues
Recording issues in FL Studio can be frustrating. Many users encounter problems that hinder their creative process. Understanding these issues is key to solving them. In this section, we will explore common recording issues in FL Studio.
Audio Input Problems
One common problem is audio input. Sometimes, FL Studio does not recognize your microphone or instrument. Ensure your device is properly connected. Check the cable and port for any damage.
Another issue is incorrect audio driver selection. Go to the audio settings and select the correct driver. This ensures FL Studio can communicate with your audio device.
Software Settings
Incorrect software settings can also cause recording issues. Make sure you have the correct input channel selected. Open the mixer and check the input source. It should match your audio device.
Check the buffer length setting. A high buffer length can cause latency. Lower it to reduce delay during recording.
Also, ensure you have armed the track for recording. Click the record button on the track you want to record. This step is often overlooked but is crucial for recording.
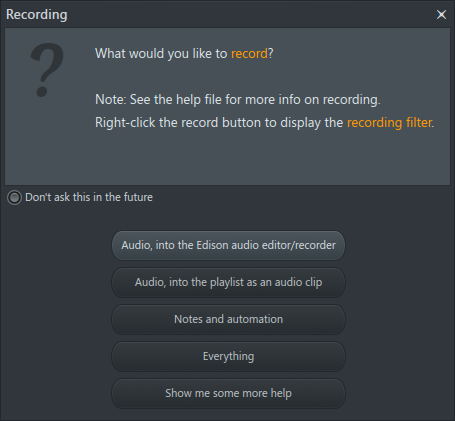
Credit: support.image-line.com
Configuring Audio Settings
Configuring audio settings is crucial for recording in FL Studio. Incorrect settings can cause issues. Let’s explore how to configure your audio settings for a smooth recording experience.
Selecting Audio Device
First, choose the right audio device. Open FL Studio and click on ‘Options’. Select ‘Audio Settings’ from the menu. Under ‘Device’, pick your preferred audio interface. Ensure it’s connected properly. This step helps FL Studio recognize your recording hardware.
Adjusting Sample Rate
Next, set the sample rate. In the ‘Audio Settings’ window, find the ‘Sample Rate’ section. Common rates are 44100 Hz and 48000 Hz. Choose one that matches your project needs. A correct sample rate ensures high-quality recordings without glitches. Test your settings by recording a short clip. Listen for any issues and adjust as necessary.
Checking Hardware Connections
Experiencing issues with FL Studio not recording? Start by checking hardware connections. Ensuring all connections are secure is vital. This process involves examining your microphone setup and any external interfaces. These steps help identify and solve recording problems.
Microphone Setup
First, check if your microphone is properly connected. Ensure the cable is firmly plugged into the correct port. Verify that your microphone is turned on and functioning. Use another device to test if possible. Sometimes, the issue lies with the microphone itself. Double-check the settings in FL Studio. Make sure the software recognizes your microphone.
External Interface
Using an external interface? Ensure it’s connected properly. Check the USB or other relevant cables. Confirm the interface is powered on and functioning. Many issues arise from loose or faulty cables. Test the interface on another device. This can help identify if the interface is the problem.
Next, verify the interface settings in FL Studio. Ensure the software recognizes the external device. Check and adjust the input settings as needed. Proper configuration is crucial for successful recording.
Driver Compatibility
One common reason why FL Studio might not be recording is due to driver compatibility issues. Ensuring that your audio drivers are compatible with FL Studio is crucial for smooth operation. Proper drivers allow FL Studio to communicate with your audio hardware effectively.
Asio Drivers
ASIO drivers are important for low-latency audio performance. They help in achieving real-time audio processing. FL Studio recommends using ASIO drivers for better performance. If FL Studio is not recording, check if the correct ASIO driver is selected.
You can select your ASIO driver from FL Studio settings:
- Open FL Studio
- Go to Options
- Select Audio Settings
- Under Input/Output, choose your ASIO driver
If the ASIO driver is not listed, you might need to install it. Many audio interfaces provide their own ASIO drivers. Make sure to download and install them from the manufacturer’s website.
Updating Drivers
Outdated drivers can also cause recording issues. It’s essential to keep your audio drivers updated. New updates often fix bugs and improve compatibility with software like FL Studio.
To update your drivers:
- Go to your audio interface manufacturer’s website
- Search for the latest drivers for your device
- Download and install the drivers
- Restart your computer
After updating, check if FL Studio is now recording properly. Sometimes, simply updating drivers can resolve many issues.
Permissions And Access
Permissions and access are critical for making sure FL Studio records correctly. Without the right permissions, your software may not function properly. This section covers two key areas: operating system permissions and FL Studio access.
Operating System Permissions
Every operating system has its own set of permissions. These permissions control what software can and cannot do. If FL Studio is not recording, it might be because it lacks the necessary permissions.
- Windows: Check if FL Studio has permission to use the microphone. Go to Settings > Privacy > Microphone. Ensure FL Studio is toggled on.
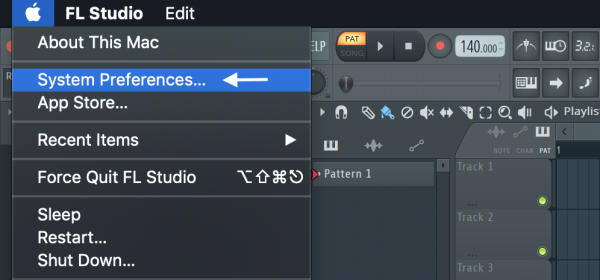
- MacOS: Open System Preferences > Security & Privacy > Privacy. Select Microphone and check if FL Studio is listed and enabled.
Without these permissions, FL Studio cannot access the microphone. Always verify these settings before troubleshooting further.
Fl Studio Access
Beyond the operating system, FL Studio itself has internal access settings. These settings must be configured correctly for recording.
- Open FL Studio and navigate to the Options menu.
- Select Audio Settings and look for the Input/Output section.
- Ensure your microphone is selected as the input device.
- Check the buffer length. A shorter buffer length can improve performance.
If the settings are incorrect, adjust them and try recording again. Sometimes, reinstalling the software can reset any misconfigured settings.
By ensuring both operating system permissions and FL Studio access are correctly set, you increase the chances of successful recording.
Monitoring Inputs
Monitoring Inputs is essential in FL Studio to ensure you can hear what you’re recording. It helps to identify any issues with the input signal. Proper monitoring can help you catch problems early, making your recording process smooth and efficient.
Enabling Input Monitoring
To enable input monitoring in FL Studio, follow these steps:
- Open the mixer window by pressing
F9. - Select the input channel you want to monitor.
- Click on the small arrow next to the input selector.
- Choose your audio interface or microphone from the list.
- Ensure the input monitoring button is enabled (it looks like a speaker).
This process allows you to hear your input signal in real-time. It’s crucial for ensuring the sound quality and avoiding any recording issues.
Latency Issues
Latency is a delay between the input signal and what you hear. It can be a major issue when recording. To reduce latency, you can:
- Lower the buffer size in the audio settings.
- Use an audio interface with low-latency drivers.
- Close other applications running on your computer.
Lowering the buffer size can help, but it may also increase the CPU load. Finding the right balance between latency and performance is key.
Monitoring inputs correctly and managing latency can significantly improve your recording experience in FL Studio. Make sure to check your settings and equipment to ensure everything is working as it should.
Software Updates
Software updates play a critical role in ensuring the smooth functioning of FL Studio. Regular updates can fix bugs, improve performance, and introduce new features. Staying up-to-date is key to avoiding common issues, including recording problems.
Latest Version
Always use the latest version of FL Studio. New versions come with bug fixes and enhancements. These updates can resolve many common issues. Check the official website or your software settings for updates.
Patch Notes
Review the patch notes that come with each update. Patch notes detail the changes and fixes included in the update. They can highlight specific issues that have been resolved. Understanding these can help you troubleshoot recording issues.
Troubleshooting Steps
Are you struggling with FL Studio not recording? Don’t worry. There are several troubleshooting steps you can take to fix this issue. Follow these simple steps to get back to making music without interruptions.
Restarting Fl Studio
Sometimes, a simple restart can solve many problems. Close FL Studio completely. Ensure it is not running in the background. Open the Task Manager to double-check. Once you are sure, restart the software. This can help reset any minor glitches.
Reinstalling Software
If restarting does not work, reinstalling FL Studio might help. First, uninstall the software from your computer. Go to the Control Panel and select “Uninstall a program.” Find FL Studio in the list and click on it. Follow the prompts to complete the uninstallation process.
Next, visit the official FL Studio website. Download the latest version of the software. Install it by following the on-screen instructions. Reinstalling can fix corrupted files or settings that are causing the recording issue.
Credit: support.image-line.com
Frequently Asked Questions
Why Is Fl Studio Not Recording Audio?
FL Studio might not record audio due to incorrect input settings. Ensure your audio device is selected in the input options.
How Do I Fix Fl Studio Not Recording?
Check your audio settings and ensure your input device is selected. Verify that the correct track is armed for recording.
Why Is My Mic Not Working In Fl Studio?
Your mic might not work in FL Studio due to incorrect input selection. Ensure your microphone is set as the input device.
What Should I Check If Fl Studio Is Not Recording?
Check your audio interface settings and ensure the correct input is selected. Verify recording is enabled on the track.
Conclusion
Troubleshooting FL Studio recording issues can be frustrating but manageable. Start by checking your audio settings and device connections. Ensure your drivers are up-to-date. Adjust buffer size to avoid latency problems. Don’t forget to monitor input levels. Simple steps can save you time and effort.

Practice patience and keep experimenting. Recording success is within reach. Happy producing!
{ “@context”: “https://schema.org”, “@type”: “FAQPage”, “mainEntity”: [ { “@type”: “Question”, “name”: “Why is FL Studio not recording audio?”, “acceptedAnswer”: { “@type”: “Answer”, “text”: “FL Studio might not record audio due to incorrect input settings. Ensure your audio device is selected in the input options.” } } , { “@type”: “Question”, “name”: “How do I fix FL Studio not recording?”, “acceptedAnswer”: { “@type”: “Answer”, “text”: “Check your audio settings and ensure your input device is selected. Verify that the correct track is armed for recording.” } } , { “@type”: “Question”, “name”: “Why is my mic not working in FL Studio?”, “acceptedAnswer”: { “@type”: “Answer”, “text”: “Your mic might not work in FL Studio due to incorrect input selection. Ensure your microphone is set as the input device.” } } , { “@type”: “Question”, “name”: “What should I check if FL Studio is not recording?”, “acceptedAnswer”: { “@type”: “Answer”, “text”: “Check your audio interface settings and ensure the correct input is selected. Verify recording is enabled on the track.” } } ] }
As an Amazon Associate, Cleanestor earns from qualifying purchases at no additional cost to you.