If your audio is recording itself in FL Studio, there might be a few reasons. Understanding the cause is the first step to fixing it.
FL Studio is a powerful tool for music production. But sometimes, users face issues. One common problem is audio recording itself. This can be frustrating. It disrupts your workflow and creativity. In this blog, we’ll explore why this happens. We’ll also look at easy ways to fix it.
Whether you’re a beginner or experienced user, this guide will help you. Stay tuned to learn more about solving this issue in FL Studio.

Credit: www.amazon.com
Common Causes
Experiencing audio recording issues in FL Studio can be frustrating. Understanding common causes helps in resolving these problems effectively. This section covers the primary reasons behind such issues.
Software Settings
Incorrect software settings often lead to recording issues. Check your input and output settings. Ensure they match your audio interface. Mismatched settings can cause echo or feedback loops. The buffer size setting also matters. A very low buffer size can lead to glitches. Adjust it according to your system’s capability.
Hardware Issues
Hardware problems can also affect your recordings. Faulty cables are a common culprit. Replace any damaged cables and see if the issue persists. Your audio interface might need an update. Check the manufacturer’s website for the latest firmware. Insufficient power supply can cause interruptions. Ensure your equipment receives adequate power. Sometimes, the issue lies with the microphone. Test with a different mic to rule out this possibility.
Fl Studio Settings
FL Studio is a powerful tool for music production. It provides many settings to optimize your audio recordings. Proper configuration can help prevent your audio from recording itself. This section covers the important FL Studio settings you need to check.
Input/output Configuration
First, check your input/output configuration. Open FL Studio and go to the audio settings. Ensure the correct audio device is selected. Choose your microphone as the input device. Set your speakers or headphones as the output device. Verify that the sample rate matches your audio interface. A common sample rate is 44100 Hz.
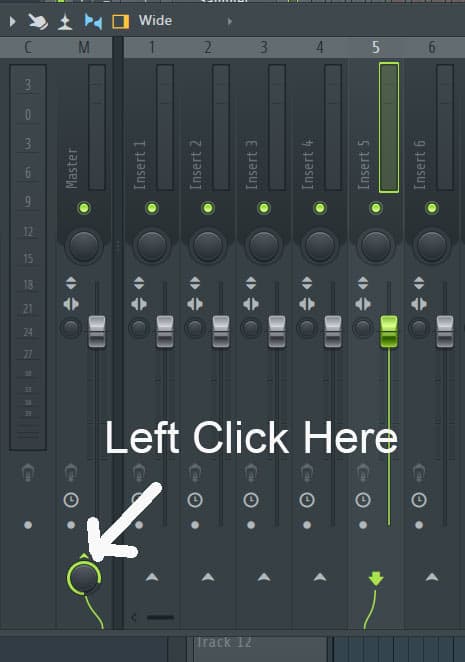
Monitoring Settings
Next, look at your monitoring settings. These settings control what you hear while recording. Open the mixer and select the track you are recording on. Check if the track is set to monitor the input. Disable the direct monitoring option if it is enabled. This prevents the input signal from looping back into the recording. Adjust the buffer length to reduce latency. Lower latency helps you hear the live sound without delay.
Audio Interface Problems
Experiencing issues with your audio recordings in FL Studio can be frustrating. One common culprit is problems with the audio interface. Understanding and resolving these issues can greatly improve your recording quality.
Driver Issues
Audio interface drivers can often cause recording problems in FL Studio. Outdated or incompatible drivers may lead to glitches or poor sound quality. Ensure your drivers are up-to-date by visiting the manufacturer’s website. They usually provide the latest driver versions.
If you’re still facing issues, try reinstalling the drivers. This can sometimes resolve hidden conflicts. Also, check your device manager to ensure the drivers are correctly installed and functioning.
Firmware Updates
Firmware updates for your audio interface can also impact performance. Like drivers, firmware updates can fix bugs and improve compatibility. Visit the manufacturer’s website to check for the latest firmware updates.
Updating the firmware is usually straightforward. Follow the instructions provided by the manufacturer. Make sure your device is connected and powered during the update process. This will help avoid any interruptions or failures.
| Potential Issue | Solution |
|---|---|
| Outdated Driver | Update from Manufacturer’s Website |
| Driver Conflict | Reinstall Driver |
| Firmware Outdated | Check for Firmware Updates |
Credit: productionden.com
Loopback Recording
Loopback recording can be a puzzling issue for many FL Studio users. It involves your audio recording itself, creating an unwanted feedback loop. Understanding and disabling loopback can help solve this problem and improve your recording quality.
What Is Loopback?
Loopback is a feature where the audio output is fed back into the input. This can cause your audio to record itself, leading to feedback and echo issues. It is often used for specific tasks but can cause problems during regular recording sessions.
Disabling Loopback
To disable loopback, follow these simple steps:
- Open FL Studio and go to the Options menu.
- Select Audio Settings from the dropdown list.
- In the Audio Settings window, locate the Input/Output section.
- Ensure that the Loopback option is unchecked.
- Click Apply and then OK to save the changes.
Disabling loopback can prevent the audio from recording itself. This leads to a cleaner and clearer recording experience.
Here’s a quick overview of the steps in a table:
| Step | Action |
|---|---|
| 1 | Open FL Studio and go to Options |
| 2 | Select Audio Settings |
| 3 | Locate Input/Output section |
| 4 | Uncheck Loopback option |
| 5 | Click Apply and OK |
By following these steps, you can avoid the common pitfall of loopback recording in FL Studio. Enjoy a smoother and more professional recording experience!
Windows Audio Settings
Understanding Windows audio settings is crucial for resolving audio recording issues in FL Studio. Sometimes, the problem lies within the settings of your Windows operating system. Tweaking these settings can greatly improve your audio recording experience. Let’s delve into the key areas: Recording Devices and Playback Devices.
Recording Devices
First, check your recording devices. Right-click the sound icon in the taskbar. Select ‘Sounds’ and navigate to the ‘Recording’ tab. Here, you see a list of all connected recording devices.
Ensure your microphone is set as the default device. If it’s not, right-click on your microphone and choose ‘Set as Default Device’. This ensures FL Studio uses the correct input for recording.
Also, check the levels. Right-click your microphone, select ‘Properties’, and go to the ‘Levels’ tab. Adjust the volume slider to an appropriate level. Click ‘OK’ to save the changes.
Playback Devices
Next, focus on playback devices. Right-click the sound icon again and select ‘Sounds’. This time, go to the ‘Playback’ tab. You will see all connected playback devices like speakers and headphones.
Ensure your main output device is set as default. Right-click your preferred playback device and select ‘Set as Default Device’. This step ensures FL Studio outputs audio through the correct device.
Check the levels here too. Right-click your playback device, select ‘Properties’, and go to the ‘Levels’ tab. Adjust the volume to your desired level and click ‘OK’ to save.
By properly configuring these settings, you can significantly improve your audio recording and playback experience in FL Studio.
Third-party Plugins
Third-party plugins can be a valuable addition to your FL Studio setup. They offer unique sounds, effects, and tools that can enhance your music production. However, these plugins can sometimes cause problems, including unexpected audio recording issues.
Plugin Conflicts
Plugin conflicts can arise from compatibility issues. Not all third-party plugins are designed to work seamlessly with FL Studio. When these plugins clash, they might interfere with your audio recording process.
To identify a conflicting plugin, disable one plugin at a time. Check if the issue persists after each one. This method helps pinpoint the problematic plugin quickly.
Once identified, consider updating or replacing the conflicting plugin. Many developers provide updates to fix known issues. Keep your plugins updated to minimize conflicts.
Plugin Settings
Incorrect plugin settings can also lead to audio recording itself in FL Studio. Some plugins have built-in recording or monitoring features that, if misconfigured, can cause feedback loops.
Inspect the settings of each plugin you use. Look for options like “Direct Monitoring” or “Input Monitoring”. These settings might need adjustment to prevent unwanted recordings.
To help you, here is a table with common plugin settings and their potential impact:
| Plugin Setting | Impact on Recording |
|---|---|
| Direct Monitoring | Can create feedback loops if enabled |
| Input Monitoring | May cause live sound to be recorded again |
| Latency Compensation | Improper settings can lead to sync issues |
Adjust these settings to see if they resolve your issue. Always save your project before making changes to avoid losing your work.
In summary, third-party plugins can cause audio recording issues due to conflicts and incorrect settings. By identifying conflicts and adjusting settings, you can minimize these problems and enjoy a smoother recording experience in FL Studio.
Troubleshooting Steps
Experiencing issues with FL Studio recording itself can be frustrating. Understanding the troubleshooting steps can help you solve the problem quickly. In this section, we will explore some key steps to resolve this issue.
Restarting Fl Studio
Sometimes, a simple restart can solve many issues. Follow these steps to restart FL Studio:
- Save your current project.
- Close the FL Studio application.
- Wait for a few seconds.
- Reopen FL Studio and load your project again.
This can help refresh the software and clear temporary glitches.
Checking Connections
Ensure all your audio devices are connected properly. Check the following connections:
- Microphone: Make sure it is plugged in correctly.
- Audio Interface: Verify its connection to your computer.
- Cables: Inspect them for any damage or loose connections.
Improper connections can cause audio issues.
By following these steps, you can address and resolve the problem of FL Studio recording itself. If the issue persists, consider seeking further technical support.
Seeking Professional Help
Experiencing issues with audio recordings in FL Studio can be frustrating. Sometimes, the best solution is to seek professional help. There are instances where technical problems require expert attention. This section will guide you on when to contact support and how to find reliable technicians.
When To Contact Support
You should reach out to support if you encounter persistent issues. For example, if your recordings are always distorted or if the software crashes frequently. These problems often need expert troubleshooting.
Another sign is when basic troubleshooting steps fail. If you’ve tried adjusting settings, reinstalling software, and updating drivers without success, it’s time to get help. Professional support can provide a more in-depth diagnosis.
Finding Reliable Technicians
Finding a reliable technician is crucial. Look for professionals with good reviews and ratings. Websites like Yelp and Google Reviews can be helpful. Check their certifications and experience with FL Studio.
You can also ask for recommendations from other musicians or producers. Word-of-mouth referrals often lead to trustworthy technicians. Ensure they have experience with audio recording software.
Here is a simple table to help you decide when to contact support:
| Issue | Action |
|---|---|
| Software Crashes | Contact Support |
| Distorted Recordings | Contact Support |
| Basic Troubleshooting Fails | Contact Support |
| Need Expert Diagnosis | Contact Support |
By knowing when to contact support and finding reliable technicians, you can ensure your FL Studio runs smoothly. This will help you focus on creating great music without technical disruptions.

Credit: www.youtube.com
Frequently Asked Questions
Why Is My Fl Studio Recording Itself?
This issue occurs when the audio output is routed back into the input. Check your audio settings and disable any unnecessary routing.
How Do I Stop Feedback In Fl Studio?
To stop feedback, ensure your input and output devices are correctly configured. Avoid routing the output back into the input.
Why Do I Hear Echo In Fl Studio?
Echoes can result from high latency settings. Adjust your buffer size and ensure your audio drivers are updated.
How Can I Fix Audio Clipping In Fl Studio?
Audio clipping occurs due to high input levels. Lower your input gain and check your mixer settings to prevent distortion.
Conclusion
Understanding why your audio is recording itself in FL Studio can be tricky. By following the steps mentioned, you can resolve this issue. Ensure your settings are correct and avoid feedback loops. Regularly check your audio devices and connections. Practice makes perfect.

With patience, you will improve your recording quality. Happy music-making!
{ “@context”: “https://schema.org”, “@type”: “FAQPage”, “mainEntity”: [ { “@type”: “Question”, “name”: “Why is my FL Studio recording itself?”, “acceptedAnswer”: { “@type”: “Answer”, “text”: “This issue occurs when the audio output is routed back into the input. Check your audio settings and disable any unnecessary routing.” } } , { “@type”: “Question”, “name”: “How do I stop feedback in FL Studio?”, “acceptedAnswer”: { “@type”: “Answer”, “text”: “To stop feedback, ensure your input and output devices are correctly configured. Avoid routing the output back into the input.” } } , { “@type”: “Question”, “name”: “Why do I hear echo in FL Studio?”, “acceptedAnswer”: { “@type”: “Answer”, “text”: “Echoes can result from high latency settings. Adjust your buffer size and ensure your audio drivers are updated.” } } , { “@type”: “Question”, “name”: “How can I fix audio clipping in FL Studio?”, “acceptedAnswer”: { “@type”: “Answer”, “text”: “Audio clipping occurs due to high input levels. Lower your input gain and check your mixer settings to prevent distortion.” } } ] }As an Amazon Associate, Cleanestor earns from qualifying purchases at no additional cost to you.