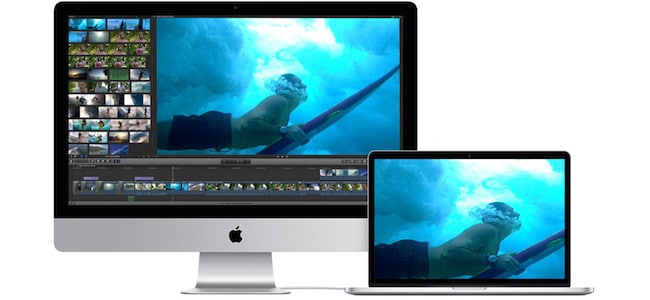
Yes, you can use an iMac as a monitor for a Mac Studio. This setup is possible through a feature called Target Display Mode.
Let’s dive into how this works and what you need to get started. Many Mac users seek to maximize their workspace without buying a new monitor. Using an iMac as a display for a Mac Studio can be a practical solution.
This method can save money and space while providing a high-quality screen. The process involves connecting the two devices with the right cables and configuring some settings. In this guide, we’ll explore the necessary steps and tools to achieve this setup. Whether for work or creativity, combining these Apple devices can enhance your productivity. Stay tuned to learn how to make your iMac serve as an efficient monitor for your Mac Studio.
Credit: machow2.com
Compatibility Check
Using your iMac as a monitor for your Mac Studio can be a convenient solution. But, before diving in, ensure compatibility between the devices.
System Requirements
To use an iMac as a monitor, certain system requirements must be met. You need a Mac Studio with macOS 10.15.5 or later. The iMac must support Target Display Mode.
Ensure the Mac Studio has the correct ports. An appropriate cable, such as Thunderbolt or Mini DisplayPort, is also necessary.
Supported Models
Not all iMac models support Target Display Mode. Here is a list of supported iMac models:
- iMac (27-inch, Late 2009)
- iMac (27-inch, Mid 2010)
- iMac (Mid 2011 to Mid 2014)
Later iMac models do not support Target Display Mode. Check your iMac’s model and year to ensure compatibility.
| iMac Model | Supported Year |
|---|---|
| iMac (27-inch) | Late 2009, Mid 2010 |
| iMac (27-inch) | Mid 2011 to Mid 2014 |
Using the table, verify if your iMac can be used as a monitor. If your iMac is not listed, it is not compatible with Target Display Mode.

Credit: www.youtube.com
Necessary Equipment
Using an iMac as a monitor for a Mac Studio can be an efficient setup. To achieve this, you need specific equipment. Let’s explore the necessary components.
Cables And Adapters
First, you need the right cables and adapters. The iMac and Mac Studio may have different ports. Check the ports on both devices.
- Thunderbolt Cable: A Thunderbolt 3 or 4 cable is essential.
- USB-C to USB-C Cable: If Thunderbolt is unavailable, this is a good alternative.
- Adapters: You might need an adapter, like Thunderbolt to HDMI.
Ensure the cables support high-resolution video and audio. This ensures a smooth experience.
Software Tools
Besides cables, you need software tools. These tools help in setting up the iMac as a monitor.
- Target Display Mode: This is a built-in feature in older iMacs. It allows the iMac to be used as an external display.
- Luna Display: A third-party software. It can turn your iMac into a second screen wirelessly.
- Duet Display: Another third-party option. It supports both wired and wireless connections.
Choose the software that best fits your needs. Ensure compatibility with both devices.
Initial Setup
Using your iMac as a monitor for Mac Studio is a great way to maximize your workspace. Before you can start using your iMac as a display, you need to complete the initial setup process. This section will guide you through connecting your devices and configuring your display settings to get the best experience.
Connecting Devices
First, ensure that both your iMac and Mac Studio are powered off. You’ll need the right cable to connect the devices. For most setups, a Thunderbolt or USB-C cable works best.
- Connect one end of the cable to the Mac Studio.
- Connect the other end to the iMac.
Once connected, power on both devices. The iMac should recognize the Mac Studio and start displaying its screen.
Configuring Display Settings
After connecting your devices, you need to configure the display settings. This ensures the screen resolution and layout are optimized.
- Open System Preferences on your Mac Studio.
- Select Displays.
- Click on the Arrangement tab.
Here, you can arrange the display layout to your liking. Drag the displays to position them as needed.
You can also adjust the screen resolution:
- In the Displays window, select the Display tab.
- Choose the desired resolution from the list.
For a better experience, enable Night Shift to reduce blue light in the evening. This is also done in the Displays settings.
Using Target Display Mode
Many Mac users ask, “Can I use my iMac as a monitor for Mac Studio?” The answer is yes, but with some steps. One effective way to achieve this is by using Target Display Mode. This feature allows your iMac to function as an external display.
Below, we’ll discuss how to activate Target Display Mode and troubleshoot common issues that may arise.
Activating Target Display Mode
To activate Target Display Mode, you’ll need to follow these simple steps:
- Ensure both the iMac and Mac Studio are powered on.
- Connect the two devices using a Thunderbolt or Mini DisplayPort cable.
- On the iMac, press Command + F2 on the keyboard. This will switch the iMac into Target Display Mode.
Now, your iMac should display the content from your Mac Studio. This setup makes it convenient for users who need a larger or secondary screen.
Troubleshooting Common Issues
Sometimes, you may encounter issues when trying to use Target Display Mode. Here are some common problems and their solutions:
| Issue | Solution |
|---|---|
| iMac not entering Target Display Mode | Ensure you’re using a compatible cable and the iMac is from 2009-2014. |
| No display on iMac | Check the cable connections and ensure both devices are on the same macOS version. |
| Keyboard shortcuts not working | Restart both devices and try again. Sometimes, a simple restart can fix the issue. |
By following these troubleshooting steps, you can resolve most issues with Target Display Mode. Enjoy the benefits of using your iMac as a monitor for Mac Studio.
Alternative Methods
Using your iMac as a monitor for your Mac Studio can be challenging. There are alternative methods to achieve this goal. This section will cover two popular methods: using third-party applications and wireless display solutions.
Using Third-party Applications
Many users prefer third-party applications to connect their iMac and Mac Studio. These applications offer flexibility and additional features.
- Duet Display: This app allows you to use your iMac as a secondary display. It is compatible with macOS and provides a high-resolution connection.
- Luna Display: Luna Display is another great option. It offers a stable and high-quality connection. It supports both wired and wireless connections.
These apps typically require installation on both devices. They may have a one-time purchase fee or a subscription model. Always check compatibility with your specific iMac and Mac Studio models.
Wireless Display Solutions
Wireless display solutions eliminate the need for cables. They provide a clean and flexible setup. There are several options available:
| Solution | Features |
|---|---|
| AirPlay | Built into macOS, simple to use, reliable |
| Google Chromecast | Requires a Chromecast device, works with many apps |
| Miracast | Requires a Miracast receiver, offers high-quality streaming |
Using AirPlay is the easiest solution if both your iMac and Mac Studio support it. It provides a seamless connection and good performance. Google Chromecast and Miracast are also great options. They may require additional hardware but offer versatility and ease of use.
In summary, both third-party applications and wireless display solutions can help you use your iMac as a monitor for your Mac Studio. Choose the method that best suits your needs and setup.
Optimizing Display Quality
Optimizing the display quality of your iMac when using it as a monitor for your Mac Studio can significantly enhance your visual experience. Ensuring that the resolution and colors are set correctly will provide crisp images and vibrant colors. This section will guide you through adjusting resolution and color calibration for the best display quality.
Adjusting Resolution
Start by accessing the display settings on your Mac Studio. Select the Apple menu, then choose “System Preferences” and click on “Displays.” Adjust the resolution to match the native resolution of your iMac screen. This ensures that you get the sharpest image possible. A higher resolution provides more screen real estate, making it easier to multitask.
Sometimes, scaling options may also be available. Choose a scaling option that maintains clarity while making text and images appear larger. Experiment with different resolutions to find the one that suits your needs best. Remember, the native resolution of your iMac is usually the optimal choice.
Color Calibration
Color calibration is crucial for accurate color representation. Go to the “Displays” settings in “System Preferences” on your Mac Studio. Click on the “Color” tab and select “Calibrate.” Follow the on-screen instructions to fine-tune the display colors.
During calibration, ensure that the ambient light in your room is consistent. This helps in achieving a more accurate calibration. You can also use professional calibration tools for even better results. Proper color calibration ensures that your images and videos look true to life.
By adjusting the resolution and calibrating the colors, you can optimize the display quality of your iMac when used as a monitor for your Mac Studio. Enjoy a sharper, more vibrant visual experience.
Performance Considerations
Using an iMac as a monitor for your Mac Studio can be an efficient way to maximize existing resources. However, understanding performance considerations is essential. This ensures an optimal user experience.
Latency And Refresh Rate
Latency refers to the delay between an action and its visual representation on the screen. High latency can affect your workflow. It can be frustrating. Using an iMac as a monitor might introduce some latency. This is due to the data transmission process.
The refresh rate is another critical factor. It measures how often the display updates per second. A higher refresh rate means smoother visuals. iMacs generally have good refresh rates. However, they might not match high-end monitors designed for professional use.
Impact On System Resources
Running an iMac as a monitor can impact system resources. This includes CPU and GPU usage. Your Mac Studio will need to allocate resources to handle the display output.
This might affect the performance of other applications. Especially those that are resource-intensive. Consider this if you run demanding software. Balancing system resources is key to maintaining efficiency.
In summary, performance considerations are vital. Assess latency, refresh rates, and resource impact. This ensures a smooth and efficient setup.
Credit: www.podfeet.com
Frequently Asked Questions
Can I Use An Imac As A Monitor For Mac Studio?
Yes, you can use certain iMac models as a monitor for Mac Studio by using Target Display Mode.
Which Imac Models Support Target Display Mode?
Only iMacs from 2009 to 2014 support Target Display Mode. Newer models do not support this feature.
How Do I Enable Target Display Mode?
Connect your iMac and Mac Studio with a Thunderbolt or Mini DisplayPort cable. Press Command + F2 on iMac.
Do I Need Any Special Cables?
Yes, you need a Thunderbolt or Mini DisplayPort cable to connect your iMac to Mac Studio.
Conclusion
Using an iMac as a monitor for Mac Studio is possible. You just need the right cables and settings. This setup can save space and money. Plus, it offers a seamless workflow. Always check compatibility before starting. Follow the steps carefully to avoid issues.

Enjoy the enhanced display and boosted productivity. This guide helps you connect and use your devices efficiently. Happy computing!
{ “@context”: “https://schema.org”, “@type”: “FAQPage”, “mainEntity”: [ { “@type”: “Question”, “name”: “Can I use an iMac as a monitor for Mac Studio?”, “acceptedAnswer”: { “@type”: “Answer”, “text”: “Yes, you can use certain iMac models as a monitor for Mac Studio by using Target Display Mode.” } } , { “@type”: “Question”, “name”: “Which iMac models support Target Display Mode?”, “acceptedAnswer”: { “@type”: “Answer”, “text”: “Only iMacs from 2009 to 2014 support Target Display Mode. Newer models do not support this feature.” } } , { “@type”: “Question”, “name”: “How do I enable Target Display Mode?”, “acceptedAnswer”: { “@type”: “Answer”, “text”: “Connect your iMac and Mac Studio with a Thunderbolt or Mini DisplayPort cable. Press Command + F2 on iMac.” } } , { “@type”: “Question”, “name”: “Do I need any special cables?”, “acceptedAnswer”: { “@type”: “Answer”, “text”: “Yes, you need a Thunderbolt or Mini DisplayPort cable to connect your iMac to Mac Studio.” } } ] }As an Amazon Associate, Cleanestor earns from qualifying purchases at no additional cost to you.