Yes, you can change the color of your electric guitar through a process called refinishing. It can involve either painting or staining the body of the guitar.
A vivid, personalized guitar can be a visual extension of your music, expressing creativity that resonates beyond the auditory experience. Refinishing your electric guitar allows you to put a unique stamp on your instrument, whether aiming for a sleek, professional look or an eye-catching design.
The process can be undertaken by professionals for premium results, or by enthusiasts as a DIY project. While it’s a way to breathe new life into an older instrument, it’s also an opportunity to ensure your guitar stands out on stage and reflects your personal style. Keep in mind that altering your guitar’s appearance can affect its resale value, so consider the change carefully.
Introduction To Personalizing Your Electric Guitar
Welcome to the exciting world of making your electric guitar as unique as your sound! Personalizing your electric guitar is not just about making a visual statement; it’s about crafting an instrument that resonates with your personality and style as a musician. Whether you’re a seasoned player or just starting out, adding a personal touch to your guitar can inspire new creativity. Let’s dive into the world of electric guitar customization, looking at the allure of making it truly your own and understanding what influences its color.
The Allure Of Customization
Customizing your electric guitar is akin to having a bespoke suit tailored just for you. It’s a thrilling process that not only sets you apart but also enhances your connection with the instrument. Personalization allows guitarists to express themselves not only through their music but also through the aesthetic allure of their instrument. From sleek and modern to vintage vibes, the possibilities are endless. This customization might involve intricate paint jobs, unique finishes, or even custom hardware, each facet contributing to the individual character of your guitar.
What Affects An Electric Guitar’s Color?
The color of an electric guitar is influenced by several factors including the type of wood, the paint or finish used, and the age of the instrument. Different woods absorb stains and finishes differently, which can affect the final hue. The type of finish—whether glossy, matte, or satin—can also impact the guitar’s color and overall look. Over time, the color can change as the guitar is exposed to different environmental conditions, like sunlight and humidity. For guitarists considering a color change, the options range from professional re-finishing to DIY painting kits, each with their own set of considerations for durability, time investment, and cost.
Credit: guitarspace.org
Understanding The Basics Of Guitar Finishing
Transforming the color of an electric guitar isn’t just about aesthetics; it’s also about understanding the intrinsic qualities that make a guitar unique. The finishing of a guitar not only protects the wood but can also influence your instrument’s resonance, sustain, and overall sonic characteristics. Before diving into the kaleidoscope of colors, it’s crucial to grasp the fundamentals of guitar finishing and how it plays a pivotal role in the life of your cherished instrument.
Different Types Of Guitar Finishes
The world of guitar finishes is diverse, each with their own visual appeal and effect on the wood’s behavior:
- Nitrocellulose lacquer – Traditionally used on vintage guitars, it’s known for its thin layer and the ability for the wood to resonate more freely.
- Polyurethane – A modern standard, thicker and more durable offering great protection with minimal maintenance.
- Polyester – Similar to polyurethane but even more rugged, though potentially dampening the wood’s natural tone.
- Shellac – Often used in classical guitars, it provides a delicate and organic finish.
- Oil finishes – Renders a natural look and is generally lighter, impacting the tone minimally.
Impact Of Finish On Sound And Playability
The choice of finish can impact your guitar’s sound and playability. Thicker finishes might dampen the wood’s natural vibrations, leading to less resonance and a change in tonal characteristics. Conversely, thinner finishes often allow for more wood vibration, potentially enhancing sustain and warmth of the tone. The finish also affects the guitar’s feel; for instance, certain players prefer the smooth glide of a satin finish under their hands over a glossy one.
Preparation For Finishing: Tools And Materials Needed
Ready to change the color of your electric guitar? The right preparation is key:
| Tool/Material | Description |
|---|---|
| Sandpaper | For smoothing the wood surface and removing the old finish. |
| Wood Filler | For patching any imperfections on the wood surface. |
| Sealer | To prep the wood for finishing touches. |
| Primer | For an even base before applying the color. |
| Paint | The color of your choice, specific to guitar finishing. |
| Clear Coat | For protection and to achieve the desired gloss or matte finish. |
Ensure you have these essential tools and materials on hand before you embark on the journey of transforming your guitar’s look and feel.
Diy Approach To Changing Your Guitar Color
Feeling stuck with the factory color of your electric guitar? An entire world of possibilities awaits those daring enough to transform their instrument’s appearance. With some elbow grease and a sprinkle of creativity, you can unlock a fresh, personalized look. Embrace the DIY approach to changing your guitar color to ensure your axe perfectly reflects your unique style. Let’s break down this electrifying makeover into manageable steps for a stunning result.
Step By Step Guide To Safely Disassembling Your Guitar
Embark on your DIY journey by disassembling your electric guitar with care. This meticulous preparation is key to achieving a flawless finish.
- Remove strings to prevent any hindrance during the process.
- Detach the neck of the guitar if it is bolt-on. Keep screws and small parts in a container.
- Take out the pickguard, pickups, and electronics. A clear photo of the wiring will help reassembly.
- Label each component if necessary to ensure everything goes back into its rightful place.
Sanding And Priming For A Fresh Base
Creating a smooth canvas is essential for the new color to shine. Start with sanding your guitar body to remove the old finish and apply a primer to ensure the new paint adheres well.
- Sand the body evenly with a fine-grit sandpaper, moving to a coarser grit for persistent areas.
- Clean the surface thoroughly to remove all dust and debris.
- Apply a quality primer and allow it to dry as per the instructions.
Selecting The Right Paint Or Stain For Your Guitar
Choosing the right type of paint or stain is crucial for both aesthetics and long-lasting results.
| Type of Finish | Characteristics | Suitable For |
|---|---|---|
| Polyurethane/Lacquer | Durable and widely available in numerous colors. | Players seeking a long-lasting, glossy finish. |
| Nitrocellulose | Gives a classic, vintage feel with a natural aging process. | Enthusiasts of antique looks and retro vibes. |
| Stain | Accentuates natural wood grain with a more subtle tint. | Those looking to highlight the guitar’s original wooden charm. |
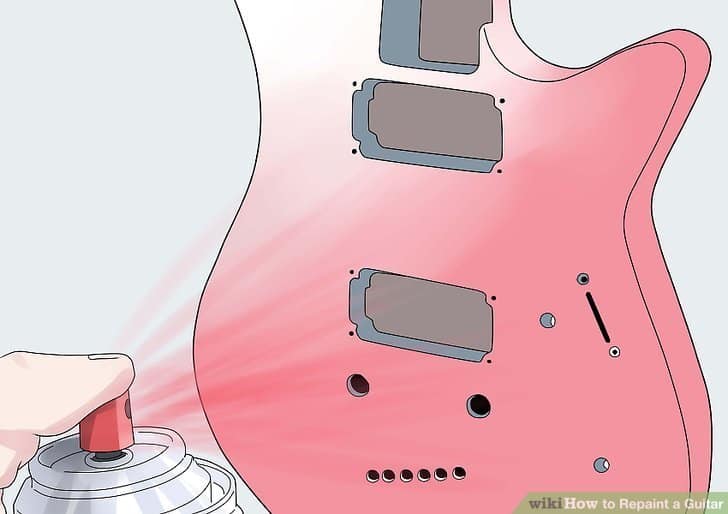
Applying The Color: Techniques For Different Finishes
After the perfect foundation is set, the next stage is to apply the color, a thrilling stride towards your revamped guitar persona.
- Test your chosen paint or stain on a scrap piece of wood to preview the result.
- Apply multiple thin coats rather than one thick coat to avoid drips and inconsistencies.
- Use spray paint for a more uniform coat, or brushes and rags for staining, depending on your desired effect.
- Finish with a clear protective coat, sanding lightly between layers for an impeccable outcome.

Credit: www.wikihow.com
Protecting The New Finish
Once you’ve transformed the color of your electric guitar, protecting the new finish becomes paramount. A stunning new hue can breathe fresh life into an old instrument, but without the right protective measures, your guitar’s finish might wear away or fail to stand the test of time. Let’s dive into the nitty-gritty of keeping your guitar’s new color bold, bright, and enduring.
Choosing A Clear Coat: Options And Application
The clear coat is the shield that keeps your guitar’s color vibrant and safe from scratches, chips, and the wear-and-tear of rock ‘n’ roll. It’s important to choose the right type of clear coat for your specific needs. The two main contenders are:
- Polyurethane – Known for its thick, durable finish and ease of application. It’s also resistant to various chemicals and solvents.
- Nitrocellulose – Offers a thinner, more traditional finish that many claim allows the guitar’s wood to breathe and resonates better for a classic sound.
Once the choice is made, the application process can begin. Ensure a clean, dust-free environment and apply the clear coat in even layers. Allow sufficient drying time between coats to avoid drips or a cloudy appearance.
Proper technique matters. Use a wide, sweeping motion with the spray nozzle to cover the surface uniformly. Multiple light coats are typically more effective than a few heavy ones.
Curing Time And Aftercare For The New Finish
Patiently waiting for the guitar to cure is crucial; dive in too early, and you might end up with unsightly smudges or fingerprints. The curing time can vary between one to four weeks, depending on the clear coat type and environmental factors. Here’s a quick guide to follow:
| Clear Coat Type | Curing Time | Aftercare Advice |
|---|---|---|
| Polyurethane | 1-2 Weeks | Keep guitar in a temperature-controlled environment; avoid playing or handling. |
| Nitrocellulose | 2-4 Weeks | Avoid placing the guitar in direct sunlight; handle with care when moving. |
After the finish has fully cured, take measures to extend the life of your new finish. Regularly cleaning and polishing the surface can prevent grime build-up that might damage the color. For lingering shine and protection, consider using a quality guitar wax or polish that’s compatible with your type of finish.
Remember, the longevity of your guitar’s new coat isn’t just about the initial application; it’s about ongoing care. Treat your reinvented axe with the love it deserves, and it will reward you with years of aesthetic appeal and preserved tone quality.
Professional Refinishing Options
Changing the color of your electric guitar isn’t just about personal expression—it’s about rejuvenating its appearance and potentially enhancing its value. Professional refinishing involves meticulous craftsmanship and a keen attention to detail that goes beyond superficial aesthetics. A professionally refinished guitar not only captivates the audience with its visual appeal but also maintains the integrity of the instrument’s quality.
When To Opt For A Professional Guitar Technician
Considering a professional for your guitar’s refinishing isn’t a decision to be taken lightly. Here are scenarios where expertise truly counts:
- Complex Finishes: High-end or custom guitars with intricate finishes require a skilled hand.
- Value Preservation: Vintage or rare guitars can lose value if not properly refinished.
- Structural Repairs: If refinishing also involves repairing cracks or other damage, a professional is imperative.
Costs And Benefits Of Professional Refinishing
| Aspect | Cost | Benefit |
|---|---|---|
| Materials | Varies based on finish quality | Durable, high-quality finish |
| Labor | Depends on complexity | Precision and attention to detail |
| Time | May take several weeks | Lasting results with minimal upkeep |
A detailed estimate by a professional will spell out the costs and the long-term benefits like a longer lifespan for your guitar and the potential for increased resale value.
Finding A Reputable Professional For Guitar Customization
Selecting the right professional is crucial for a satisfying result. Follow these steps to ensure you’re entrusting your guitar to a reliable expert:
- Research: Look up reviews and ask for recommendations from fellow musicians.
- Portfolio: Evaluate their previous work to assess their craftsmanship and style compatibility.
- Quotation: Get detailed quotes from multiple technicians to compare services and rates.
- Communication: Ensure they understand your vision and communicate their process clearly.
A well-chosen technician will not only transform your guitar’s color but will also cater to your instrument’s specific needs, ensuring a finish that both looks stunning and stands the test of time.
Possible Pitfalls And Tips For Success
Embarking on the journey to change your electric guitar’s color can be as thrilling as it is daunting. Achieving a stunning, professional-looking finish requires more than just enthusiasm. Awareness of potential pitfalls and armed with practical tips for success will guide you through the delicate process while preserving your instrument’s functionality and sound quality.
Common Challenges When Changing Guitar Color
The quest for a fresh new look for your guitar often encounters roadblocks that test your patience and skill. Addressing these challenges is key:
- Surface Prep: A smooth surface is vital, and any oversight in sanding can lead to a lackluster finish.
- Paint Adhesion: Selecting the right type of paint and primer for compatibility with your guitar’s body.
- Color Consistency: Ensuring even coats to avoid blotchiness or color variance.
Troubleshooting Issues With The Diy Approach
DIY projects often hit snags. The key is to anticipate and address these in stride:
Runny Paint: If paint runs are ruining your finish, it often points to applying too much product or painting at the wrong angle. Rectify by sanding down once dry, and reapplying with a more measured approach.
Uneven Layers: Uneven layers detract from the aesthetic appeal. Practice your technique, ensuring consistent pressure and distance while spraying.
Dust Nibs: Prevalent dust particles can settle on wet paint. A dedicated workspace free from dust, with proper ventilation, minimizes this issue.
Maintaining The Integrity Of Your Instrument
Throughout the painting process, safeguarding your guitar’s integrity is paramount:
- Disassembling with Care: Remove all hardware and electronics to prevent damage and access all surfaces.
- Avoiding Over-Sanding: Over-sanding can remove too much material, affecting the sound. Proceed with caution and meticulousness.
- Quality Finishes: A top-quality clear coat not only seals in the color but also protects your guitar from wear and tear.
Embrace the process, and with careful planning, you’ll end up with a guitar that looks as good as it sounds.
Conclusion: The Final Encore
Welcome to the ‘Conclusion: The Final Encore’ of our discussion on transforming the color of your electric guitar. Throughout this post, we have explored the limitless possibilities and the creative freedom that customization offers. Whether you’re a professional musician looking to stand out on stage or a passionate hobbyist seeking a personal touch on your instrument, changing the color of your electric guitar is a powerful statement in your musical journey.
Showcasing Your Personalized Guitar
Witness the transformation and watch your guitar become an extension of your own style and personality.
- Take to the stage with confidence knowing your guitar is one-of-a-kind.
- Share photos and videos on social media to inspire others and show off your unique guitar.
- Enjoy the admiration of audiences and fellow musicians alike, as your personalized instrument makes a bold statement.
Reflection On The Value Of Customization In Music Expression
Embarking on the journey of customizing your guitar is more than a mere cosmetic upgrade; it is a reflection of your identity as an artist. A guitar’s color can influence not only the visual appeal but also the emotional connection between you and your instrument.
- Encourages Creativity: Choosing a color that speaks to you can rekindle inspiration and creativity.
- Personal Branding: By customizing your guitar, you create a signature look that can become part of your personal brand.
- Emotional Resonance: A personalized instrument can enhance the emotional impact of your performance, making each note feel even more heartfelt.
Credit: blog.andertons.co.uk
Frequently Asked Questions Of Can You Change The Color Of Your Electric Guitar
How Much Does It Cost To Change Guitar Color?
The cost to change a guitar’s color typically ranges from $100 to $500, depending on the finishing process and luthier fees.
Can You Get An Electric Guitar Repainted?
Yes, you can have an electric guitar repainted. Ensure a professional does the job to protect the instrument’s integrity and sound quality.
Can You Paint An Electric Guitar Without Damaging It?
Yes, you can paint an electric guitar without damaging it. Ensure you use guitar-friendly paint, and remove hardware and electronics first. Apply primer, paint, and finish with a protective clear coat. Allow ample drying time between layers for best results.
Can You Customize An Electric Guitar?
Yes, you can customize an electric guitar to suit your aesthetic preferences and playing style. Options include changing pickups, hardware, and finishing, as well as upgrading components for better sound and performance.
Conclusion
Revamping your electric guitar’s color is entirely possible with the right tools and techniques. Tailoring its appearance can invigorate your musical journey, making your instrument a true reflection of you. Remember to approach this project with care to ensure a successful transformation.

Your guitar’s fresh coat awaits, ready to strike a chord that’s uniquely yours.
As an Amazon Associate, Cleanestor earns from qualifying purchases at no additional cost to you.