Yes, you can use the Akai MPK Mini with FL Studio. This combination is popular among music producers.
The Akai MPK Mini is a compact MIDI controller. FL Studio is a powerful digital audio workstation (DAW). When paired, they create a versatile setup for music production. Whether you are a beginner or an experienced producer, using the Akai MPK Mini with FL Studio can enhance your workflow.
This setup allows you to create beats, control virtual instruments, and produce music with ease. In this blog post, we will explore how to connect and use the Akai MPK Mini with FL Studio. We will also provide tips to optimize your music production experience. So, let’s dive in and get started!
Credit: support.akaipro.com
Compatibility
When exploring the world of music production, compatibility is crucial. You want to ensure your MIDI controller and software work seamlessly together. In this blog post, we’ll examine if the Akai MPK Mini is compatible with FL Studio. We’ll also cover system requirements and FL Studio compatibility. Let’s dive in!
System Requirements
Before using the Akai MPK Mini with FL Studio, verify your system meets the requirements. The Akai MPK Mini works with both Windows and macOS. For Windows, you need Windows 7 or later. For macOS, you need macOS 10.10 or later. Ensure your computer has at least 4GB of RAM. Also, have a USB port available for connection.
Fl Studio Compatibility
The Akai MPK Mini is compatible with FL Studio. It integrates well and enhances your music production experience. To set it up, connect the MPK Mini to your computer. Open FL Studio and go to the MIDI settings. Select the Akai MPK Mini from the list of devices. This should enable the controller for use in FL Studio. You can now map the knobs, pads, and keys to your liking.
FL Studio recognizes the Akai MPK Mini as a MIDI device. You can use it to control various aspects of your projects. The pads are useful for drum beats, while the keys help with melodies. The knobs allow for real-time adjustments of parameters. This integration makes your workflow smoother and more efficient.

Credit: www.reddit.com
Setting Up Akai Mpk Mini
The Akai MPK Mini is a compact yet powerful MIDI controller. It’s perfect for musicians and producers. Setting it up with FL Studio is straightforward. Here’s a step-by-step guide to get you started.
Unboxing And Components
Start by unboxing your Akai MPK Mini. Inside the box, you’ll find:
- The Akai MPK Mini controller
- A USB cable
- Software download instructions
- A quick start guide
Ensure all components are present. Check for any visible damage. If everything looks good, you’re ready to proceed.
Connecting To Computer
Follow these steps to connect your Akai MPK Mini to your computer:
- Plug the USB cable into the Akai MPK Mini.
- Connect the other end to your computer’s USB port.
- Wait for your computer to recognize the device.
Once connected, download the necessary drivers. Follow the software download instructions provided in the box. Install the drivers on your computer. This ensures the Akai MPK Mini works seamlessly with FL Studio.
Next, open FL Studio on your computer. Go to the Options menu and select Midi Settings. In the Input section, find Akai MPK Mini. Enable it by clicking the Enable button. Adjust the settings as needed.
You’re now ready to start creating music. Explore the different features of the Akai MPK Mini. Experiment with the pads, knobs, and keys. Enjoy your music-making experience with FL Studio.
Installing Necessary Software
Installing the necessary software is crucial for using the Akai MPK Mini with FL Studio. This step ensures your device communicates well with the software. Follow these steps to make sure everything is set up correctly.
Drivers Installation
First, download the drivers for the Akai MPK Mini from the official Akai website. These drivers help your computer recognize the device. After downloading, follow the installation instructions. The process is straightforward. Once installed, restart your computer. This ensures the drivers are fully integrated.
Fl Studio Integration
Next, open FL Studio and go to the options menu. Select ‘MIDI Settings’. Here, you will see a list of MIDI devices. Find ‘Akai MPK Mini’ in the list and enable it. This allows FL Studio to receive inputs from your device. You can now start making music with your Akai MPK Mini in FL Studio.
Configuring Akai Mpk Mini In Fl Studio
The Akai MPK Mini is a compact and powerful MIDI controller. Pairing it with FL Studio can enhance your music production. Configuring the Akai MPK Mini in FL Studio is straightforward. Here’s how you can set it up for optimal performance.
Midi Settings
First, connect your Akai MPK Mini to your computer via USB. Open FL Studio and navigate to the MIDI settings:
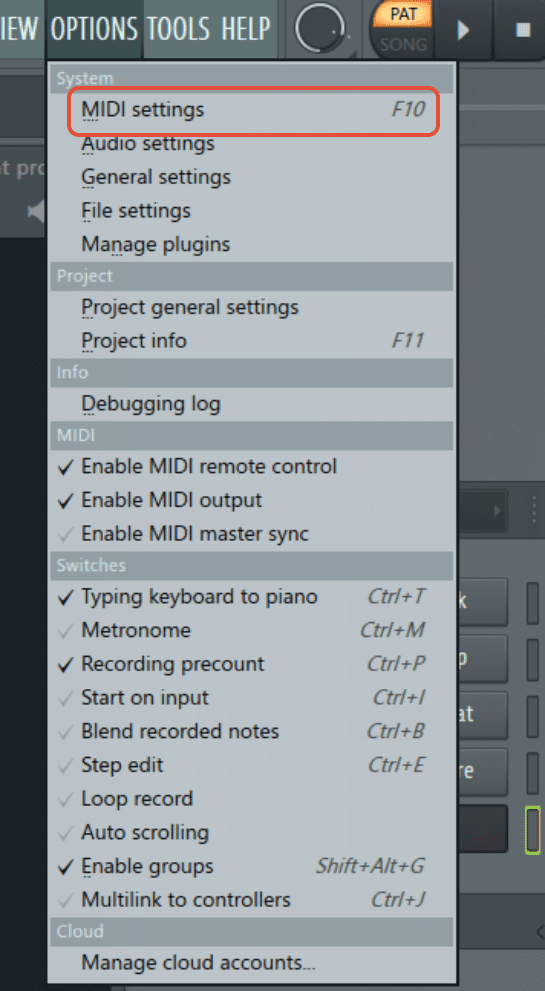
- Click on Options in the menu bar.
- Select MIDI Settings from the dropdown.
In the MIDI settings window, locate the Input section. You should see MPK Mini listed:
- Click the Enable checkbox next to MPK Mini.
- Ensure the Controller type is set to generic controller.
This will allow FL Studio to recognize your Akai MPK Mini as a MIDI device.
Controller Mapping
After setting up the MIDI, you need to map the controls. Mapping allows you to assign MPK Mini pads and knobs to FL Studio functions:
- Open a new project in FL Studio.
- Right-click on any control you want to map (e.g., volume fader).
- Select Link to controller… from the context menu.
A new window will appear. Move the desired knob or pad on the Akai MPK Mini. FL Studio will automatically link the control to the selected parameter. Repeat this process for other controls.
You can also use the FPC plugin in FL Studio to map drum pads:
- Load the FPC plugin.
- Click on a pad in the FPC interface.
- Press the corresponding pad on the MPK Mini.
This makes it easy to create custom drum patterns using the MPK Mini pads.
By following these steps, you can effectively configure your Akai MPK Mini in FL Studio. This setup will enhance your workflow and improve your music production experience.
Basic Functions
The Akai MPK Mini is a compact and versatile MIDI controller. It can be used with FL Studio to enhance your music production. Understanding its basic functions will help you make the most out of this device.
Playing Notes
The Akai MPK Mini features 25 velocity-sensitive keys. These keys allow you to play notes and chords. They are responsive to how hard you press them. This helps in creating dynamic and expressive sounds. You can connect the controller to FL Studio via USB. Once connected, the keys will trigger virtual instruments in the software. You can choose different sounds and instruments from FL Studio’s library.
Using Pads
The Akai MPK Mini also has 8 drum pads. These pads are useful for creating beats and triggering samples. Like the keys, the pads are velocity-sensitive. This means the volume of the sound changes based on how hard you hit them. You can assign different sounds to each pad in FL Studio. This allows for a customized drumming experience. The pads can also be used to control other functions. For example, you can use them to start and stop loops.

Credit: www.youtube.com
Advanced Features
The Akai MPK Mini is a versatile MIDI controller. It pairs seamlessly with FL Studio. This section explores the advanced features of using Akai MPK Mini with FL Studio. These features can enhance your music production experience.
Customizing Controls
Customizing controls is one of the powerful features of the Akai MPK Mini. You can map knobs and pads to different functions in FL Studio. This allows you to create a personalized workflow.
Follow these steps to customize controls:
- Open FL Studio and load a project.
- Press F10 to open the MIDI settings.
- Select the Akai MPK Mini from the input list.
- Click the link button next to the control you want to customize.
- Move the desired knob or pad on the MPK Mini.
Now, the control is mapped. You can repeat the process for other controls. This customization allows for a smoother and more efficient production process.
Using Arpeggiator
The arpeggiator is another advanced feature of the Akai MPK Mini. It can create complex sequences with ease. This tool adds depth to your music.
To use the arpeggiator, follow these steps:
- Press the Arp button on the MPK Mini.
- Select the desired mode using the knobs.
- Hold down a chord or note.
- Adjust the rate and range as needed.
The arpeggiator can sync with FL Studio’s tempo. This ensures that your sequences are always in time. Experiment with different settings to create unique patterns.
These advanced features make the Akai MPK Mini a valuable tool for music producers. Customizing controls and using the arpeggiator can streamline your workflow. This can lead to more creative possibilities.
Troubleshooting
Using the Akai MPK Mini with FL Studio can sometimes present challenges. Troubleshooting these issues is essential for smooth operation. This section will help you identify and solve common problems, providing a better experience.
Common Issues
Many users experience connectivity issues. The keyboard might not be recognized by FL Studio. Ensure all cables are connected securely. Also, check if the device is properly installed on your computer.
Another issue is latency. This is a delay between pressing a key and hearing the sound. Adjust the buffer size in FL Studio settings. Lowering the buffer size can reduce latency.
Sometimes, the keys might not produce any sound. Make sure the correct MIDI channel is selected. Also, check if the volume is turned up in the software.
Support Resources
If problems persist, consult the user manual. It often contains solutions for common issues. The Akai Pro website also provides a support section. There you can find drivers, firmware updates, and troubleshooting guides.
Another great resource is online forums. Many users share their experiences and solutions. The FL Studio forum and Reddit are good places to start. You can also watch tutorial videos on YouTube. Many creators offer step-by-step guides.
Finally, consider contacting customer support. Both Akai and FL Studio offer technical support. They can help with more complex issues.
Frequently Asked Questions
Can You Use Akai Mpk Mini With Fl Studio?
Yes, you can use Akai MPK Mini with FL Studio. It’s a great MIDI controller and easily integrates with the software.
How To Set Up Akai Mpk Mini In Fl Studio?
To set up, connect the MPK Mini to your computer, open FL Studio, and configure it under MIDI settings.
Is Akai Mpk Mini Compatible With Fl Studio?
Yes, Akai MPK Mini is fully compatible with FL Studio. It works seamlessly for music production and live performances.
What Are The Benefits Of Using Akai Mpk Mini?
The benefits include portability, intuitive controls, and seamless integration with FL Studio. It’s great for both beginners and professionals.
Conclusion
Using the Akai MPK Mini with FL Studio is simple and effective. This combination enhances music production. The keyboard is user-friendly and integrates well with FL Studio. Beginners and professionals alike can benefit. Follow the setup steps carefully for best results.

Experiment and create unique music easily. Enjoy the seamless experience and boost your creativity. The Akai MPK Mini paired with FL Studio is a solid choice. Happy music making!
{ “@context”: “https://schema.org”, “@type”: “FAQPage”, “mainEntity”: [ { “@type”: “Question”, “name”: “Can you use Akai MPK Mini with FL Studio?”, “acceptedAnswer”: { “@type”: “Answer”, “text”: “Yes, you can use Akai MPK Mini with FL Studio. It’s a great MIDI controller and easily integrates with the software.” } } , { “@type”: “Question”, “name”: “How to set up Akai MPK Mini in FL Studio?”, “acceptedAnswer”: { “@type”: “Answer”, “text”: “To set up, connect the MPK Mini to your computer, open FL Studio, and configure it under MIDI settings.” } } , { “@type”: “Question”, “name”: “Is Akai MPK Mini compatible with FL Studio?”, “acceptedAnswer”: { “@type”: “Answer”, “text”: “Yes, Akai MPK Mini is fully compatible with FL Studio. It works seamlessly for music production and live performances.” } } , { “@type”: “Question”, “name”: “What are the benefits of using Akai MPK Mini?”, “acceptedAnswer”: { “@type”: “Answer”, “text”: “The benefits include portability, intuitive controls, and seamless integration with FL Studio. It’s great for both beginners and professionals.” } } ] }As an Amazon Associate, Cleanestor earns from qualifying purchases at no additional cost to you.
