Fixing a violin string can seem daunting at first. But it’s manageable with the right steps and tools.
Violins are delicate instruments that require care. Strings can break during tuning or playing. Knowing how to fix a broken string is essential for any violinist. This skill can save you time and money. Plus, it ensures you can keep playing without long interruptions.
Whether you’re a beginner or experienced, understanding this process will benefit you. In this guide, we will walk you through fixing a violin string step-by-step. You’ll learn what tools you need and how to replace the string correctly. With patience and practice, you’ll be able to handle this common issue confidently. Let’s get started on making your violin ready for beautiful music again.
Gathering Necessary Tools
Fixing a violin string can seem daunting. But having the right tools makes it easier. Below, we will guide you through gathering what you need.
Required Items
Before you start, gather these tools:
- Replacement strings: Make sure they match your violin.
- Tuning peg compound: This helps the pegs move smoothly.
- Fine tuners: Useful for precise tuning adjustments.
- String winder: Speeds up the winding process.
- Soft cloth: Keeps the violin clean during the process.
Choosing The Right Strings
Choosing the right strings is crucial. Here are some tips:
- Type of music: Select strings based on the music style.
- Material: Strings come in gut, steel, and synthetic. Each has its own sound.
- Gauge: This refers to the thickness. Thicker strings can produce a richer sound.
Here is a table to help you choose:
| String Material | Sound Quality | Best Used For |
|---|---|---|
| Gut | Warm, rich tone | Baroque and classical music |
| Steel | Bright, clear tone | Modern and jazz music |
| Synthetic | Balanced tone | All types of music |
By having these tools and making the right choices, you can easily fix your violin strings. Happy playing!

Credit: www.ifixit.com
Removing The Broken String
Removing a broken violin string is a simple process. This step ensures your violin sounds its best. Follow these easy steps to get your violin ready for a new string.
Loosening The Peg
First, locate the peg holding the broken string. Turn the peg counterclockwise to loosen it. This will release tension on the string. Continue turning until the string feels loose enough to remove.
Taking Off The String
Once the peg is loose, gently pull the string out of the peg hole. Be careful not to damage the peg or the string hole. Remove the string from the tailpiece. It may be attached by a fine tuner or a loop. If so, carefully unhook it.
| Step | Action |
|---|---|
| 1 | Locate the peg |
| 2 | Turn peg counterclockwise |
| 3 | Pull string out of peg hole |
| 4 | Remove string from tailpiece |
- Ensure the peg is fully loosened.
- Be gentle to avoid damage.
- Keep track of small parts like fine tuners.
- Identify the broken string.
- Loosen the peg slowly.
- Remove string from peg and tailpiece.
With the broken string removed, you are ready for the next step. Replacing it with a new string ensures your violin is in perfect tune.
Preparing The New String
Replacing a violin string requires careful preparation. This ensures a smooth and successful installation. Let’s explore the steps involved in preparing the new string for your violin.
Unwinding The New String
Begin by unwinding the new string from its packaging. Be gentle to avoid any kinks or twists. Follow these simple steps:
- Carefully open the string packaging.
- Hold the string at both ends.
- Unwind it slowly to prevent any tangles.
Keep the string straight and flat. This will help you during the installation process.
Inspecting For Defects
Before installing, inspect the new string for any defects. This is a crucial step to ensure the string’s quality. Look for the following:
- Cracks or breaks: Check if the string has any visible damage.
- Kinks: Ensure the string is smooth and without sharp bends.
- Even winding: Inspect the winding to see if it is even and tight.
If you find any defects, do not use the string. Contact the manufacturer for a replacement. A quality string ensures better sound and longevity.
With the new string prepared, you are ready for the next steps in fixing your violin string. Stay tuned for further instructions!
Attaching The New String
Replacing a broken violin string can be tricky. Attaching the new string properly is crucial. This ensures the violin sounds right and the string stays in place. Follow these steps to attach the new string correctly.
Securing The String At The Tailpiece
First, locate the tailpiece of your violin. The tailpiece is where the strings anchor. You will see small holes or fine tuners here. Take the ball end of the new string.
Insert this ball end into the hole or hook it onto the fine tuner. Make sure the string is secure. If using a fine tuner, pull the string gently to check if it is firmly attached. Ensure the ball end is properly seated. This prevents the string from slipping.
Winding The String Onto The Peg
Next, move to the pegbox of your violin. Find the corresponding peg for your new string. Insert the other end of the string into the small hole in the peg. Push the string through until it comes out the other side.
Begin winding the string around the peg. Turn the peg away from you to tighten. Wind the string neatly and ensure it wraps around the peg evenly. Avoid overlapping the coils as much as possible.
Keep the string taut while winding. This helps avoid slack and ensures the string stays in tune. Continue winding until the string is tight but not overly stretched. Tune the string to the correct pitch using a tuner.
| Step | Action |
|---|---|
| 1 | Insert ball end into tailpiece |
| 2 | Secure ball end |
| 3 | Insert other end into peg |
| 4 | Wind string onto peg |
| 5 | Keep string taut |
| 6 | Tune string to pitch |
Tightening The String
Tightening a violin string is a crucial skill for any violinist. It ensures your instrument sounds its best. Properly tightened strings stay in tune longer and produce a richer tone. There are specific steps to follow to achieve the right tension.
Turning The Peg
First, locate the peg corresponding to the string you need to tighten. Gently turn the peg away from you. This action increases the tension. Turn slowly to avoid breaking the string. Listen for the pitch to rise as you turn.
Checking The Tension
After turning the peg, pluck the string. Check if it produces the desired pitch. If not, continue to adjust the peg. Fine-tune until the pitch is perfect. Over-tightening can cause damage, so proceed carefully. Feel the string with your fingers. It should be firm but not overly tight.

Credit: www.youtube.com
Tuning The Violin
Tuning a violin can seem challenging, but it’s essential for good sound. A well-tuned violin makes playing enjoyable and ensures correct pitch. Let’s explore two common methods: using a tuner and fine-tuning by ear.
Using A Tuner
A tuner is a helpful tool for beginners and experts alike. Start by turning the tuner on and setting it to 440 Hz. This frequency matches the A string on the violin.
Pluck or bow the A string gently. The tuner will show if the pitch is too high or low. Adjust the tuning peg slowly. Turn it clockwise to raise the pitch, counterclockwise to lower it.
Repeat this process for the D, G, and E strings. Each string should match the corresponding note on the tuner. Check each string again to ensure they are still in tune.
Fine-tuning By Ear
Fine-tuning by ear is a valuable skill for any violinist. Start by tuning the A string using a tuner or piano. Once the A string is in tune, use it as a reference for the other strings.
Place your finger lightly on the D string at the fifth fret. This should produce an A note. Compare this note to the open A string. Adjust the D string until they match.
Repeat this process for the G and E strings. Use the D string to tune the G string, and the A string to tune the E string. Listen carefully to ensure the pitches match.
With practice, tuning by ear becomes easier and more accurate.
Checking The Bridge
When it comes to fixing a violin string, checking the bridge is an essential step. The bridge holds the strings in place and affects the sound quality. An improperly aligned bridge can cause issues with tuning and playability.
Ensuring Proper Alignment
First, ensure the bridge is upright and centered. A crooked bridge may affect the sound. Look at the bridge from the side. It should be perpendicular to the violin’s top plate.
Next, check the alignment of the feet. The feet of the bridge should make full contact with the violin’s body. Gaps or uneven contact can lead to sound problems.
Use a ruler to measure. The distance between the bridge and the fingerboard should be even on both sides. This ensures the strings are evenly spaced and the bridge is not skewed.
Adjusting The Bridge
If the bridge is not aligned, gently adjust its position. Hold the violin firmly, and grasp the bridge by the top corners. Move it slowly until it is upright and centered.
Be careful not to apply too much force. Violins are delicate instruments. A gentle touch is crucial.
If the bridge feet do not sit flat, you may need to reshape them. Sand the feet gently to match the contour of the violin’s top plate.
After making adjustments, check the alignment again. Ensure the bridge is upright, centered, and the feet make full contact with the violin’s body. This will help maintain proper tension and sound quality.
Maintaining Your Violin
Maintaining your violin ensures it produces a beautiful sound every time. Proper care can extend the life of your instrument. Regular inspection and proper storage are key to keeping it in top shape.
Regular Inspection
Check your violin for any signs of wear and tear. Inspect the strings, pegs, and body. Look for cracks or loose parts. Tighten any loose pegs carefully. Ensure the bridge is straight and not leaning. Regularly clean the strings with a soft cloth. This removes rosin buildup and improves sound quality. A professional inspection once a year is advisable.
Proper Storage
Store your violin in a hard case when not in use. Keep it in a cool, dry place. Avoid extreme temperatures and humidity. These can damage the wood and affect the sound. Use a humidifier in dry climates to maintain optimal conditions. Never leave your violin in a car. Direct sunlight and heat can cause severe damage. Always ensure the case is latched securely to protect your violin.
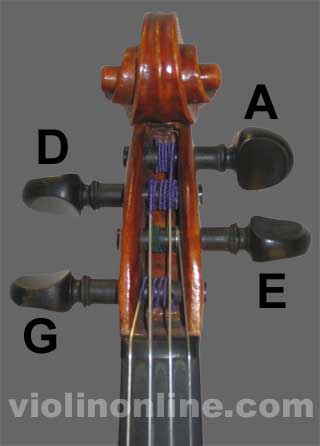
Credit: www.violinonline.com
Frequently Asked Questions
How Do You Replace A Broken Violin String?
To replace a broken violin string, remove the old string first. Then, thread the new string through the peg and tighten it gradually while tuning.
What Tools Do You Need To Fix A Violin String?
You will need a tuner, string winder, and the replacement string. These tools help ensure proper tension and tuning.
How Often Should You Change Violin Strings?
It is recommended to change violin strings every 6 to 12 months. Frequent playing may require more frequent changes.
Can You Fix A Violin String Yourself?
Yes, you can fix a violin string yourself. Follow a step-by-step guide carefully to ensure proper installation and tuning.
Conclusion
Fixing a violin string is a simple task with practice. Gather the right tools. Follow the steps carefully. Always be gentle with the strings. Check the tuning regularly. Replace old strings for the best sound. Your violin will stay in great shape.

Enjoy playing your well-tuned instrument. Happy practicing!
As an Amazon Associate, Cleanestor earns from qualifying purchases at no additional cost to you.