
Micing drums for live performance ensures every beat is heard clearly. It can be tricky but is essential for a great sound.
Live performances need the right drum micing to sound their best. Drums can be loud and complex, requiring a good setup to capture their full range. Whether you’re a beginner or a seasoned pro, knowing how to mic drums can enhance your performance.
This guide will help you understand the basics. From choosing the right microphones to positioning them correctly, we’ll cover all you need to get started. By following these steps, you’ll ensure your drums sound fantastic in any live setting. Ready to dive in? Let’s explore how to mic drums for an amazing live performance.
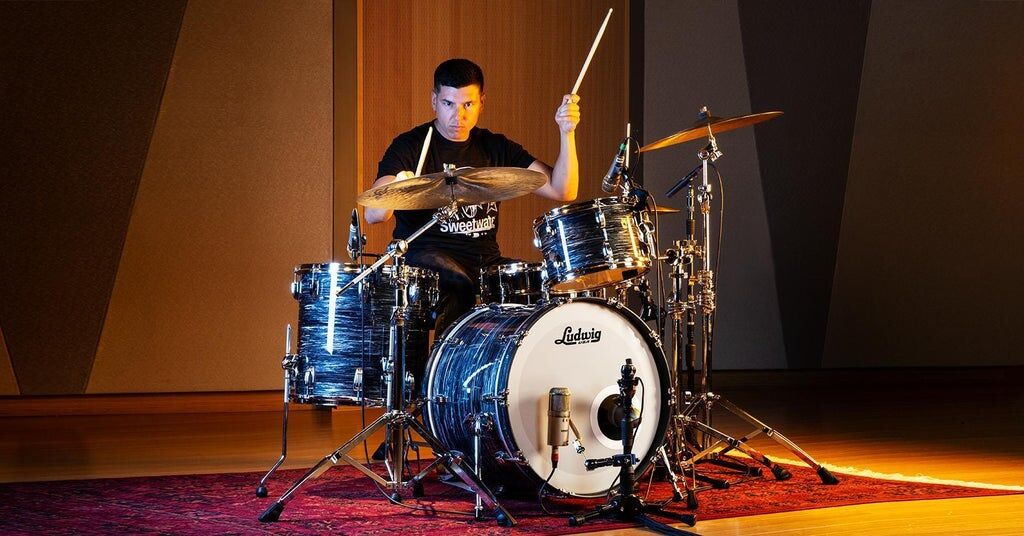
Credit: www.sweetwater.com
Introduction To Drum Miking
Drum miking is an essential part of live performance. It ensures that the sound of the drums is clear and balanced. Without proper miking, the drums can get lost in the mix. This affects the overall quality of the performance. Let’s explore the basics of drum miking for live settings.
Importance Of Proper Miking
Proper miking captures the true essence of each drum. It highlights the unique sounds of the kick, snare, and cymbals. This helps in creating a balanced mix. Every drumbeat must be heard clearly by the audience. Good miking also prevents feedback and other sound issues. This results in a better listening experience.
Challenges In Live Settings
Live settings present unique challenges for miking drums. The biggest challenge is the stage environment. There is a lot of noise and movement. This makes it hard to capture clean sound. Miking also needs to be quick and efficient. There is little time for adjustments during a live show. Lastly, each venue has different acoustics. This requires constant fine-tuning of the mics.
Essential Equipment
To mic drums for a live performance, having the right equipment is crucial. With the right tools, you can capture the best sound from your drum kit. This section covers the essential equipment needed for micing drums, focusing on microphone types and stands and mounts.
Microphone Types
Different microphones serve different purposes. For the bass drum, use a dynamic mic. It captures low frequencies well. Snare drums need a mic with a fast response. Small diaphragm condenser mics work great for cymbals and hi-hats. They pick up higher frequencies clearly. Tom drums benefit from dynamic mics that handle mid-range frequencies.
Stands And Mounts
Stands and mounts hold your mics in place. Boom stands allow flexible positioning. They are perfect for overhead mics. Use clip-on mounts for close micing. They attach directly to the drum rims. This setup saves space on stage. Ensure all stands are sturdy. This prevents them from tipping over during the performance.
Kick Drum Miking
Miking the kick drum is crucial for a powerful live performance. The kick drum provides the beat’s foundation, making it essential to capture its sound accurately. Proper kick drum miking enhances the audience’s experience, ensuring the drum’s deep thump and punch are heard clearly.
Microphone Placement
Positioning the microphone correctly is key. Start by placing the mic inside the drum. Aim the mic at the spot where the beater hits the drumhead. This position captures the attack and punch of the kick. Keep the mic a few inches from the batter head. Experiment with distance for the best sound.
Consider placing the mic outside the drum. Point it at the resonant head’s center. This captures more low-end frequencies. Adjust the mic’s angle and distance to find the sweet spot. Proper placement balances the attack, tone, and low-end punch.
Common Techniques
Use a dynamic microphone for the kick drum. Dynamic mics handle high sound pressure levels well. They capture the kick’s powerful low-end. Popular choices include the Shure Beta 52A and the AKG D112. These mics deliver a clear, punchy sound.
Try using a boundary microphone. Place it inside the drum, on a small pillow or foam. This mic captures both attack and low-end well. The Shure Beta 91A is a common boundary mic for kick drums.
Combine two microphones for a fuller sound. Use one dynamic mic inside the drum. Place another condenser mic outside the drum. Blend the two signals for a balanced kick drum sound. This technique captures both the punch and the low-end.
Always check phase alignment. Ensure both mics are in phase to avoid phase cancellation. Phase issues can thin out the kick drum sound. Listen carefully and adjust mic positions if needed.
Snare Drum Miking
The snare drum is crucial in a live drum kit setup. Miking it properly ensures a crisp and clear sound. The snare drum often cuts through the mix, making its sound quality essential for a great performance.
Top And Bottom Miking
Miking the snare drum from both the top and bottom helps capture its full sound. The top mic captures the strike and snap, while the bottom mic picks up the rattle and sizzle of the snares.
Top Mic Placement:
- Use a dynamic mic.
- Place it 1-2 inches above the drumhead.
- Angle it towards the center of the drum.
Bottom Mic Placement:
- Use a condenser mic.
- Position it 1-2 inches below the snare wires.
- Angle it towards the center of the drum.
Phase Considerations
Proper phase alignment is crucial when using multiple mics. Poor phase alignment can cause sound cancellation and result in a weak snare sound.
- Check the phase between the top and bottom mics.
- Use the phase invert switch on your mixer if needed.
- Listen carefully to ensure a full, rich sound.
Sometimes, flipping the phase of the bottom mic can improve the sound. Always trust your ears and adjust as needed.
Tom Miking
Tom miking is crucial for a balanced drum sound. Proper mic placement captures the full tone of the toms. This section explains the best techniques and microphone choices for miking toms during live performances.
Close Miking
Close miking involves placing the microphone very near the drumhead. This method provides a clear and isolated tom sound. Position the mic an inch or two from the drumhead. Aim it towards the center of the drum. This technique reduces bleed from other drums and cymbals. It also captures the attack and resonance of the toms.
Microphone Choices
Choosing the right microphone is essential. Dynamic microphones are a popular choice for toms. They are durable and handle high sound pressure levels well. For example, the Shure SM57 is a reliable option. It delivers a punchy and clear tom sound.
Another good choice is the Sennheiser e604. It’s compact and easy to position. Its clip-on design makes setup quick and simple. Condenser microphones can also be used, though they are less common for toms. They capture more detail and a wider frequency range.
The Audio-Technica AT4040 is a good condenser mic for toms. It offers a natural and detailed sound. Remember, the choice of microphone affects the overall drum mix. Select one that suits the style of music and the acoustics of the venue.
Hi-hat Miking
Hi-hat miking is crucial for live drum performances. This technique helps capture the crisp and sharp sound of the hi-hat, ensuring that it stands out in the mix. Proper miking of the hi-hat can make a significant difference in the overall drum sound, providing clarity and definition. Here are some essential tips for achieving the best hi-hat sound during live performances.
Placement Tips
Position the microphone a few inches above the edge of the hi-hat. Aim it slightly downward to capture the stick’s attack. Avoid placing the mic too close to the cymbals. This can cause unwanted noise. Ensure the mic is angled to pick up the hi-hat’s open and closed sounds. A small diaphragm condenser mic works well for hi-hats.
Balancing With Other Cymbals
Balancing the hi-hat with other cymbals is crucial. Ensure the hi-hat mic does not pick up too much sound from the crash or ride cymbals. Adjust the mic placement and angle to minimize bleed from other cymbals. Use a high-pass filter to reduce low-frequency bleed. This helps keep the hi-hat sound clean and focused. Proper balance ensures each cymbal stands out without overpowering others.
Overhead Miking
Overhead miking captures the overall sound of the drum kit. It provides a balanced, clear picture of your drums. This method is essential for live performances. It ensures every element of your kit is heard.
Stereo Techniques
Stereo techniques are vital for overhead miking. They create a wide, immersive sound. Two common methods are XY and spaced pair.
XY technique places two microphones close together. The capsules form a 90-degree angle. This setup captures a focused image of the kit. It minimizes phase issues.
The spaced pair technique uses two microphones placed apart. This method covers a broader area. It creates a wide stereo image. Be cautious of phase cancellation.
Height And Angle
Height and angle are crucial for overhead miking. They affect the balance and sound quality.
- Height: Start with the mics 3-4 feet above the kit. Adjust based on the venue and drum kit size.
- Angle: Point the mics at the snare and toms. This setup ensures even coverage.
Experiment with different positions. Find what works best for your setup. The goal is a clear, balanced sound. Avoid placing mics too high. It can cause a thin, distant sound.
Remember, overhead miking is an art. Practice and experiment. Achieve the best sound for your live performances.

Credit: www.audiomentor.com
Sound Check And Adjustments
Proper sound check and adjustments are crucial for a live drum performance. Without these, you risk poor sound quality and unbalanced levels. This section will guide you through essential steps to ensure the best possible sound. We will cover gain staging, EQ, and compression.
Gain Staging
Start with the gain staging. Set the gain for each drum mic. Ensure the levels are not too high or too low. This prevents distortion or unwanted noise. Adjust the gain until the signal is clear and strong.
EQ
Next, focus on EQ. Equalization helps shape the drum sound. Cut unwanted frequencies and boost the ones you need. For the kick drum, cut the mid-range. Boost the low end for a deeper sound. For snare, cut low frequencies and boost the high-mid range. Adjust the toms and cymbals similarly.
Compression
Compression controls the dynamic range of the drums. It makes the sound consistent and tight. Set the threshold to start reducing the peaks. Adjust the ratio to control the amount of compression. Use a fast attack and release for a tight sound. Ensure the drums sound natural and not overly compressed.
Troubleshooting Common Issues
Mic’ing drums for live performance can be challenging. Sometimes, issues arise that disrupt the sound quality. Knowing how to troubleshoot these problems is crucial. Let’s explore some common issues and their solutions.
Feedback Control
Feedback is a common issue in live performances. It causes loud screeching noises. To control feedback, follow these steps:
- Position mics away from monitor speakers.
- Use directional mics to minimize feedback.
- Reduce gain on the mixer.
- Adjust EQ settings to cut problematic frequencies.
Consider using a feedback eliminator. This device can automatically detect and remove feedback frequencies. Always keep monitoring your setup. It helps to prevent feedback before it starts.
Phase Problems
Phase issues occur when two mics pick up the same sound at different times. This can cause weak or hollow sounds. To avoid phase problems, check the following:
- Ensure mics are equidistant from the drum.
- Use the 3:1 rule: Place each mic three times the distance from each other as they are from the sound source.
- Flip the phase switch on the mixer if needed.
Using a phase meter can help detect phase issues. This tool shows if two signals are out of phase. Adjust mic placements accordingly to fix the problem.
| Issue | Solution |
|---|---|
| Feedback | Position mics properly, reduce gain, adjust EQ |
| Phase Problems | Check mic distance, use 3:1 rule, flip phase switch |

Credit: www.soundonsound.com
Frequently Asked Questions
How Do I Mic A Drum Set Live?
To mic a drum set live, use dynamic mics for kick and snare. Use condensers for overheads and high-hats. Ensure proper placement for best sound capture.
What Are The Best Mics For Live Drums?
For live drums, Shure SM57 for snare, AKG D112 for kick, and Rode NT5 for overheads are excellent choices. They offer durability and quality.
Where Should I Place Overhead Mics?
Place overhead mics above the drum set, equidistant from the snare. This captures a balanced stereo image of the entire kit.
How Do I Avoid Feedback In Live Drum Mics?
To avoid feedback, use directional mics, proper placement, and monitor levels. Utilize a soundcheck to adjust and minimize feedback issues.
Conclusion
Miking drums for live shows can seem challenging. But with practice, it becomes easier. Start with good microphones. Place them correctly. Make small adjustments. Listen carefully. Each venue is different. So, adapt your setup. Trust your ears. Quality sound makes your performance stand out.

Keep learning and experimenting. You will get better over time. Happy drumming!
As an Amazon Associate, Cleanestor earns from qualifying purchases at no additional cost to you.