Recording music at home is easier than ever. With the right tools, anyone can do it.
In the past, recording music required expensive studio time and professional equipment. Today, technology has made it possible to create high-quality recordings right from your living room. This guide will show you how to set up your home studio, choose the right equipment, and record your music.
Whether you’re a beginner or a seasoned musician, recording at home can be simple and fun. You don’t need a lot of money or space. Just a few basics and some creativity. Ready to start? Let’s dive into how you can make your home the perfect place for your musical creations.
Credit: www.homebrewaudio.com
Setting Up Your Home Studio
Recording music at home is an exciting journey. The first step is setting up your home studio. A well-organized studio can make a huge difference in your recordings. Let’s dive into the essentials of creating a perfect home studio.
Choosing The Right Space
Selecting the right space for your studio is crucial. It should be a quiet room with minimal outside noise. A spare bedroom or basement often works well.
Consider the acoustics. Rooms with hard floors and bare walls can cause unwanted echoes. Use rugs and curtains to help absorb sound. Soundproofing materials can also be beneficial.
Ensure you have enough space for your equipment. You’ll need room for your desk, computer, and musical instruments. Good lighting is also important. Natural light is best, but adjustable lamps can work too.
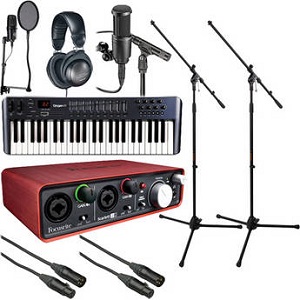
Essential Equipment
Having the right equipment is key to high-quality recordings. Here’s a list of the essential items you’ll need:
- Computer: A reliable computer is the heart of your studio. Make sure it has enough processing power and storage.
- Digital Audio Workstation (DAW): This software allows you to record, edit, and mix music. Popular options include Ableton Live, Logic Pro, and FL Studio.
- Audio Interface: This device connects your instruments and microphones to your computer. Look for one with good preamps and multiple inputs/outputs.
- Microphones: A good condenser microphone is essential for vocals. You may also need dynamic mics for instruments like drums and amps.
- Studio Monitors: These are specialized speakers for accurate sound reproduction. Headphones can also be useful for detailed listening.
- MIDI Controller: A keyboard or pad controller can help you create and control digital instruments.
- Pop Filter: This accessory reduces plosive sounds in vocal recordings. It’s a simple and inexpensive addition.
- Cables and Stands: Ensure you have quality cables and sturdy stands for your microphones and instruments.
With these essentials, you’re ready to start recording music at home. Remember, the quality of your equipment can greatly impact your sound. Invest in the best you can afford.
Acoustic Treatment
Recording music at home has become more accessible than ever. One crucial aspect of achieving professional-quality sound is acoustic treatment. Proper acoustic treatment can significantly improve your recordings by controlling reflections, echoes, and external noise. Let’s dive into some essential tips on how to enhance your home studio’s acoustics.
Soundproofing Basics
Soundproofing your home studio helps to block external noise and prevent sound from escaping. Here are some basic steps:
- Seal gaps and cracks: Use weatherstripping or acoustic sealant around doors and windows.
- Heavy curtains: Hang thick, heavy curtains to dampen sound.
- Rugs and carpets: Cover floors with rugs or carpets to absorb sound.
- Soundproofing panels: Install specialized panels or foam to reduce noise transmission.
Improving Room Acoustics
Improving your room’s acoustics will help to create a balanced sound environment. Consider these tips:
- Acoustic panels: Place panels on walls to absorb reflections.
- Bass traps: Install bass traps in corners to manage low-frequency buildup.
- Diffusers: Use diffusers to scatter sound waves evenly.
- Furniture placement: Arrange furniture to break up sound reflections.
Here’s a simple table to summarize the acoustic treatment tips:
| Tip | Description |
|---|---|
| Seal gaps and cracks | Use weatherstripping or acoustic sealant |
| Heavy curtains | Hang thick, heavy curtains |
| Rugs and carpets | Cover floors with rugs or carpets |
| Soundproofing panels | Install specialized panels or foam |
| Acoustic panels | Place panels on walls |
| Bass traps | Install bass traps in corners |
| Diffusers | Use diffusers to scatter sound waves |
| Furniture placement | Arrange furniture to break up reflections |
Applying these tips can greatly improve the quality of your home recordings. By focusing on soundproofing and room acoustics, you can create a professional-sounding home studio environment.
Recording Software
Recording music at home has never been easier. The right software can make all the difference. Recording software helps you capture, edit, and mix your music. It’s the heart of your home studio.
Popular Daws
Digital Audio Workstations (DAWs) are essential tools. They offer a platform for recording, editing, and producing music. Here are some popular DAWs:
- Pro Tools: Industry standard, used by professionals.
- Logic Pro X: Excellent for Mac users. Comprehensive features.
- Ableton Live: Great for live performances and electronic music.
- FL Studio: User-friendly. Perfect for beginners and pros alike.
- Reaper: Affordable with powerful features.
Free Vs. Paid Options
Choosing between free and paid software depends on your needs and budget. Let’s compare:
| Features | Free DAWs | Paid DAWs |
|---|---|---|
| Cost | Free | Varies ($60 – $600) |
| Features | Basic | Advanced |
| Support | Community-based | Professional support |
| Plugins | Limited | Extensive |
Free DAWs are a great starting point. Examples include:
- Audacity: Simple and effective. Good for basic recording.
- GarageBand: Perfect for Mac users. Easy to use.
Paid DAWs offer more features and flexibility. They are worth the investment for serious musicians. Some popular options include:
- Pro Tools: Ideal for professional studios.
- Logic Pro X: Great for comprehensive music production.
- Ableton Live: Best for live performances.
Choosing the right recording software is key. It impacts your recording quality and workflow. Whether you opt for free or paid, ensure it meets your needs.
Microphone Selection
Choosing the right microphone is crucial for recording music at home. The microphone can make or break your sound quality. Whether you are a beginner or a seasoned pro, understanding microphone types and their uses is essential.
Dynamic Vs. Condenser
Understanding the difference between dynamic and condenser microphones is important. Each has its own strengths and weaknesses.
Dynamic microphones are rugged and durable. They handle high sound pressure levels well. This makes them perfect for loud instruments like drums and electric guitars. They do not require external power. This makes them easy to use.
Condenser microphones are more sensitive. They capture a wider range of frequencies. This makes them ideal for recording vocals and acoustic instruments. They need external power, usually from a battery or phantom power from an audio interface.
Best Budget Microphones
Finding a good microphone on a budget is possible. Here are some options that offer great value for money.
| Microphone | Type | Price | Best For |
|---|---|---|---|
| Shure SM58 | Dynamic | $99 | Vocals, Live Performances |
| Audio-Technica AT2020 | Condenser | $99 | Vocals, Acoustic Instruments |
| Samson Q2U | Dynamic | $59 | Podcasts, Vocals |
These microphones are affordable and reliable. They provide good sound quality for home recordings.
Choosing the right microphone depends on your needs. Think about what you will be recording most often. This will guide your decision.
Recording Techniques
Recording music at home can be fun and fulfilling. Knowing the right techniques is essential. This guide will help you with some key recording techniques. Let’s start with setting levels and mic placement tips.
Setting Levels
Setting the right levels is crucial. You don’t want to record too loud or too soft. Here are some steps to set levels correctly:
- Start with the gain: Adjust the gain knob on your audio interface. Aim for a level where the loudest parts hit around -6 dB.
- Check for clipping: Make sure the signal does not clip. Clipping distorts the sound and ruins the recording.
- Use a reference track: Compare your levels with a professional recording. This helps you set a good level balance.
Mic Placement Tips
Mic placement can make a big difference in your recordings. Here are some tips:
- For vocals: Place the mic 6-12 inches from the singer’s mouth. Use a pop filter to reduce plosive sounds.
- For guitar amps: Point the mic at the center of the speaker cone. Experiment with different angles for varied tones.
- For drums:
Experiment with different placements to find the best sound. Trust your ears and record test clips. Use these clips to decide on the best mic positions.
Editing Your Tracks
After recording your music, the next step is editing your tracks. Editing helps refine your sound and remove any mistakes. It can turn a good recording into a great one. This process might seem daunting, but with the right tools and techniques, it becomes manageable and even enjoyable.
Basic Editing Tools
Basic editing tools are essential for any home recording setup. These tools help you make quick fixes and adjustments.
- Cut: Remove unwanted sections of your track.
- Copy: Duplicate parts of your track.
- Paste: Insert copied sections into your track.
- Trim: Cut the start and end of your track to remove silence.
- Fade In/Out: Smoothly increase or decrease the volume at the beginning or end of your track.
These tools are often found in most Digital Audio Workstations (DAWs). They are simple yet powerful. They allow you to shape your recordings quickly.
Advanced Editing Techniques
Once you’re comfortable with basic tools, move to advanced editing techniques. These can elevate your recordings to a professional level.
- Time Stretching: Adjust the tempo without changing the pitch. Useful for aligning tracks with different tempos.
- Pitch Shifting: Change the pitch of your track without affecting its tempo. Ideal for fixing off-key notes.
- Quantization: Align your recordings to a grid. This is great for tightening up rhythms.
- Automation: Automate volume, panning, and effects. This adds dynamic changes throughout your track.
These techniques require more practice but offer greater control. They help in achieving a polished and professional sound.
Understanding both basic and advanced editing will improve your music production skills. Practice regularly to get comfortable with these tools and techniques.
Mixing Your Music
Mixing Your Music is a critical step in the recording process. It’s where your tracks come together to form a cohesive song. Good mixing can make a song sound polished and professional. Let’s dive into some essential aspects of mixing your music at home.
Balancing Levels
Balancing levels is about ensuring each track has the right volume. This helps each instrument and vocal sit well in the mix. Start by setting the volume of your drums and bass. These are the foundation of your mix.
Next, bring in the other instruments one at a time. Adjust their levels until they blend well with the drums and bass. Pay attention to the vocals. They should be clear and sit on top of the mix.
Use the pan controls to place instruments in the stereo field. This creates space and helps to avoid clutter. For example, pan guitars slightly left and right. Keep the bass and vocals in the center.
Using Effects
Effects can add depth and character to your mix. Common effects include reverb, delay, and compression.
- Reverb: Adds space and ambiance. Use it on vocals and snare drums.
- Delay: Creates echoes. It can make vocals and guitars more interesting.
- Compression: Controls dynamics. It makes loud parts softer and soft parts louder.
Apply effects sparingly. Too much can muddy the mix. Always listen to how the effect changes the sound. Make adjustments if necessary.
For more precise control, use equalization (EQ). EQ can cut or boost specific frequencies. This helps each instrument find its place in the mix.
Remember, the goal of mixing is to create a balanced and engaging song. Take your time and trust your ears. Happy mixing!

Credit: homerecordinglab.com
Mastering The Final Track
Mastering the final track is the last step in the music production process. It ensures that your song sounds polished and professional. This phase can seem daunting, but with the right approach, you can achieve great results at home.
Mastering Basics
Mastering involves adjusting the final mix’s overall sound. It aims to balance and enhance the audio. The goal is to make the track sound consistent across all playback systems. This includes speakers, headphones, and car stereos.
Key elements in mastering include equalization (EQ), compression, and limiting. EQ balances the frequency spectrum. Compression controls the dynamic range. Limiting ensures the track does not clip or distort. These tools help achieve a clean, professional sound.
Diy Mastering Tips
Start with a high-quality mix. Mastering cannot fix major mix issues. Ensure your mix is balanced before moving to mastering.
Use reference tracks. Compare your track to professionally mastered songs. This helps you understand what adjustments are needed.
Apply gentle EQ. Boost or cut frequencies subtly. Avoid drastic changes. Small adjustments can make a big difference.
Use compression wisely. Apply light compression to control dynamics. Preserve the track’s natural feel.
Limit the track’s peak levels. Use a limiter to prevent clipping. Aim for a consistent loudness without distortion.
Listen on multiple devices. Test your mastered track on different speakers and headphones. Ensure it sounds good everywhere.
Take breaks. Rest your ears. Fresh ears can identify issues you might miss otherwise.

Credit: severnriverguitar.com
Frequently Asked Questions
How Do I Start Recording Music At Home?
Starting to record music at home requires basic gear and software. You’ll need a computer, audio interface, microphone, and headphones. Choose a Digital Audio Workstation (DAW) like Ableton, Logic Pro, or GarageBand to begin.
What Equipment Do I Need To Record Music?
To record music at home, you need a computer, audio interface, microphone, headphones, and a Digital Audio Workstation (DAW). These essentials will help you produce quality recordings.
How Can I Improve My Home Recording Quality?
Improving home recording quality involves acoustic treatment, proper mic placement, and using quality gear. Also, learn mixing and mastering techniques to enhance your recordings.
Which Daw Is Best For Beginners?
For beginners, GarageBand and Audacity are excellent choices. They are user-friendly and free. More advanced options include Ableton Live and Logic Pro, offering more features.
Conclusion
Recording music at home can be fun and rewarding. With the right tools, anyone can create great music. Remember to set up a quiet space for clear sound. Use good equipment to improve your recordings. Practice and experiment with different techniques.

Keep learning and don’t be afraid to make mistakes. Soon, you’ll be making music that sounds professional. Happy recording!
{ “@context”: “https://schema.org”, “@type”: “FAQPage”, “mainEntity”: [ { “@type”: “Question”, “name”: “How do I start recording music at home?”, “acceptedAnswer”: { “@type”: “Answer”, “text”: “Starting to record music at home requires basic gear and software. You’ll need a computer, audio interface, microphone, and headphones. Choose a Digital Audio Workstation (DAW) like Ableton, Logic Pro, or GarageBand to begin.” } } , { “@type”: “Question”, “name”: “What equipment do I need to record music?”, “acceptedAnswer”: { “@type”: “Answer”, “text”: “To record music at home, you need a computer, audio interface, microphone, headphones, and a Digital Audio Workstation (DAW). These essentials will help you produce quality recordings.” } } , { “@type”: “Question”, “name”: “How can I improve my home recording quality?”, “acceptedAnswer”: { “@type”: “Answer”, “text”: “Improving home recording quality involves acoustic treatment, proper mic placement, and using quality gear. Also, learn mixing and mastering techniques to enhance your recordings.” } } , { “@type”: “Question”, “name”: “Which DAW is best for beginners?”, “acceptedAnswer”: { “@type”: “Answer”, “text”: “For beginners, GarageBand and Audacity are excellent choices. They are user-friendly and free. More advanced options include Ableton Live and Logic Pro, offering more features.” } } ] }As an Amazon Associate, Cleanestor earns from qualifying purchases at no additional cost to you.