Setting up studio monitors can transform your audio experience. Proper setup ensures accurate sound reproduction.
Good sound quality is crucial for any audio project. Studio monitors help you hear your music or audio tracks precisely. But just buying them isn’t enough. You need to set them up correctly to get the best results. Placing your monitors the right way can make a huge difference.
It affects how you perceive bass, mids, and highs. Small adjustments can lead to a big improvement in sound clarity. In this guide, we’ll walk you through the steps to set up studio monitors. Whether you’re a beginner or a seasoned audio professional, these tips will help you achieve optimal sound in your studio.
Choosing The Right Studio Monitors
Choosing the right studio monitors is crucial for achieving the best sound quality in your studio. This decision can impact the accuracy of your mixes and the overall listening experience. In this section, we will explore the differences between active and passive monitors, and how to match monitors to your room size.
Active Vs Passive Monitors
Active monitors have built-in amplifiers. This means you don’t need an external amplifier. They are popular because they are simple to set up. Just plug them in and you are ready to go.
Passive monitors require an external amplifier. This gives you more flexibility. You can choose an amplifier that suits your needs. But setting them up can be more complex. You need to match the amplifier’s power to the monitors.
Matching Monitors To Your Room Size
The size of your room affects how your monitors sound. Small rooms benefit from smaller monitors. These prevent sound reflections and standing waves. Large rooms can handle bigger monitors. These provide more power and a fuller sound.
Consider the acoustics of your room. Soft furnishings can absorb sound. Hard surfaces reflect sound. Adjust your monitor size and placement accordingly.
Think about your listening position. The monitors should form an equilateral triangle with your ears. This ensures the best stereo image.
Credit: macprovideo.com
Finding The Ideal Placement
Finding the ideal placement for your studio monitors is crucial. Proper placement enhances sound quality and ensures accurate audio reproduction. Follow these tips to achieve the best setup for your space.
Creating An Equilateral Triangle
Begin by positioning your studio monitors and your listening spot in an equilateral triangle. This means all three points—the two monitors and your head—are equal distances from each other. This setup helps in creating a balanced soundstage. You will hear sounds as they were intended to be heard.
Make sure the distance between the two monitors is the same as the distance from each monitor to your listening position. Use a measuring tape for accuracy. This simple step can significantly improve your listening experience.
Height And Angle Considerations
Next, consider the height of your studio monitors. The ideal height places the tweeters at ear level when you are seated. This ensures high frequencies reach your ears directly. If your monitors are too low or too high, you may miss important sound details.
Angle your monitors inward so they face your listening spot directly. This ensures the sound is directed towards you, not towards the walls. Avoid placing monitors directly against walls. This can cause reflections and distort the sound. A slight angle helps in achieving clearer audio.
Setting Up The Listening Position
Setting up your studio monitors correctly is crucial for accurate audio production. One of the most important steps in this process is determining the ideal listening position. Proper placement ensures you hear the true sound of your recordings. Let’s dive into the details of setting up the listening position.
Primary Listening Position
The primary listening position is where you’ll spend most of your time in the studio. To find this spot, sit at your workstation and place the monitors so they form an equilateral triangle with your head. This means the distance between each monitor and your head should be the same. Use a measuring tape for accuracy.
| Step | Description |
|---|---|
| 1 | Measure the distance between the two monitors. |
| 2 | Place your head at the same distance from each monitor. |
| 3 | Adjust the monitors to face your ears directly. |
Ensure the height of the monitors aligns with your ear level. This helps in achieving the best sound quality.
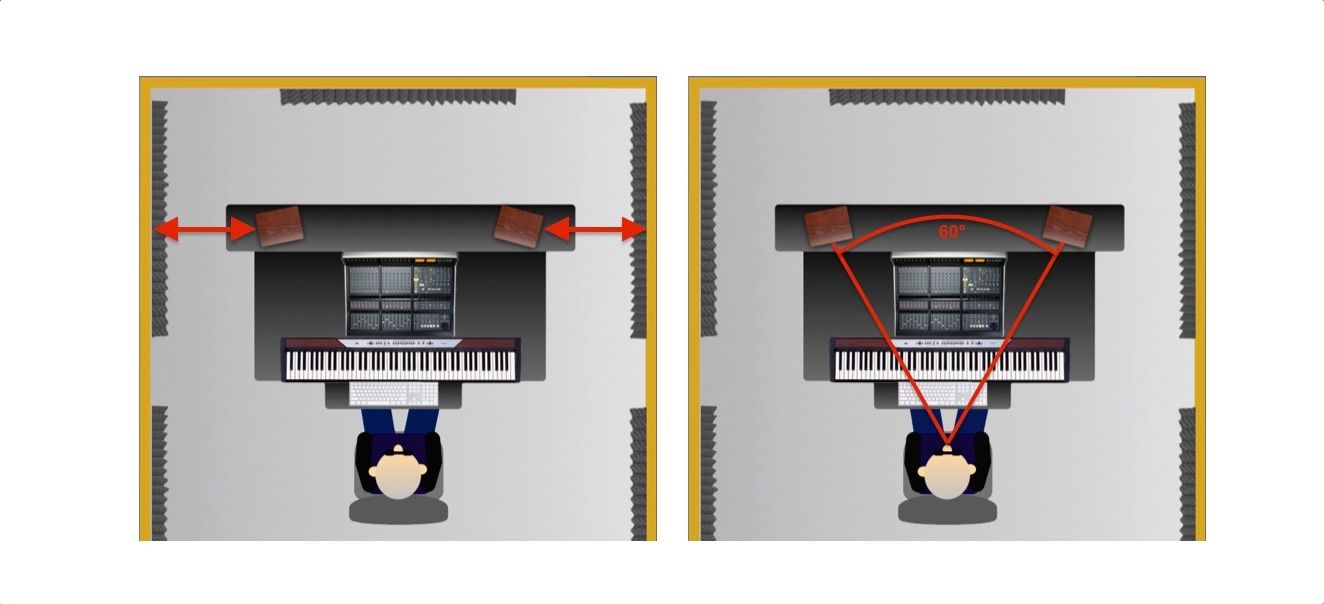
Adjusting For Sweet Spot
The sweet spot is the optimal listening area where the sound is most balanced. To adjust for the sweet spot, make sure your monitors are angled towards your ears. This angle is known as the toe-in angle. A 30-degree angle is usually ideal.
- Position yourself at the primary listening position.
- Adjust the monitors to form a 30-degree angle with your head.
- Listen and make fine adjustments if necessary.
Another tip is to place acoustic panels around the listening area. This minimizes sound reflections and enhances clarity.
Check the sound by playing a test track. If you notice any imbalances, tweak the monitor positions slightly. Small changes can make a big difference.
In summary, setting up the listening position involves finding the primary listening spot and adjusting for the sweet spot. These steps ensure you get the most accurate sound from your studio monitors.

Credit: www.youtube.com
Connecting The Studio Monitors
Connecting your studio monitors correctly ensures accurate sound reproduction. This step is crucial for a professional audio setup. In this section, we’ll go over the essentials of connecting your studio monitors.
Cable Selection
Choosing the right cables is important. Use balanced cables for better sound quality. Balanced cables include XLR and TRS cables. These cables reduce noise and interference. They offer a clear and clean sound.
Avoid unbalanced cables if possible. These cables are more prone to noise. Unbalanced cables include RCA and TS cables. They might affect the sound quality of your monitors.
Audio Interface Setup
Connect your studio monitors to an audio interface. The audio interface acts as a bridge. It connects your computer to the monitors. Ensure the audio interface has balanced outputs.
Plug the balanced cables into the outputs of your audio interface. Then connect the other end to the studio monitors. Check the input and output levels. They should match for optimal sound performance.
Test the setup by playing some audio. Adjust the volume levels as needed. Make sure there is no distortion. Your studio monitors should now be ready for use.
Optimizing Acoustic Treatment
Optimizing acoustic treatment in your studio can greatly improve sound quality. Proper treatment reduces echo and unwanted noise. This ensures your recordings sound clear and professional. Below, we will discuss the use of bass traps and placement of acoustic panels.
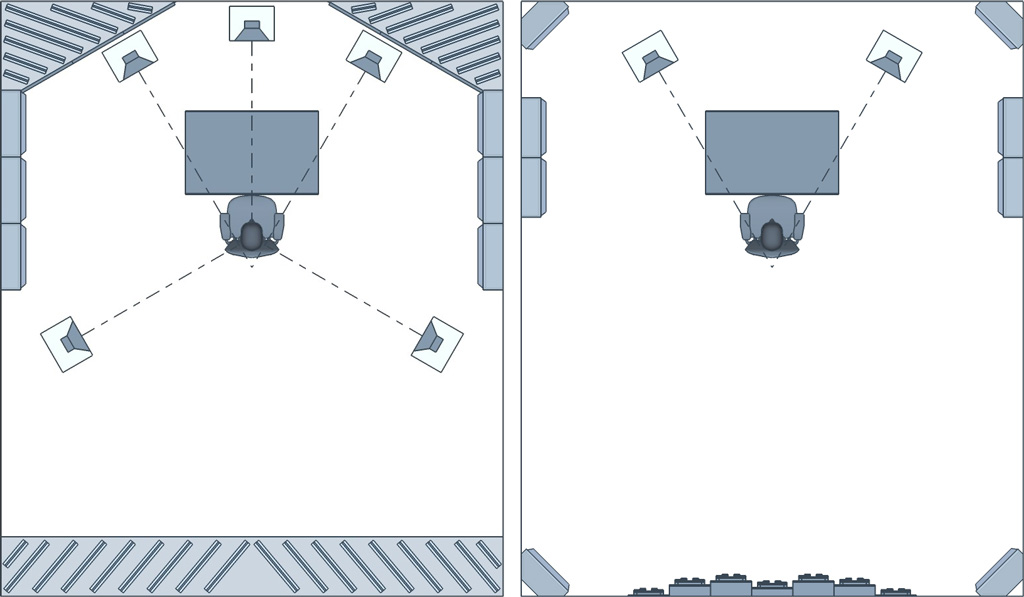
Using Bass Traps
Bass traps are essential for controlling low frequencies. They help reduce bass buildup in the corners of your room. Place bass traps in the corners where walls meet. This placement maximizes their effectiveness. You can also place them where the walls meet the ceiling. This further reduces low-frequency issues.
Placement Of Acoustic Panels
Acoustic panels absorb mid and high frequencies. Place them on the walls around your listening position. This helps to reduce reflections and echoes. A good rule is to place panels at ear level. You can also place panels on the ceiling. This reduces reflections from above. Don’t forget to leave some space between the panel and the wall. This improves the panel’s absorption capabilities.
Credit: arqen.com
Calibrating Your Studio Monitors
Calibrating your studio monitors is essential for accurate sound reproduction. Proper calibration ensures that your mix translates well on other systems. It involves several steps, including using measurement microphones and adjusting volume levels. Let’s dive into these steps to achieve the best sound quality.
Using Measurement Microphones
To start, use a measurement microphone to analyze your room’s acoustics. Place the microphone at your listening position. This spot is where your head will be when you mix. Connect the microphone to your audio interface.
Use a software program to generate test tones. These tones will help you measure frequency response. Record the data and look for any peaks or dips. These are problem areas in your room’s acoustics. You might need to adjust your monitor placement or add acoustic treatment to your room.
Adjusting Volume Levels
After analyzing your room, focus on adjusting volume levels. Start by setting the volume of your audio interface to a reference level. This level is usually around 0 dB.
Play a test tone at this level through your studio monitors. Use a sound level meter to measure the output. Adjust the volume on your monitors until the sound level meter reads around 85 dB SPL. This level is a good starting point for most studio environments.
If your monitors have built-in volume controls, make sure both monitors are set to the same level. This ensures a balanced stereo image. Consistent volume levels are crucial for accurate mixing.
Testing The Setup
After setting up your studio monitors, it’s crucial to test the setup. Proper testing ensures that your monitors provide accurate sound reproduction. Follow the steps below to fine-tune your setup.
Playing Reference Tracks
Play a few reference tracks. Choose high-quality recordings that you know well. These tracks should cover various music genres. Listen to how they sound in your room. Focus on the clarity and balance of the audio.
Making Fine Adjustments
Based on your observations, make necessary adjustments. Start with the placement of your monitors. Ensure they are at ear level. Check the distance between them and your listening position. Adjust angles to achieve the best stereo image.
Next, tweak the settings on your monitors. Adjust the volume and EQ settings. Aim for a natural and balanced sound. If needed, use acoustic treatment to improve room acoustics. Add bass traps and diffusers as required.
Maintenance And Troubleshooting
After setting up your studio monitors, regular maintenance is vital. This keeps them performing at their best. Also, knowing how to troubleshoot common issues can save you time and frustration. Let’s dive into the specifics.
Regular Cleaning
Dust and dirt can affect the sound quality of your studio monitors. Cleaning them regularly helps maintain their performance.
- Unplug your monitors before cleaning.
- Use a soft, dry cloth to wipe the exterior.
- For stubborn dirt, dampen the cloth slightly with water. Avoid using chemical cleaners.
- Clean the speaker grilles carefully to avoid damaging the drivers.
Tip: Keep the area around your monitors clean to reduce dust buildup.
Common Issues And Fixes
Even with the best care, issues can arise. Here are some common problems and their solutions.
| Issue | Fix |
|---|---|
| Distorted sound | Check cable connections. Ensure they are secure and not damaged. |
| No sound | Verify the power supply. Ensure the monitors are turned on and connected to a power source. |
| Humming noise | Check for ground loop issues. Use balanced cables to minimize interference. |
Pro Tip: Regularly check and replace any worn-out cables to prevent sound issues.
Frequently Asked Questions
What Height Should Studio Monitors Be?
Studio monitors should be at ear level when seated. This ensures accurate sound delivery. Adjust stands or shelves to achieve this height.
How Far Apart Should Studio Monitors Be?
Place studio monitors an equal distance from each other and your listening position. This creates a perfect listening triangle.
Do I Need Acoustic Treatment For Studio Monitors?
Yes, acoustic treatment improves sound quality. It minimizes reflections and enhances clarity. Consider bass traps, diffusers, and absorbers.
Can I Use Studio Monitors For Regular Listening?
Yes, studio monitors provide accurate sound. They are suitable for casual listening and mixing. They offer a true representation of audio.
Conclusion
Setting up studio monitors is crucial for great sound. Follow the steps carefully. Place monitors at ear level. Ensure they form an equilateral triangle with your head. Use acoustic treatment to reduce room reflections. Check connections and adjust settings for optimal performance.

Test your setup with different tracks. Make adjustments as needed for best results. Proper setup makes a big difference in sound quality. Now, you’re ready to enjoy your music and mixes. Happy listening!
{ “@context”: “https://schema.org”, “@type”: “FAQPage”, “mainEntity”: [ { “@type”: “Question”, “name”: “What height should studio monitors be?”, “acceptedAnswer”: { “@type”: “Answer”, “text”: “Studio monitors should be at ear level when seated. This ensures accurate sound delivery. Adjust stands or shelves to achieve this height.” } } , { “@type”: “Question”, “name”: “How far apart should studio monitors be?”, “acceptedAnswer”: { “@type”: “Answer”, “text”: “Place studio monitors an equal distance from each other and your listening position. This creates a perfect listening triangle.” } } , { “@type”: “Question”, “name”: “Do I need acoustic treatment for studio monitors?”, “acceptedAnswer”: { “@type”: “Answer”, “text”: “Yes, acoustic treatment improves sound quality. It minimizes reflections and enhances clarity. Consider bass traps, diffusers, and absorbers.” } } , { “@type”: “Question”, “name”: “Can I use studio monitors for regular listening?”, “acceptedAnswer”: { “@type”: “Answer”, “text”: “Yes, studio monitors provide accurate sound. They are suitable for casual listening and mixing. They offer a true representation of audio.” } } ] }As an Amazon Associate, Cleanestor earns from qualifying purchases at no additional cost to you.