Yes, you can use a mixer as an audio interface. This can enhance your recording or live sound experience.
Mixers can offer more control and flexibility. Using a mixer as an audio interface can seem tricky at first. Mixers help combine multiple audio sources into one output. This is useful for musicians, podcasters, and live sound engineers. With a mixer, you can adjust levels, add effects, and mix sounds in real-time.
It is important to understand the basics of how mixers work and how to connect them to your computer. This guide will walk you through the steps to use your mixer as an audio interface. Let’s dive in and explore the benefits and steps involved.
Introduction To Audio Mixers
Audio mixers are essential tools in the world of sound engineering. They allow you to control, adjust, and balance various audio inputs. Whether you are recording a podcast or performing live, an audio mixer can make a significant difference. This guide will introduce you to the basics of audio mixers, their benefits, and why you might need one.
What Is An Audio Mixer?
An audio mixer is a device that blends multiple audio signals. It has various inputs for microphones, instruments, and other audio sources. The mixer adjusts the volume, tone, and dynamics of each input. This allows you to create a balanced and polished sound output. Audio mixers are used in recording studios, live concerts, and broadcasting.
Benefits Of Using A Mixer
Using a mixer offers several advantages. First, it provides control over multiple audio sources. You can adjust each input’s volume and tone to create a harmonious blend. Second, it improves sound quality. By fine-tuning each input, you can reduce noise and enhance clarity. Third, it offers flexibility in managing audio inputs. You can easily switch between different sources or combine them as needed.
An audio mixer also allows for real-time adjustments. During a live performance, you can tweak settings on the fly. This ensures the best possible sound quality throughout the event. Finally, using a mixer can simplify your setup. Instead of connecting multiple devices directly, you route them through the mixer. This makes it easier to manage and control your audio inputs.
Credit: virtuosocentral.com
Understanding Audio Interfaces
Before using a mixer as an audio interface, it’s essential to understand what an audio interface is. Audio interfaces play a crucial role in music production and recording. They convert analog signals into digital signals that your computer can process. This section will help you grasp the basics of audio interfaces.
What Is An Audio Interface?
An audio interface is a device that allows you to connect microphones, instruments, and other audio gear to your computer. It converts analog audio signals into digital data that your software can use. Without an audio interface, the sound quality of your recordings would be poor.
Key Features Of Audio Interfaces
Audio interfaces have several important features. The first is the number of inputs and outputs. These allow you to connect multiple devices at once. Another key feature is the type of connections available, such as XLR, TRS, and USB.
Audio quality is also crucial. High-quality preamps ensure clear and clean recordings. Latency is another important factor. Low latency means there is little delay between the input and output of the audio signal. This is vital for real-time recording and monitoring.
Lastly, audio interfaces often come with software. This software helps you manage your recordings and apply effects. By understanding these features, you can make an informed choice when selecting an audio interface.
Connecting A Mixer To Your Computer
Connecting a mixer to your computer can elevate your audio setup. It allows for professional-quality recordings and streams. To get started, you will need some essential equipment.
Required Cables And Adapters
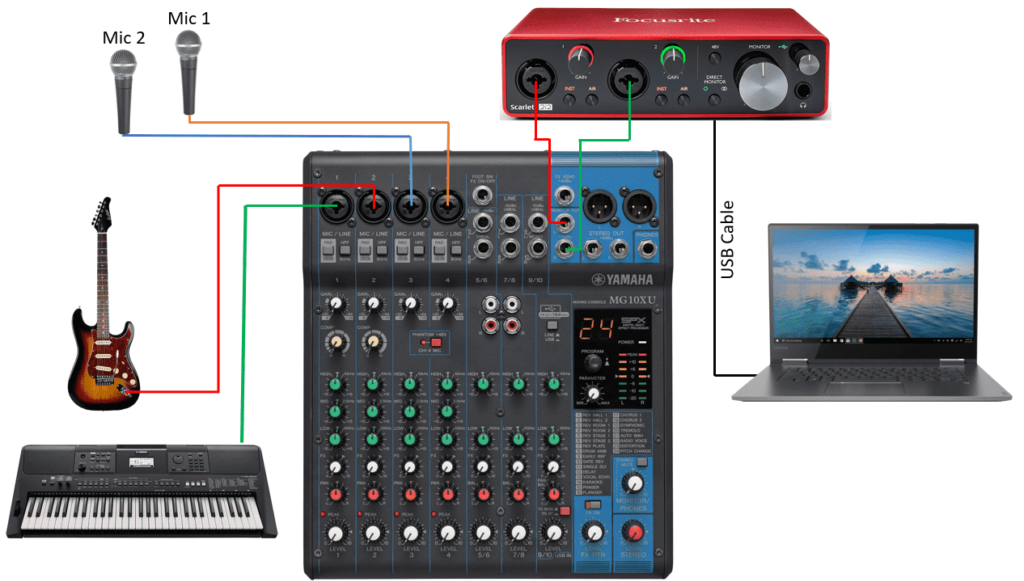
To connect your mixer to your computer, you need a few cables and adapters. These usually include a USB cable, RCA cables, and XLR cables. The type of cable depends on your mixer’s output options. Check your mixer’s manual for specific requirements. Some mixers may also need an audio interface for optimal performance.
Setting Up Connections
Begin by powering off your mixer and computer. This prevents electrical damage. Next, connect the USB cable to the mixer’s USB output. Then, plug the other end into your computer’s USB port.
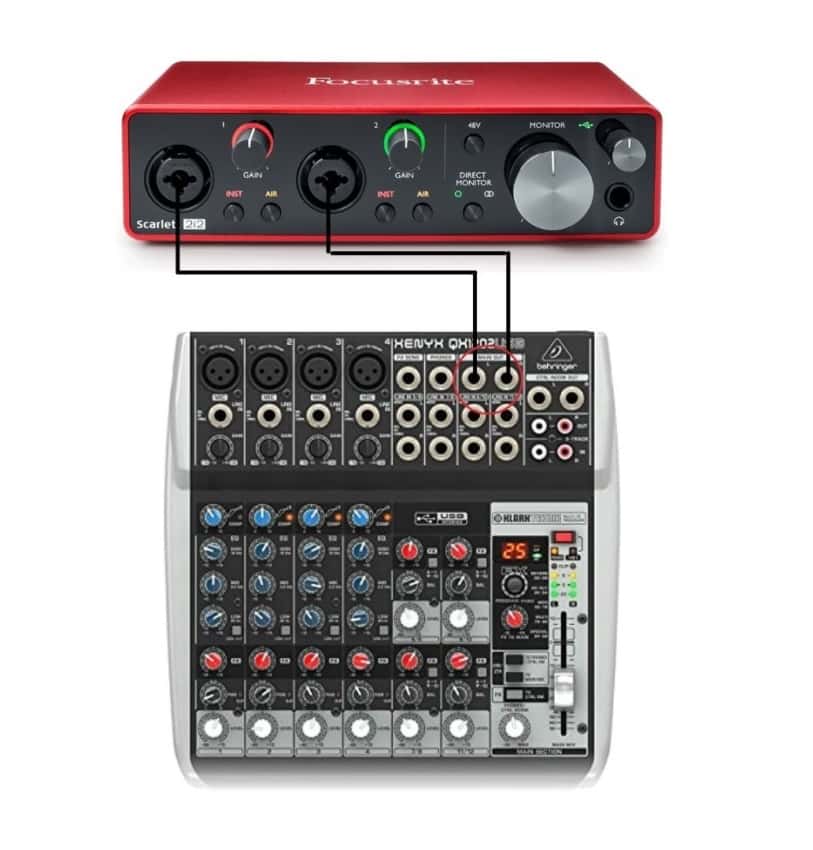
For mixers without a USB output, use RCA or XLR cables. Connect them from the mixer’s output to your computer’s audio input. You might need an adapter if your computer lacks specific ports.
Once connected, power on your mixer and computer. Your computer should recognize the mixer as an audio device. If not, you may need to install the mixer’s drivers. Follow the manufacturer’s instructions for driver installation.
Credit: thehomerecordings.com
Configuring Your Mixer
Configuring your mixer is essential to ensure optimal performance as an audio interface. Proper configuration allows for clear and balanced sound. Follow these steps for a seamless setup experience.
Initial Settings
First, ensure your mixer is powered on. Connect it to your computer using a USB cable. Check that all cables are secure. Set the mixer to USB mode if available. Open your computer’s audio settings. Select the mixer as the audio input and output device.
Adjusting Levels And Gain
Start with the gain knobs turned all the way down. Slowly increase the gain while speaking into a connected microphone. Aim for a level that is clear but not distorted. Adjust the faders for each input channel. Ensure they are balanced and not peaking. Use the main output fader to control the overall volume. Keep an eye on the mixer’s level meters. They should not hit the red zone.
Setting Up Your Digital Audio Workstation (daw)
Setting up your Digital Audio Workstation (DAW) can seem complex. But with clear steps, it becomes easier. A well-configured DAW enhances your audio mixing experience. It ensures you get the best sound quality from your mixer used as an audio interface.
Choosing The Right Daw
First, you need the right DAW. Popular choices include:
- Pro Tools
- Logic Pro
- Ableton Live
- FL Studio
Consider the features each offers. Choose one that fits your needs. For beginners, simpler interfaces are best. More advanced users might need more features.
Configuring Audio Inputs And Outputs
Once you have chosen your DAW, the next step is configuring it:
- Open your DAW software.
- Navigate to the settings or preferences menu.
- Select the audio settings or audio devices tab.
- Choose your mixer from the list of available devices.
- Set the input and output channels to match your mixer.
Most DAWs allow you to name your inputs and outputs. This can help keep track of your different channels. Make sure to save your settings.
Proper configuration ensures you capture every sound detail. Your recordings will be clear and professional.

Credit: www.youtube.com
Testing Your Setup
Testing your setup is a crucial step in using a mixer as an audio interface. It ensures that everything works as expected and helps you identify any issues early on. This section will guide you through the process of checking the signal flow and troubleshooting common issues.
Checking For Signal Flow
First, confirm that all cables are securely connected. Check the input and output connections. Ensure your mixer is connected to your computer via USB or FireWire. Next, turn on your mixer and your computer. Open your audio software. Create a new session or project. Add a new audio track. Set the input source to your mixer’s channel. Test the setup by playing an instrument or speaking into a microphone. Observe the signal levels on both the mixer and the software. If you see movement, the signal flow is correct.
Troubleshooting Common Issues
If there is no signal, start by checking the power supply. Ensure your mixer is properly powered on. Verify all cables are connected correctly. Make sure your audio software recognizes the mixer. Check the audio settings in your software. Ensure the correct input and output devices are selected. If you still face issues, restart your computer and mixer. Sometimes, a simple reboot can fix connection problems. If the problem persists, consult the mixer’s manual or contact customer support.
Recording And Monitoring
Recording and monitoring are crucial parts of using a mixer as an audio interface. With the right techniques, you can achieve high-quality audio recordings. Monitoring ensures you hear the sound as it is recorded. This helps you make necessary adjustments in real-time. Let’s dive into the details below.
Recording Audio Tracks
First, connect your instruments or microphones to the mixer. Use the appropriate input channels. Set the levels to avoid distortion. Adjust the gain so the signal is strong but clear. Route the output of the mixer to your computer. This can be done using a USB or FireWire connection. Open your recording software. Select the mixer as the input device. Create a new audio track. Start recording. Watch the levels in the software to ensure they do not peak. Save the recorded tracks in a high-quality format.
Monitoring Sound Quality
Monitoring is key to achieving great recordings. Connect headphones or monitors to the mixer. Listen to the input signals as you record. Make sure the sound is clear and balanced. Adjust the EQ settings if necessary. This helps in getting the best sound from your instruments or vocals. Pay attention to the mix of all channels. Ensure nothing is too loud or too soft. Regularly check the sound quality during the session. This prevents issues from creeping into your recordings.
Tips For Optimal Performance
Using a mixer as an audio interface can elevate your sound recording. Ensuring optimal performance is key to achieving high-quality results. Below are some essential tips to help you maximize your mixer’s capabilities.
Reducing Latency
Latency is the delay between audio input and output. Reducing latency ensures smoother recordings.
- Update Drivers: Always use the latest drivers for your mixer. This ensures compatibility and performance.
- Buffer Size: Lower the buffer size in your DAW settings. Smaller buffers reduce latency but can increase CPU load.
- Direct Monitoring: Enable direct monitoring on your mixer. This allows you to hear inputs without delay.
Improving Sound Quality
Sound quality can make or break your recording. Here are some tips for pristine audio.
- Proper Gain Staging: Set input levels correctly to avoid clipping. Use the mixer’s gain knobs to adjust.
- High-Quality Cables: Invest in good cables to reduce noise and interference.
- Sample Rate and Bit Depth: Use higher sample rates (e.g., 48kHz) and bit depths (e.g., 24-bit) for better sound.
Follow these tips to ensure your mixer performs at its best. Happy recording!
Frequently Asked Questions
How Do I Connect A Mixer To My Computer?
To connect a mixer to your computer, use an audio interface. Connect the mixer’s output to the interface’s input. Then, connect the interface to your computer via USB.
Can A Mixer Be Used As An Audio Interface?
Yes, a mixer can be used as an audio interface. Many mixers have built-in USB interfaces. This allows you to connect directly to your computer.
What Cables Do I Need To Use A Mixer As An Interface?
You need USB or audio interface cables. Connect the mixer’s output to the interface’s input. Then, connect the interface to your computer.
Is Using A Mixer As An Audio Interface Complicated?
No, it is not complicated. Most mixers with built-in USB interfaces are plug-and-play. Simply connect and configure your computer settings.
Conclusion
Using a mixer as an audio interface can enhance your recordings. It’s a versatile tool. This guide has shown you the steps. Now, you can connect your gear easily. Remember to check your levels. Adjust settings for the best sound.

Practice makes perfect. Soon, you’ll find it simple. Happy recording!
{ “@context”: “https://schema.org”, “@type”: “FAQPage”, “mainEntity”: [ { “@type”: “Question”, “name”: “How do I connect a mixer to my computer?”, “acceptedAnswer”: { “@type”: “Answer”, “text”: “To connect a mixer to your computer, use an audio interface. Connect the mixer’s output to the interface’s input. Then, connect the interface to your computer via USB.” } } , { “@type”: “Question”, “name”: “Can a mixer be used as an audio interface?”, “acceptedAnswer”: { “@type”: “Answer”, “text”: “Yes, a mixer can be used as an audio interface. Many mixers have built-in USB interfaces. This allows you to connect directly to your computer.” } } , { “@type”: “Question”, “name”: “What cables do I need to use a mixer as an interface?”, “acceptedAnswer”: { “@type”: “Answer”, “text”: “You need USB or audio interface cables. Connect the mixer’s output to the interface’s input. Then, connect the interface to your computer.” } } , { “@type”: “Question”, “name”: “Is using a mixer as an audio interface complicated?”, “acceptedAnswer”: { “@type”: “Answer”, “text”: “No, it is not complicated. Most mixers with built-in USB interfaces are plug-and-play. Simply connect and configure your computer settings.” } } ] }As an Amazon Associate, Cleanestor earns from qualifying purchases at no additional cost to you.