Placing .dll files correctly in FL Studio is crucial for smooth operation. It ensures plugins and software function as expected.
FL Studio is a powerful music production software used by many. It relies on various components to work seamlessly. One such component is the. dll file. These files contain code that helps plugins and extensions run correctly. Misplacing them can lead to issues or crashes.
Knowing where to put. dll files in FL Studio can save you time and frustration. In this guide, we’ll explore the best practices for managing. dll files. This will ensure your FL Studio setup runs smoothly and efficiently. Let’s dive into the details.

Credit: www.reddit.com
Introduction To .dll Files
Understanding .dll files is key for FL Studio users. These files play an important role in the software’s functionality. Knowing where to put them can enhance your music production experience.
What Are .dll Files?
.Dll stands for Dynamic Link Library. These files contain code, data, and resources used by programs to perform specific functions. They allow programs to share code and resources, making them more efficient.
In simple terms, a .dll file is like a helper. It provides functions and resources to your software. Without them, many programs, including FL Studio, wouldn’t work properly.
Importance In Fl Studio
In FL Studio, .dll files are crucial. They are often used for VST plugins. VST plugins extend the capabilities of FL Studio, allowing you to add new sounds and effects.
Imagine you want a new synthesizer in FL Studio. You download a VST plugin. This plugin comes with a .dll file. To use the new synthesizer, you need to place the .dll file in the correct folder.
Incorrect placement of .dll files can cause issues. FL Studio might not recognize the plugin, or it might not work as expected. Hence, knowing where to put .dll files is essential for a smooth workflow.
Locating Fl Studio Installation Folder
Finding the right location for .dll files in FL Studio is important. This section will help you locate the FL Studio installation folder. Knowing where your software is installed will make managing plugins and .dll files easier.
Default Installation Paths
FL Studio usually installs to a default path on your computer. This path depends on your operating system.
| Operating System | Default Path |
|---|---|
| Windows | C:\Program Files\Image-Line\FL Studio |
| Mac | /Applications/FL Studio |
These paths are the default locations. You can check these folders first.
Custom Installation Paths
Sometimes, users choose custom paths during installation. If you installed FL Studio in a different location, find the path as follows:
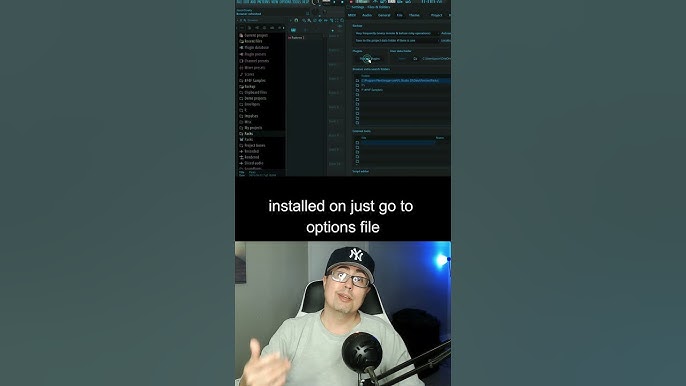
- Open FL Studio.
- Go to Options > File Settings.
- Look for the Browser extra search folders section.
- Check the paths listed there. These are custom paths.
Write down these paths. These will help you locate the .dll files.
By knowing these paths, you can manage your plugins and .dll files better.
Appropriate Directories For .dll Files
Knowing where to put .dll files in FL Studio is essential. Correct placement ensures smooth functioning of your plugins. Misplacing these files can lead to errors or crashes. To help you avoid such issues, here are the appropriate directories.
Vst Plugins Folder
The VST Plugins folder is the primary location for .dll files. This folder is usually found within the FL Studio installation directory. If you have customized your setup, the location might differ. A common path is C:\Program Files\Image-Line\FL Studio\Plugins\VST.
Copying your .dll files here enables FL Studio to recognize and load your plugins. Keep this folder organized to avoid confusion. Create subfolders for different plugin types or manufacturers. This practice helps in managing your plugins efficiently.
Other Relevant Directories
Some users prefer to store .dll files in different directories. You might have a separate folder for third-party plugins. This can be helpful if you use multiple DAWs. A typical path for such a folder could be C:\VSTPlugins.
You need to tell FL Studio where to find these files. Go to Options > File Settings > VST Plugins Extra Search Folder. Add your custom directory here. FL Studio will then scan this location for plugins.
Remember to rescan the plugins list after adding new .dll files. This ensures FL Studio recognizes the latest additions. Keeping your plugins in the right directories avoids conflicts and enhances your workflow.
Credit: www.youtube.com
Steps To Add .dll Files
Adding .dll files to FL Studio can enhance your music production capabilities. These files are crucial for integrating third-party plugins. Follow these steps to seamlessly add .dll files to FL Studio and unlock new creative possibilities.
Manual Addition
Manually adding .dll files is straightforward. First, locate the .dll file you want to add. Ensure it is compatible with FL Studio.
- Open your FL Studio installation directory. Typically, it is located in C:\Program Files\Image-Line\FL Studio.
- Navigate to the ‘Plugins’ folder within the FL Studio directory.
- Find the ‘VST’ folder. If it does not exist, create a new folder and name it ‘VST’.
- Copy the .dll file and paste it into the ‘VST’ folder.
- Restart FL Studio to recognize the new plugin.
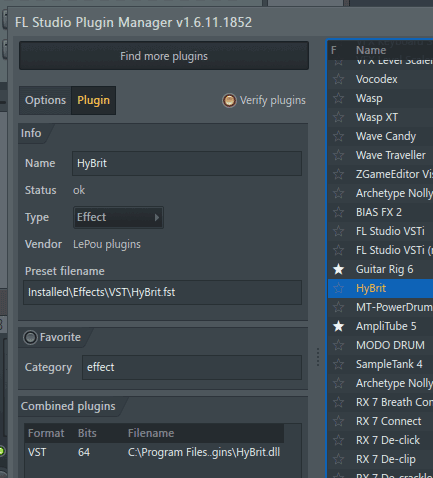
Using Fl Studio Plugin Manager
The FL Studio Plugin Manager simplifies the addition of .dll files. Follow these steps:
- Open FL Studio.
- Navigate to ‘Options’ in the top menu bar.
- Select ‘Manage Plugins’ from the dropdown menu.
- In the Plugin Manager window, click on ‘Add path’.
- Browse to the folder containing your .dll file and click ‘OK’.
- Click ‘Start scan’ to search for new plugins.
- Once the scan completes, your new plugin will appear in the list.
Using the Plugin Manager ensures that FL Studio efficiently locates and integrates new plugins.
Verifying Plugin Installation
Verifying that your plugin is installed correctly in FL Studio is crucial for smooth music production. This step ensures that all .dll files are correctly placed and that the software recognizes them. Follow these simple steps to verify the installation and get your plugins working seamlessly.
Refreshing Plugin List
After placing the .dll files in the appropriate folder, you need to refresh your plugin list in FL Studio. This step ensures that FL Studio recognizes the new plugins you have added.
- Open FL Studio.
- Navigate to the Options menu.
- Select Manage plugins.
- Click on the Find Plugins button.
FL Studio will now scan your system for new plugins. This process might take a few minutes. Once the scan is complete, you should see your new plugins in the plugin list.
Testing The Plugin
After refreshing the plugin list, it’s important to test the plugin to ensure it works correctly. Follow these steps:
- Go to the Channel Rack.
- Click on the + button to add a new plugin.
- Find the plugin you just installed from the list.
- Select the plugin to load it into the Channel Rack.
Play a few notes to test the plugin’s sound and functionality. If the plugin works as expected, you have successfully installed and verified your plugin.
Common Issues And Solutions
Working with .dll files in FL Studio can be tricky. Users often face common issues that need easy solutions. Below, we will cover some of the most frequent problems and their fixes.
Missing Files
One of the most common issues is missing .dll files. This problem occurs when the file is not in the correct directory. Ensure the .dll file is in the FL Studio VST folder. If the file is still missing, try reinstalling the plugin.
Compatibility Issues
Compatibility issues can also arise with .dll files. Make sure the .dll file matches your system’s architecture. For example, use 64-bit .dll files on a 64-bit system. Mismatched files cause errors and crashes.
Best Practices
In FL Studio, managing your .dll files can be confusing. Following best practices ensures your plugins work properly, and your workflow remains smooth. Let’s explore these best practices for organizing and updating your .dll files in FL Studio.
Organizing Plugins
Proper organization of your plugins is crucial. This prevents conflicts and ensures FL Studio runs smoothly.
- Create a dedicated folder for your plugins, such as C:\VSTPlugins.
- Within this folder, create subfolders for different types of plugins (e.g., Effects, Instruments).
- Place the .dll files in the appropriate subfolders.
- In FL Studio, go to Options > File Settings and add the path to your VST folder.
Organizing your plugins this way makes it easier to find and manage them. It also helps avoid conflicts between plugins.
Regular Updates
Keeping your plugins updated is essential. This ensures compatibility with the latest version of FL Studio and avoids potential issues.
- Check the developer’s website for updates regularly.
- Download the latest version of the plugin .dll file.
- Replace the old .dll file in your plugins folder with the new one.
- Rescan your plugins in FL Studio by going to Options > Manage Plugins and clicking Find Plugins.
Regular updates ensure your plugins are compatible and perform well. It also helps to fix bugs and security issues.
Credit: guitargearfinder.com
Frequently Asked Questions
Where Do I Place .dll Files In Fl Studio?
Place. dll files in the ‘Plugins’ folder within the FL Studio directory. Typically, this can be found at `C:\Program Files\Image-Line\FL Studio\Plugins\VST`.
How To Install Vst Plugins In Fl Studio?
To install VST plugins, copy the. dll file to the ‘VST’ folder in FL Studio. Then, refresh the plugin list in FL Studio.
Can I Use Any .dll File In Fl Studio?
You can only use. dll files that are VST plugins compatible with FL Studio. Ensure they are designed for music production.
Why Are My Plugins Not Showing In Fl Studio?
If plugins are not showing, ensure. dll files are in the correct folder. Refresh the plugin list in FL Studio settings.
Conclusion
Placing. dll files in FL Studio is simple. First, locate your plugin folder. Next, copy the. dll file into this folder. Restart FL Studio to refresh the plugin list. This process ensures smooth integration of new plugins. Remember, correct file placement avoids errors.

Always keep your plugin folder organized for easy access. Following these steps helps maintain an efficient workflow. Happy music making!
{ “@context”: “https://schema.org”, “@type”: “FAQPage”, “mainEntity”: [ { “@type”: “Question”, “name”: “Where do I place .dll files in FL Studio?”, “acceptedAnswer”: { “@type”: “Answer”, “text”: “Place .dll files in the ‘Plugins’ folder within the FL Studio directory. Typically, this can be found at `C:\Program Files\Image-Line\FL Studio\Plugins\VST`.” } } , { “@type”: “Question”, “name”: “How to install VST plugins in FL Studio?”, “acceptedAnswer”: { “@type”: “Answer”, “text”: “To install VST plugins, copy the .dll file to the ‘VST’ folder in FL Studio. Then, refresh the plugin list in FL Studio.” } } , { “@type”: “Question”, “name”: “Can I use any .dll file in FL Studio?”, “acceptedAnswer”: { “@type”: “Answer”, “text”: “You can only use .dll files that are VST plugins compatible with FL Studio. Ensure they are designed for music production.” } } , { “@type”: “Question”, “name”: “Why are my plugins not showing in FL Studio?”, “acceptedAnswer”: { “@type”: “Answer”, “text”: “If plugins are not showing, ensure .dll files are in the correct folder. Refresh the plugin list in FL Studio settings.” } } ] }As an Amazon Associate, Cleanestor earns from qualifying purchases at no additional cost to you.