Playing a note on the violin might seem tricky at first. But with practice, it becomes easier.
The violin is a beautiful instrument known for its expressive sound. Learning to play even one note on it can be very rewarding. This guide will help you understand the basics of playing a note on the violin. Whether you are a beginner or just need a refresher, this information is here to help.
We will break down the steps so that you can follow them easily. By the end, you will have a clear understanding of how to produce a note on the violin. Grab your violin, and let’s get started on this musical journey!

Credit: musescore.com
Choosing The Right Violin
Playing the violin starts with choosing the right instrument. A well-chosen violin can make learning easier and more enjoyable. Let’s dive into the key factors to consider.
Selecting The Size
Violin sizes vary to fit different players. Measure the length from your neck to the middle of your left palm. This measurement helps determine the correct size. Common sizes are full-size, 3/4, 1/2, and 1/4. A full-size violin is for adults and teenagers. Smaller sizes suit children.
A properly sized violin ensures comfort and ease of playing. You can visit a music store to try different sizes. The staff can help you find the best fit. Always choose comfort over appearance.
Understanding Violin Parts
The violin has several key parts. The body is the large wooden section that produces sound. The neck is the long wooden part that connects the body to the scroll. The strings run from the scroll to the tailpiece.
The fingerboard is on top of the neck. Players press strings against it to produce notes. The bow is used to play the strings. It has horsehair stretched between its ends.
Knowing these parts helps in playing and maintaining your violin. Each part plays a role in creating beautiful music.
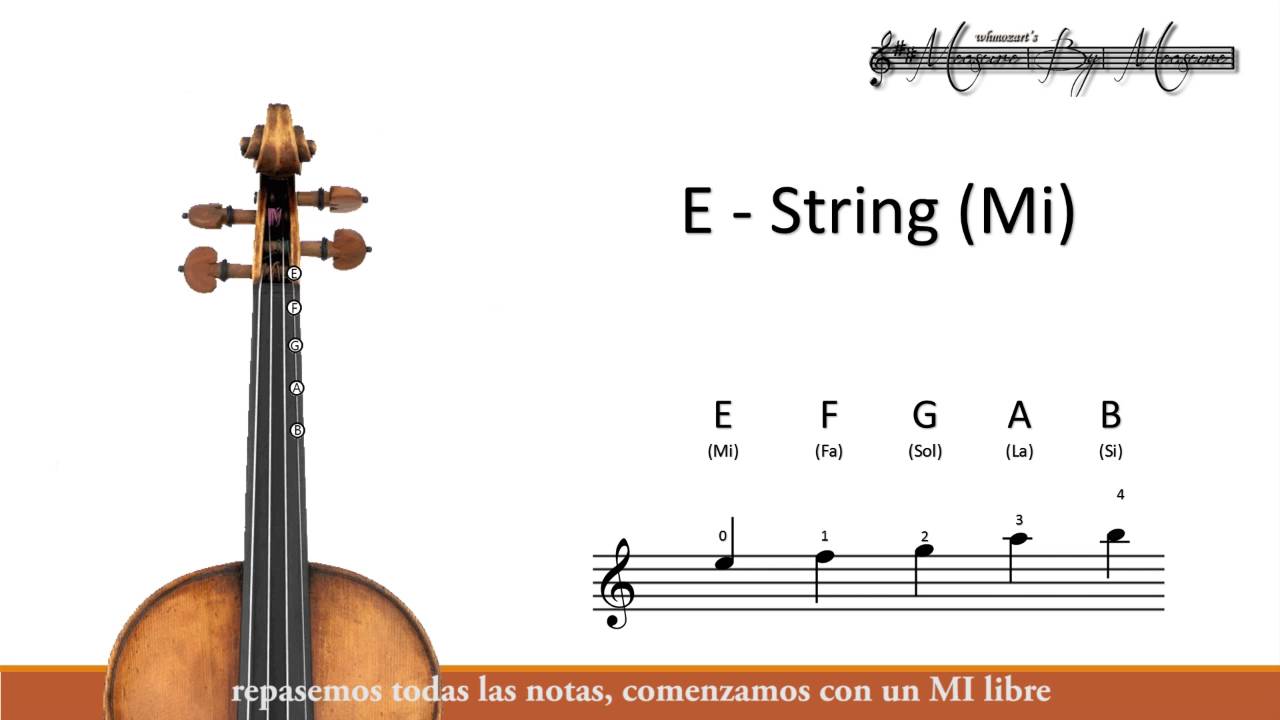
Credit: www.youtube.com
Preparing The Violin
Before you can play a note on your violin, proper preparation is crucial. This ensures that your instrument produces the best sound and remains in good condition. Here are the key steps to prepare your violin for playing.
Tuning The Strings
Tuning your violin strings is the first important step. Follow these steps:
- Use a tuner or a tuning fork.
- Adjust the pegs to match the correct pitch.
- Fine-tune using the fine tuners near the tailpiece.
Make sure each string is in tune. This will help in producing a clear and accurate sound.
Rosining The Bow
Rosining the bow is essential for creating friction between the bow and strings. This friction produces sound. Follow these steps to rosin your bow properly:
- Hold the rosin and bow firmly.
- Rub the rosin on the bow hairs from frog to tip.
- Ensure even distribution without over-rosining.
Properly rosined bow hairs will grip the strings better, producing a rich tone.
Proper Posture
Learning to play the violin starts with mastering proper posture. Good posture sets the foundation for beautiful sound. It also prevents strain and injury. Let’s explore the essentials of holding the violin and positioning the bow.
Holding The Violin
First, stand straight with your feet shoulder-width apart. Hold the violin with your left hand. Place the violin’s base on your collarbone. Make sure it feels balanced. Your left hand should gently cradle the neck of the violin.
Keep your thumb under the neck. Do not grip too tightly. Your fingers should be relaxed. Curve them naturally over the strings. This helps you reach all notes with ease. Your chin should rest on the chin rest. Do not press down too hard.
Positioning The Bow
Hold the bow with your right hand. Your thumb should be bent. Place it under the frog of the bow. Your pinky finger should rest on top, slightly curved. The other fingers should wrap around the bow.
Your wrist should be flexible. Keep it relaxed. The bow should move smoothly across the strings. Start near the frog and move to the tip. Keep the bow parallel to the bridge. This ensures a clear and steady sound.
Practicing these steps will help you play with ease. Remember, good posture is key. It makes playing the violin enjoyable and rewarding.
Finger Placement
Learning to play a note on the violin requires precise finger placement. Correct finger placement ensures clear and accurate sound production. This section will guide you through the basics of finger placement, from understanding the fingerboard to placing your fingers correctly.
Understanding Fingerboard
The fingerboard is the black strip of wood on the violin neck. It is where your fingers press down the strings. Each string corresponds to different notes. The four strings are G, D, A, and E from lowest to highest pitch. Familiarize yourself with the fingerboard layout. Notice the spacing between the notes.
Placing Fingers Correctly
Place your left hand on the neck of the violin. Curve your fingers slightly. Your thumb should rest opposite your second finger. This position is crucial for balance. Place your first finger on the string to play the first note. Press down firmly but not too hard. Ensure the finger is placed close to the desired note. Repeat this process for the other fingers. Use your ear to check the accuracy. Adjust the finger position as needed.
Bow Technique
Mastering the bow technique is key to producing a beautiful sound on the violin. The bow, when used correctly, can make the violin sing. This section will guide you through the essentials of holding and drawing the bow.
Holding The Bow
Holding the bow properly is the first step to good bow technique. Follow these simple steps:
- Hold the bow with your right hand.
- Place your thumb between the frog and the grip.
- Curve your fingers over the bow stick.
- Keep your pinky on top for balance.
Your grip should be firm but relaxed. This will help you control the bow better.
Drawing The Bow
Drawing the bow smoothly across the strings is essential for a clean sound. Here’s how:
- Place the bow on the string near the frog.
- Pull the bow straight towards the tip.
- Keep the bow parallel to the bridge.
- Use even pressure for a consistent sound.
Practice drawing the bow slowly at first. Focus on keeping the bow straight and the sound even.
Playing The First Note
Learning to play the first note on the violin is exciting. It’s the start of your musical journey. Let’s break it down into simple steps.
Choosing The String
First, decide which string to play. The violin has four strings: G, D, A, and E. Beginners often start with the A string. It’s in the middle and easier to reach.
Applying The Right Pressure
Next, hold the bow gently. Don’t grip it too tight. Place the bow on the string you chose. Apply light pressure. Too much pressure can make a scratchy sound. Too little pressure can make a weak sound. Aim for a balanced sound.
Move the bow smoothly across the string. Listen to the sound. Adjust the pressure if needed. Practice this until you get a clear note.
Maintaining Rhythm
Maintaining rhythm on the violin involves steady bow movements and consistent finger placements. Focus on even pressure and smooth transitions to play notes accurately. Practice regularly to develop muscle memory and improve timing.
Maintaining rhythm is crucial for playing the violin. It ensures your music sounds smooth and professional. Beginners often struggle with keeping a consistent tempo. Here are some tips to help you maintain rhythm while playing the violin.
Using A Metronome
A metronome is a useful tool. It helps you keep a steady beat. Set the metronome to a comfortable speed. Start playing your notes in sync with the clicks. Focus on matching each note to the metronome’s beat. Gradually increase the speed as you improve. Consistent practice with a metronome builds strong rhythm skills.
Counting Beats
Counting beats is another effective method. Count aloud while you play. This helps internalize the rhythm. Start with simple pieces. Count “1, 2, 3, 4” for each measure. Ensure each note fits within these counts. Practice different rhythms by varying the counts. For instance, try “1 and 2 and 3 and 4.” This technique enhances your timing and coordination.
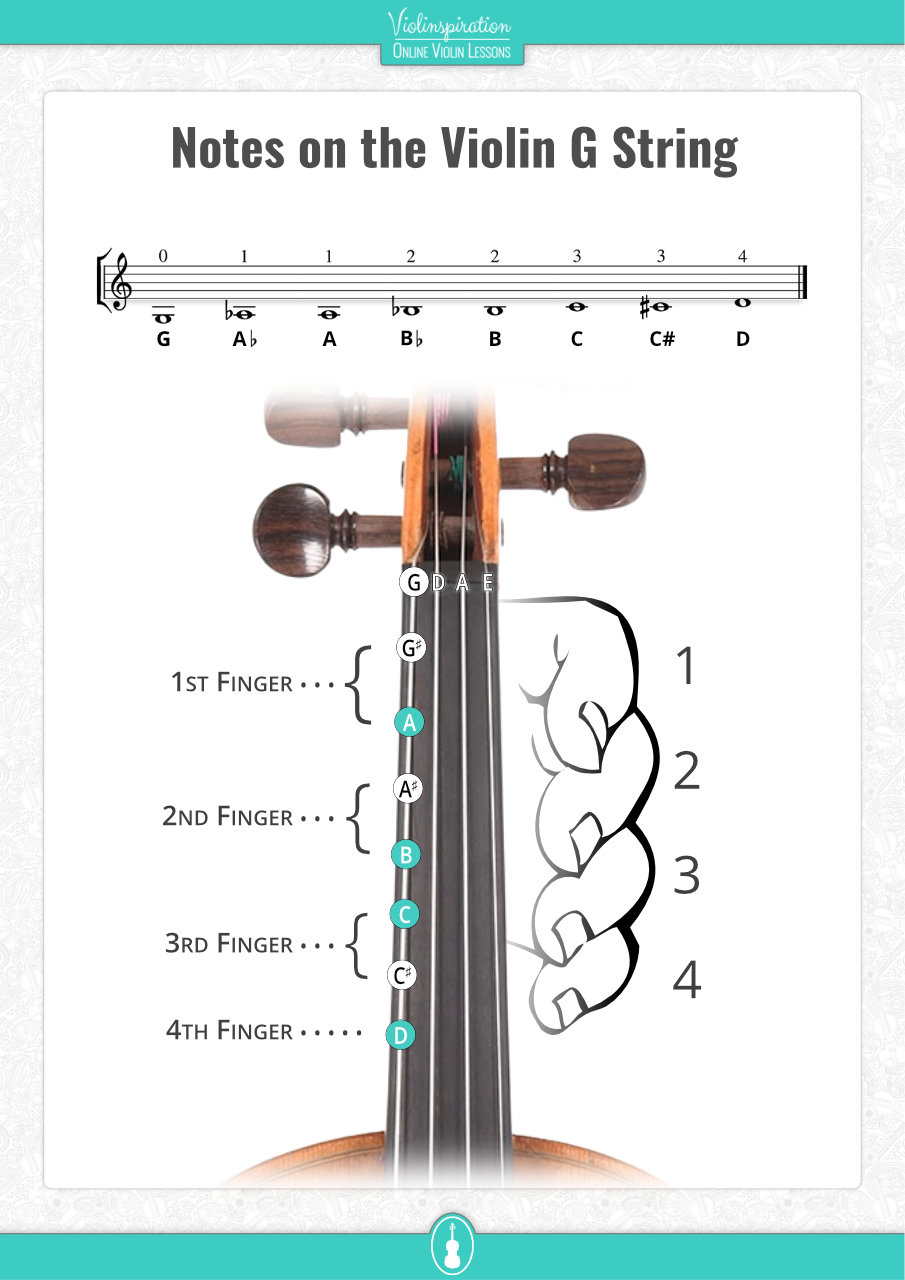
Credit: violinspiration.com
Practice Tips
Playing a note on the violin requires dedication and practice. Consistent practice will help you improve your skills. Here are some practice tips to help you play better.
Daily Practice Routine
Start with a warm-up. This could be simple scales or arpeggios. Warm-up exercises prepare your fingers and bow hand. Aim for at least 30 minutes of practice each day.
Focus on one technique at a time. You might work on bowing for 10 minutes and finger placement for another 10 minutes. Break down complex pieces into smaller sections. Practice each section slowly and carefully.
Overcoming Common Mistakes
Many beginners press the strings too hard. This can make the sound scratchy. Use a light touch on the strings. Check your bow angle. The bow should be parallel to the bridge. If the bow is tilted, it can affect the sound quality.
Watch your finger placement. Each finger should press down firmly but not too hard. If your fingers are too far from the fingerboard, the note may be out of tune. Keep your hand relaxed. Tension can cause mistakes and make playing uncomfortable.
Listen to your playing. Record yourself and listen for mistakes. This helps you identify areas that need improvement. Ask a teacher for feedback. They can provide tips and corrections.
Frequently Asked Questions
How Do You Hold A Violin Bow?
Hold the bow with a relaxed grip. Position your thumb under the frog. Your index, middle, and ring fingers should be placed on top, with the pinky resting on the side.
What Is The Correct Violin Posture?
Stand with your back straight. Place the violin on your left shoulder. Keep your chin on the chin rest. Your left hand supports the violin neck, while your right hand holds the bow.
How Do You Produce A Clear Sound On A Violin?
Apply consistent bow pressure. Maintain a straight bow path. Use smooth, controlled movements. Ensure your bow hair is evenly tensioned.
What Is The First Note To Learn On Violin?
The first note to learn is often the open string notes: G, D, A, and E. These notes do not require finger placement.
Conclusion
Playing a note on the violin takes practice and patience. Start with proper posture. Hold the violin correctly. Use your fingers to press the strings. Apply the bow with steady pressure. Listen carefully to the sound. Adjust as needed to get the right pitch.

Keep practicing daily. Soon, you will play notes smoothly and confidently. Remember, progress happens bit by bit. Enjoy the journey of learning the violin.
As an Amazon Associate, Cleanestor earns from qualifying purchases at no additional cost to you.